Table of Contents
Advertisement
Quick Links
User Manual
Version 1.0
CONTENTS
-----------------------------------
---------------------------------------------------
-----------------------------------------------------
--------------------------------------------
----------------------------------------
----------------------------------------------------
------------------------------------------------------
------------------------------------
------------------------------------
---------------------------------------------------------
-------------------------------------------------------
---------------------------------------------------------
-----------------------
01
02
03
04
05
07
09
21
25
26
26
26
27
Advertisement
Table of Contents

Summary of Contents for Brise SUOVIS Smini
-
Page 1: Table Of Contents
CONTENTS 01. IMPORTANT SAFETY INSTRUCTIONS ----------------------- User Manual 02. DEVICE AND ACCESSORIES ----------------------------------- 03. INSTALLATION --------------------------------------------------- Version 1.0 04. HOW TO USE ----------------------------------------------------- 05. APCO TECHNOLOGY -------------------------------------------- 06. BUTTONS AND LIGHTS ---------------------------------------- 07. ACCESSORIES ---------------------------------------------------- 08. SUVIOS APP ------------------------------------------------------ 09. CLEANING/MAINTENANCE ------------------------------------ 10. -
Page 2: Important Safety Instructions
IMPORTANT SAFETY DEVICE AND ACCESSORIES INSTRUCTIONS For your safety: Please read the saftey instructions carefully before using the What is in the box appliance the first time. A warranty service is not applicable for damage or defects caused by noncompliance with the instructions for use. -
Page 3: Installation
INSTALLATION HOW TO USE Upright Desktop with Desktop Stand Connect the cable to 5V2A(or above) power adapter, and plug the power adapter into the power socket. Plug the power/charging cable into the Smini power jack Mobile Use with Battery Box Hanging with Leather Lanyard Ceiling Mount... -
Page 4: Apco Technology
APCO TECHNOLOGY 3 phases sanitization APCO module (APCO, Advanced PhotoCatalysis Oxidation) Step 1 - Kill 99.9% germs in the airflow in 0.026 sec Through the most advanced methods, it decomposes contaminants into H O, CO other inorganic molecules, returning to the environment without any pollution. The APCO chamber inside Smini contains VUV (vacuum ultraviolet) which increased Together with Optoelectronics experts and Medical experts, SUVIOS has created Smini 8.3x more efficiency than traditional UVC. -
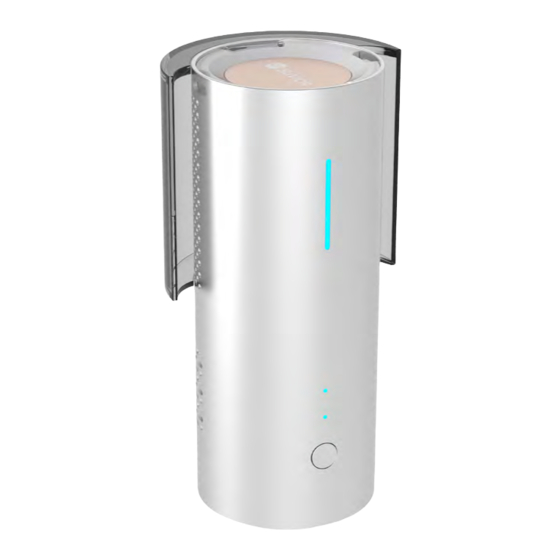
Page 5: Buttons And Lights
Buttons and lights LED lights lights Description Power is off APCO is working Wind shield APCO is not working APCO status Power is off APCO status Air outlet High Turbo Fan is not working Air inlet Mode indication Mode status ※While you activate Smini in SUVIOS APP successfully, the BLUE light mentioned above will become GREEN Use with APP Please read page 21 「08 SUVIOS APP」 Description Power button Power jack APP pairing mode: Press and hold the power button for 5 seconds until the LED indicator flashes and hear beeper. - Page 6 ACCESSORIES Accessories Desktop Stand Leather Lanyard • • Belt Rotation axis Fixed buckle Base Battery Box Ceiling Mount • • Cover Rotation axis Power switch Body Power indication Lock knob Screw holes * Please use flat top 18650 Li-ion battery. LED lights Description Battery power...
- Page 7 ACCESSORIES Application scenarios Desktop Stand Leather Lanyard • • Applied with Desktop Stand. Can be placed on table, office bureau, or building With Leather Lanyard and Battery Box. entrance...etc. Hang it in cloakroom, bathroom, babywagen, Cart… Battery Box Ceiling Mount • • Attach Battery Box without power cable. Mount on ceiling or wall with Wall Mount. For travel or at public transport Wall of bathroom, office or ceiling of strorage room...etc...
- Page 8 ACCESSORIES Install and remove Install Desktop Stand Remove Desktop Stand • • Press the base of the Desktop Stand with Press and hold the power button for about a your hand to stabilize it, align the groove on second and release it to turn off the Smini the back of the Smini with the tenon of the Desktop Stand, and install it from left to right until you hear a click Connect the cable to 5V2A(or above) power Remove the power/charging cable from the adapter, and plug the power adapter into the Smini power socket. Plug the power/charging cable into the Smini power jack Press the power button shortly Hold the base of the Desktop Stand with your hand to stabilize it, slide the Smini to the left to remove it from the Desktop Stand Press the base of the Desktop Stand with one hand to stabilize it, and hold the Smini with another hand, you can adjust the angle according to your wish.
- Page 9 ACCESSORIES Install Battery Box The button of the Batter Box is facing up, align • with the groove on the back of the Smin and then install it Using a coin as an aid, turn the battery box knob clockwise to the end (the knob groove is completely horizontal) to unlock Shortly press the power button to turn on the Grasp the position of the USB-C charging hole with Smini one hand, and slide the upper cover of the Battery Box with another hand to remove Remove Battery Box • Confirm the + and - directions of the battery and mark on the Battery Box. Insert 18650 flat head lithium battery with +/+ and -/- Press and hold the power button for about a second and release it to turn off the Smini Grasp the position of the USB-C charging hole with one hand, and replace the top cover of the Battery Box with another hand. The Battery Box is removed upwards Using a coin as an aid, turn the Batter Box knob counterclockwise to the end (the knob groove is completely vertical) to lock Counterclockwise The TOP mark on the Wind Shield is facing upwards, and the inside of the Wind Shield is aligned with the groove on the back of the Hold the Smini with one hand and pull the Wind Shield Smini. Install it from top to bottom. Finally, push upwards with another hand it a little bit harder into the groove to confirm that the WInd Shield is stable and will not fall down...
- Page 10 ACCESSORIES Install Leather Lanyard Remove Leather Lanyard • • Thread the Leather Lanyard through the top hole on Press and hold the power button for about a second the Smini device and release it to turn off the Smini Insert the opening on the belt into the buckle a. Take it with you - remove the Battery Box b. Fixed place - remove Wind Shield and power cord a. Take it with you - use with the Battery Box b. Fixed place - use with Wind Shield and power cord Detach the Leather Lanyard from the left and right buckles Shortly press the power button to turn on the Smini Remove the Leather Lanyard...
-
Page 11: Accessories
ACCESSORIES Adjust the angle as needed Install Wall/Ceiling Mount • Connect the cable to 5V2A(or above) power Push the lock button under the wall mount to adapter, and plug the power adapter into the right to unlock the power socket. Plug the power/charging cable into the Smini power jack The main body of the wall mount is separated Shortly press the power button to turn on from the back panel the Smini After installing the plastic wall anchors into the Remove Wall/Ceiling Mount wall hole, lock the screw into the back plate • hole Press and hold the power button for about a second and release it to turn off the Smini Reinstall the main body of the wall mount to the back panel Remove the power/charging cable from the Smini Push the lock key to the left to lock Remove the Smini from the wall mount from right to left Align the groove on the back of the Smin with the tenon of the wall mount and install it... -
Page 12: Suvios App
SUVIOS APP Download SUVIOS APP Add device Scan the QR code to download the SUVIOS APP, or search for "SUVIOS" on Google Play / App Store ※ Please contact local SUVIOS dealers for the official launch time of SUVIOS APP 1, Control if the 2. Select "Device" 3. Follow the APP 4. Set the 5. Press and hold the bluetooth of in the menu and instructions to information of the Smini power button for smartphone is ON click "Add Device" turn on the device, place where you about 5 seconds until then click "Next" want to place the the blue light of the long Register a SUVIOS account Smini, then click light bar flashes and then "Next" release. At this point Smini enters the enabled mode, then click "Next" 6. Confirm the 7. Select your 8. Enter the WIFI 9. Activating, 10. The activation... - Page 13 SUVIOS APP SUVIOS APP interface Failed to add device to APP • Description How to process Switch devices Swipe left or right to switch devices or Smini has been Your device has been successfully activated, add new devices successfully but the mobile phone may be temporarily activated, but the disconnected from the Internet.
-
Page 14: Cleaning/Maintenance
CLEANING/MAINTENANCE PRODUCT SPECIFICATION Power Consumption Max 8 W Voltage 5V2A Press and hold the power button for about a second and release it to turn Wireless 2.4G WiFi / BLE off the Smini Noise < 45 dB(A) Dimensions Ø 68 x 160 mm Net Weight 460 g Remove the power/charging cable from SUPPORT the Smini If you have any questions, please contact us Telephone: +31(0)15-8000 240 E-mail : support@brisecare.com Use a vacuum cleaner to absorb the dirt Twitter global: @Brisecare on the air inlet, or wipe it with a slightly moistened cloth. If there is serious dirt on the surface, please use a neutral detergent ※ The machine is strictly forbidden to wash with water WARRANTY To prevent danger, always remove the power supply during... -
Page 15: Appendix
APPENDIX RoHS declaration Equipment name: Sanitizer Type designation (Type): Smini Restricted substances and its chemical symbols Unit Lead Mercury Cadmium Hexavalent Polybrominated Polybrominated (Pb) (Hg) (Cd) biphenyls diphenyl ethers chromium (PBB) (PBDE) Power cord set, internal wiring Circuit board related components APCO module Plastic components Metal parts Note 1 : “Exceeding 0.1 wt %” and “exceeding 0.01 wt %” indicate that the percentage content of the restricted substance exceeds the reference percentage value of presence condition. Note 2 : “○” indicates that the percentage content of the restricted substance does not exceed the percentage of reference value of presence.
Need help?
Do you have a question about the SUOVIS Smini and is the answer not in the manual?
Questions and answers