Table of Contents
Advertisement
Quick Links
Advertisement
Table of Contents

Summary of Contents for Digital Equipment AMIG280PM
- Page 2 Production specification may change without advance notice. The model you purchase is for: AMIG280PM Please find corresponding models from the "Contents". Important: Please take special note of safety rules and operate as...
- Page 3 Safety Rules “Danger” indicates an imminently hazardous situation which, if not avoided, will result in death or serious injury. “Warning!” indicates a possible hazardous situation which, if not avoided, could result in death or serious injury. The possible hazards are explained in the text.
- Page 4 body protection while performs the welding. • Insulate yourself from work and ground using dry insulating protection which is large enough to prevent you full area of physical contact with the work or ground. • Connect the primary input cable according to rules. Disconnect input power or stop machine before installing or maintenance.
- Page 5 ARC rays can burn. • Visible and invisible rays can burn eyes and skin. • Wear an approved welding helmet or suitable clothing made from durable flame-resistant material (leather, heavy cotton, or wool) to protect your eyes and skin from arc rays and sparks when welding or watching.
- Page 6 strike flammable material and where the atmosphere may contain flammable dust, gas, or liquid vapors (such as gasoline). • Protect yourself and others from flying sparks and hot metal. Remove any combustibles from operator before perform any welding. • Keep a fire extinguisher readily available. •...
- Page 7 Flying metal or dirt can injure eyes • When welding, chipping, wire brushing, and grinding can cause sparks and flying metal. It can hurt your eyes. • Remember wear appropriate safety glasses with side shields when in welding zone, even under your welding helmet. Noise can damage hearing •...
-
Page 8: Table Of Contents
3- BEFORE COMMISSIONING..................12 3-1 Utilization for intended purpose only............. 12 3-2 Machine installation rules................12 3-3 Power source connection................12 3-4 Welding cables instruction................13 4 – AMIG280PM........................14 4-1 System components..................14 4-2 Basic equipments for welding................. 14 4-3 Control panel..................... 15 4-4 Sub-menu......................21 4-5 JOB mode-call&store function................ -
Page 9: 1- General Remarks
1- GENERAL REMARKS This series of power sources apply IGBT soft switch inverter technology. Its internal control system applies digital signal processor which ensures quick response to any change during the welding process so as to achieve precise control of welding process and ensure optimal welding results. -
Page 10: Output Characteristics
circuit's closed-loop control makes the power source enjoy strong ability against power grid fluctuation and perfect welding performance. Fig. 1-2-1: Schematic diagram 1-3 Output characteristics Fig.1-3-1: Output characteristics 1-4 Duty cycle Duty cycle is percentage of 10 minutes that a machine can weld at rated load without overheating. -
Page 11: Applications
Fig.1-4-1: Duty cycle 1-5 Applications This series of machines have many welding processes and can weld most of the metal materials, including carbon steel, stainless steel, aluminum and Al-Mg alloy, copper and alloy, etc. Recommended areas of use as follows: - Automobile and car manufacture industry - Aluminum form work for construction - LED light bracket... -
Page 12: Warning Label
● AMIG280PM AMIG280PM apply the industrial standard design, have Pulse-MIG, MIG, STICK ,LIFT TIG, Mainly used in the welding of medium and thin plate aluminum and alloys. It can also be used in the welding industry of medium and thin carbon steel and stainless steel. -
Page 13: 3- Before Commissioning
3- BEFORE COMMISSIONING Warning! Operating the equipment incorrectly can cause serious injury and damage. Do not use the functions described here until you have read and completely understood “safety rules”. 3-1 Utilization for intended purpose only The power source may only be used for MIG, P-MIG, STICK ,LIFT TIG. Utilization for other purposes, or in any other manner, shall be deemed to be "not in accordance with the intended purpose". -
Page 14: Welding Cables Instruction
Note!Inadequately dimensioned electrical installations can lead to serious damage. The mains lead, and its fuse protection, must be dimensioned in accordance with the local power supply. The technical data shown on the nameplate shall apply. 3-4 Welding cables instruction When welding, please pay attention to the followings: a. -
Page 15: Amig280Pm
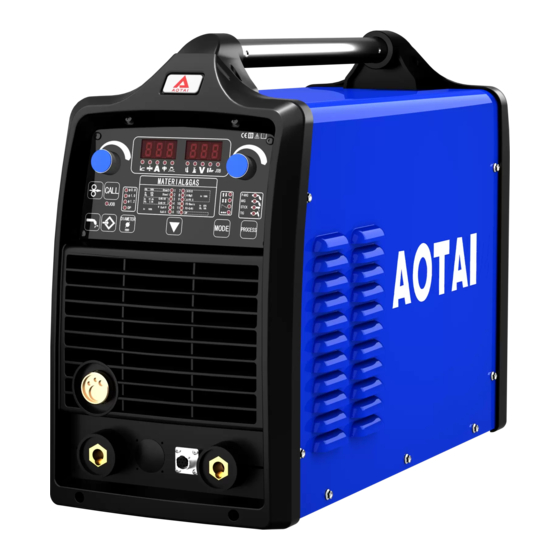
4 – AMIG280PM 4-1 System components This machine can be equipped with many different accessories and can be used in different special sites with different configurations. Fig. 4-1-1: System components 4-2 Basic equipments for welding Only be equipped with the necessary accessories, can the power source operate well. -
Page 16: Control Panel
TIG welding torch with air valve switch Gas regulator, gas hose, gas cylinder (to supply the machine with shielding gas) Welding wire STICK welding Power source Ground cable Electrode holder Electrode 4-3 Control panel The functions on the control panels are all arranged in a very logical way. The various modes and parameters needed for welding are easy to select by pressing the appropriate button;... - Page 17 Fig. 4-3-1: Control panel 1.Adjustment knob-R Press the knob to select parameters, turn the knob to adjust the value of each parameter. Optional parameters for operation -Arc length correction -Welding voltage -Welding speed -Job number n° Important: After pressing down the knob, turn the knob to adjust the value of the parameter after the corresponding parameter indicator light is on.
- Page 18 + longer arc length Important!The range (-5.0-+5.0) means that, when preset welding current, the arc length value is -50%~+50% of the corresponding welding voltage. 6.Overheat Indicator When the power source is overheated, the indicator light is on. 7.Peak current/Inductance parameter For adjusting the peak current during the P-MIG/MAG welding process, values range (-5.0-+5.0) - shorter arc length...
- Page 19 Welding current Welding speed Peak current/inductance Important: After pressing down the knob, turn the knob to adjust the value of the parameter after the corresponding parameter indicator light is on. 14.Gas test Press this button, the gas will flow out, press it again within 30s, the gas will stop flowing out 15.Inching wire feeding Press this button to start wire feeding at a slow speed, and stop when released.
- Page 20 P03……Pre-gas time P05……Initial parameter: The base metal can be heated up rapidly, despite the fast thermal dissipation at the start of welding. P07……Down-slope time: The time from welding current to crater-filler current. I………..Welding current: Uniform thermal input for the preheated base metals. P06……Crater-filler parameter: Prevent burn-through caused by too much heat at the welding ends.
- Page 21 - Special 4-step mode (initial parameters and crater filler parameters are adjustable) Fig. 4-3-7: Special 4-step mode - Spot welding mode Fig. 4-3-8: Spot welding mode 20. Process button (s) For select welding process. MIG/MAG Pulse welding MIG/MAG welding STICK welding Lift TIG welding...
-
Page 22: Sub-Menu
4-4 Sub-menu In order to achieve an optimum welding result, it is necessary in some cases to make corrections of the arc-length, arc force as well as parameters like pre gas flow time, post-gas time and slow wire feeding. For details of how to set the Sub-menu parameters, please refer to “Sub-menu parameter set”. - Page 23 Note! P11-P14 is available on double pulse function; P20-P21 is available on twin wire welding mode. - P01 Burn back time If too long time, the wire will burn back too much with too large melting ball at the end of wire; if too short time,the wire will stick with the workpiece.
- Page 24 The double pulse welding is added modulated by low frequency pulse and the low frequency pulse between 0.5-5.0 Hz. Compared with single pulse, double pulse has more advantages: no need to swing, welding seam become fish-scaly automatically, the depth and density of the fish-scale welding seam is adjustable;...
- Page 25 Set the time that fan continues to work after power source stops welding. - P17 Special 2-step arc starting time On special 2-step mode, time for start period.When choose at number, it is time for start period, when reach to this time, will turn to welding standard; when choose at OFF, the function closes.
-
Page 26: Job Mode-Call&Store Function
2. Press wire diameter selection button (6) to select parameters; Note! Also can use wire material selection button(s) (7) to select. Use the adjusting knob to adjust the parameter value; Important! Adjust the parameters of current percent and arc-length correction firstly before select the parameters of initial standard (P05) and arc stopping standard (P06). - Page 27 2.Briefly press the Store button (16) to enter into the job menu. The first vacant program location for the job is now indicated. 3.Select the program location with the adjustment knob (1), or else leave the suggested program location unchanged. 4.Press and hold the Store button (16).
- Page 28 6. Briefly press the Store button (16) to exit from the job menu Recall a job After storage, all jobs can be recalled and used in job mode. 1.With the “Call” button (12), indicator is on -the last job used is displayed. To view settings programmed in this job, use the adjustment knob-R (1) and (13).
-
Page 29: Interface
2.With the adjustment knob (1), select the desired job. 3.Press the “CALL” button (13), indicator is off. Exit from the recall mode. 4-6 Interface Fig. 4-6-1: Interface... -
Page 30: Installation
1. Quick socket (+) In MIG/MAG solid wire: it is used to connect with polarity conversion plug; In Lift TIG (GTAW): it is used to connect with ground cable; In SMAW (Stick): it is used to connect with welding cable. 2. - Page 31 5. When using water-cooled welding torch, pay attention to anti-freezing. ● power supply installation Please note the size of fuse and circuit breaker in the table below are for reference only. Model AMIG280PM power supply(3 phase) AC380/400/415V±10%, 50Hz 18.5 Power grid Electricity grid min.
- Page 32 Fig. 4-7-1: Connections of power cord and distribution box ●Gas cylinder installation 1. Stand the gas cylinder on the trolley and secure it by fixing the cylinder strap around a point in the top third of the cylinder-but never around the neck of the cylinder.
- Page 33 ● Making an earth connection (1) Plug one end of the ground cable to the output socket (-) of power source and turn it to fasten it; (2) Connect the other end of the ground cable to the work piece. ●...
-
Page 34: Welding Process Installation
Note!If the wire hose is too tight or too loose, it will increase resistance for wire feeding and cause wire feeding unstable. 4-8 welding process installation Warning! Operating the equipment incorrectly can cause serious injury and damage. This part is about operating. Do not use the functions until you have read and completely understood content of this manual. -
Page 35: Technical Data
MIG:20~280/STICK:30-280/TIG:30-280 Range of welding voltage(V) MIG:15~28/STICK:21.2-31.2/TIG:11.2-21.2 OCV(V) 107~112/16(VRD) Duty cycle (%) Full-load efficiency(%) ≥87 Power factor ≥0.95 Wire diameter (mm) Ф0.8、Ф1.0、Ф1.2 Gas flow(L/min) 15~20 Dimension(mm 630×280×480 Weight (Kg) Isolation degree IP class IP21S EMC class Table 4-9-1: AMIG280PM technical data... -
Page 36: Dimension
4-10 Dimension Fig. 4-10-1: Dimension Item Unit(mm) Unit(inches) length 24.8 Width 11.1 Height 18.9 Table.4-10-1: Dimension... -
Page 37: Disassembly And Reassembly
4-11 Disassembly and reassembly Fig. 4-11-1: Disassemble and reassembly... - Page 38 Item Stock No Remarks Valve 752001-00020 Main circuit breaker 745011-00022 Fuse 745007-00022 Fuse 745007-00011 Thermal switch 745008-00006 Three-phase rectifier 735005-00002 746002-00047 Varistor 720021-00017 735007-00038 IGBT module Power supply board of the fan 210100-00033 Current transformer board 220149-00162 Polypropylene capacitor 722001-00070 Current sensor 753001-00020 Wire wound resistor...
-
Page 39: 5-Wirefeeder
5-WIREFEEDER Fig. 5-1: Wire feeding device structure 5-1 Roller Assembly instructions for wire feed wheel when welding steel and aluminum Steel aluminum Pressed wire bearing assembly Passive gear + double drive wire feed roller single groove U type Passive gear + double drive wire Passive gear + double drive wire feed feed roller double groove V type roller double groove U type... - Page 40 Fig. 5-2: Wire feed rollers type and pressure adjustment Important! When use pressure device to adjust wire feed roll pressure, too much pressure will cause wire crushed, and the wire coating be damaged, and it will cause the wearing out of feed rollers and increase the wire feeding resistance.
-
Page 41: Disassembly And Reassembly
5-2 Disassembly and reassembly Fig. 5-2-1: Disassemble and reassembly... -
Page 42: 6-Trouble Shooting
Item Stock No Remarks Handle 327047-00015 European connector 322017-00010 Speed measuring parts 328005-00199 Wire feeder motor 321011-00027 Screws for fixing the press roller 328005-00197 Guide wire nozzle-Teflon material 324005-00016 Aluminum welding Guide wire nozzle-steel material 324005-00015 CS/SS welding 321005-00006 Passive gear Screw for fixing the wire feed 328005-00198 roller... - Page 43 work for ground connection. ● Error code This series of machines have automatic protection and error code display function. Relevant Cause & Remedy can be found according to below Error codes, as shown in Table 6-1 code Trouble Causes and troubleshooting ①...
- Page 44 -Relay signal wire is broken -Temperature relay failure -Display control board failure Communication ① Display control board communication circuit failure abnormal Table 6-1: Displayed error code Important! If any error message that is not described here appears on the displays, then the fault is one that can only be put right by a service technical.
-
Page 45: -Care And Maintenance
-Display control board is damaged does not work after pressing the welding gun switch -Damaged control panel components Welding parameters are -Display control board is damaged not adjustable -Current sensor is damaged -Power supply problem -Fuse is broken No display on panel -The power transformer is broken -Display control board is damaged -Fan is broken... - Page 46 -Dismantle machine side panels and clean machine inside with clean and low-pressure compressed air by professional technician, not less than twice per year. Clean the components at a certain distance only; -If a lot of dust has accumulated, clean the cooling-air ducts. Maintenance of power source ...
- Page 47 Maintenance of wire feeder -Avoid water and other corrosive liquids during use. If accidentally touched, wipe it off in time and keep the wire feeder clean. -The wire feed wheel and the wire press wheel will have a certain amount of wear after long-term use.
Need help?
Do you have a question about the AMIG280PM and is the answer not in the manual?
Questions and answers