
Related Manuals for Comfort COMPASS

Summary of Contents for Comfort COMPASS
- Page 1 USER GUIDE COMPASS POWER MOUNT HARDWARE ® & MANUAL FOR ALL ACTA-SERIES BACK SUPPORTS COMFORTCOMPANY.COM UM-COMPASS-POWER-HDWR REV0616...
-
Page 2: Table Of Contents
Before using, make sure that you are properly trained to operate the equipment for its application. Failure to do so could lead to discomfort, injury or damages. NOTE: “We,” “Us” and “Our” refers to Comfort Company. “You” refers to the product purchaser or user. INTRODUCTION www.comfortcompany.com... -
Page 3: Safety Guidelines
Antibacterial or Disinfectant Spray Comfort Company cannot be held responsible for damages or injury due to misuse Wipe with Water Only of the product or failure to follow instructions provided in this manual. Please contact us if you require further assistance in understanding cautions, warnings or instructions for using or maintaining your product. -
Page 4: Safety
Acta-Series back supports offer a variety of available support and positioning features to accommodate various user rehabilitation needs and goals while allowing for function and comfort. The size and function of the back support should be matched by the healthcare provider to suit the user needs. -
Page 5: Installation & Set Up
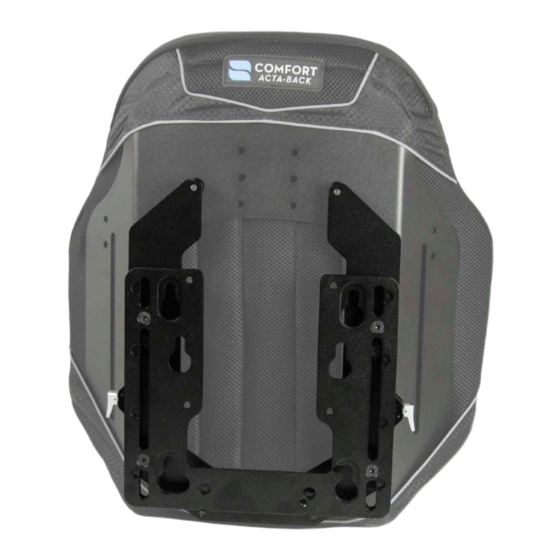
PARTS DETAIL Contact Customer Service for replacement parts or additional hardware when needed. *Please note that using Compass Power Mount Hardware requires a different cover style for back supports than when using manual Compass ® ® Mounting Hardware. Contact Customer Service for the correct cover if converting a back support to Compass Power Mount Hardware. -
Page 6: Power Chair Compatibility
COMPATIBILITY & HEIGHT Compass Power Mount Hardware is compatible with the chairs listed below using only the seating systems specified. ® The power bases listed are a reference for what is available with the compatible seating system. COMPASS POWER MOUNT COMPATIBILITY ®... -
Page 7: Seat Depth Guide
® ® ® SEAT DEPTH USED = the distance from the base mounting plate to the rear face of the back support shell. This is the distance required for the Compass ® Power Mount Hardware assembly complete with spacers. Back support foam thickness varies by model and size and therefore is not included in seat depth used. -
Page 8: Start - (Pre-Assembled)
INSTALLATION (PRE-ASSEMBLED) Use the following instructions if Compass Power Mount Hardware is already assembled and attached to the back support. ® For all Acta-Series back supports. Compass Power Mount Hardware will most often come pre-assembled ® Acta-Back ® shell shown and attached to the back support ready for use with the chair designated during the ordering process. -
Page 9: Mounting Bracket Set Up & Alignment
MOUNTING BRACKET & TRACK ALIGNMENT Use the following instructions to verify and/or switch mounting bracket orientation or replace the mounting bracket and male track parts. To check track alignment: The mounting bracket (pictured below) should be set up for the power chair selected when ordered. -
Page 10: Installation
INSTALLATION (QUANTUM , PERMOBIL , & ROVI ® ® ® The following instructions illustrate the base mounting plate found on each power chair. WARNING! To prevent injury, damages or voided warranty, DO NOT make any alterations to the equipment. Modifications in attempt to interface with any other products than those listed in this manual potentially compromise the safety of the user and voids warranty. -
Page 11: Installation (Quickie ® )
INSTALLATION (QUICKIE ® The following instructions illustrate the base mounting plate found on each power chair. WARNING! To prevent injury, damages or voided warranty, DO NOT make any alterations to the equipment. Modifications in attempt to interface with any other products than those listed in this manual potentially compromise the safety of the user and voids warranty. QUICKIE ®... -
Page 12: Finish Installation And Height Adjustments
INSTALLATION (BACK SUPPORT ASSEMBLY) Acta-Embrace without cover shown (rear view) ® WARNING! DO NOT allow for wires or other components to run through the support/hardware system at any time. Installing the back support assembly: From behind the chair, hold the back support and hardware assembly on each side at the release levers A with them in the open position as shown. -
Page 13: Back Support Adjustment Features
The next cable up should support the lumbar support and encourage region. The top one or two cables (whichever is applicable) can proper positioning. then be adjusted to the user’s needs and comfort. SET UP & ADJUSTMENTS... -
Page 14: Assembly - Acta-Relief™ Shell Spacers, Bracket & Shell
For Acta-Relief™ & Acta-Relief™ LTS. Compass Power Mount Hardware requires a certain cover style for the back support. If converting a ® back support from manual chair hardware to Compass Power Mount Hardware, contact Customer Service for the correct cover. ®... -
Page 15: Assembly - Acta-Relief™ Tracks And Track Spacers
ASSEMBLY (ACTA-RELIEF™ SHELL BRACKET & TRACK SPACER) For Acta-Relief™ & Acta-Relief™ LTS. Track spacers for Compass ® Power Mount Hardware are to be used on Acta-Relief™ only when using a head support and additional clearance is needed. Please refer to the instructions provided with the head support for installation of head support and hardware. -
Page 16: Assembly -Acta-Back ® /Acta-Embrace ® Tracks And Shell Bracket
& ACTA-EMBRACE SHELL BRACKET) ® ® Use the following instructions if Compass Power Mount Hardware is not already assembled and attached to the back support. ® Compass Power Mount Hardware requires a certain cover style for the back support. If converting a back support from manual ®... -
Page 17: Cleaning And Maintenance
HARDWARE CLEANING & ALIGNMENT Frequent sliding of the track pieces may cause wear and binding and may require cleaning and lubrication. Follow the track alignment instructions anytime track pieces are assembled, altered or appear to be binding. Cleaning and lubricating tracks: Track alignment: The following may be completed with the hardware Start with the back support and hardware assembly... -
Page 18: Cleaning Back The Support
Frequent heat drying and bleaching naturally cause fabric break down. Air drying and cleaning without bleach are recommended whenever possible to help extend the life of the cover. SURFACE CLEANING COMFORT-TEK FABRIC ONLY* Spray with common household or commercial antibacterial Wipe with damp, water-only cloth after disinfecting and let dry before use. -
Page 19: Inspection
MAINTENANCE WARRANTY This product is covered by the Comfort Company Lifetime Guarantee. INSPECTION Inspect all components monthly. Check and tighten hardware fasteners regularly. Inspect all materials for wear such as stretching, fraying, fractures, and bends. Some wear with regular use is expect- ed. - Page 20 , Acta-Back ® , and Acta-Embrace ® are registered trademarks of Comfort Company. BodiLink™, Acta-Relief™, Comfort-Tek™, and Stretch-Air™ are trademarks of Comfort Company. Viscool™ is a trademark of American Excelsior Company. Quantum , TRU-Balance 3, Q6 Edge , and Rival are registered trademarks of Pride Mobility Products Corporation.
Need help?
Do you have a question about the COMPASS and is the answer not in the manual?
Questions and answers