Table of Contents
Advertisement
Quick Links
Advertisement
Table of Contents

Summary of Contents for ADF T1
- Page 1 User Manual Smart Thermostat V0.1...
-
Page 2: Table Of Contents
Initial Setup - What’s in the box - Power up - User registration (on mobile apps) 8 - 9 - Setup T1 connect to Internet (with mobile apps) 10 - 14 Share Function 15 - 16 Device Placement OLED HMI interface... - Page 3 Device not able to power up troubleshooting System not working troubleshootting - Cloud setting not working Shifting T1 to another AC Unit within same house/office. Shifting T1 to another AC Unit for different house/office. When AC Unit and Mobile App On/Off Status not the same.
-
Page 4: Product Description
T1 Smart Thermostat T1 Smart Thermostat is a smart air-conditioner controller that provides best comfort and convenience to end users. T1 smart thermostat uses built-in, external sensors and air-conditioner(AC) unit control information to model environment information and AC unit performance. Based on essential data collected, T1 smart thermostat leverages on AI technolo- gy to process data and control AC unit. -
Page 5: T1 General Feature
T1 General feature Remote control ● T1 support most of the existing air-conditioning unit in the market. It only required to follow an easy setup procedure to enable the control on air-conditioner. ● T1 is internet-connected device that allow user access everywhere as long as there is internet connectivity. -
Page 6: Device Interface Overview
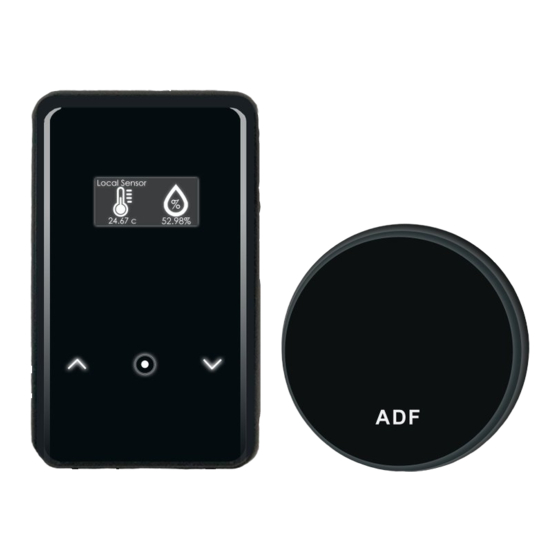
Device interface overview Local network HMI interface User Wifi Router Internet Cloud Mobile Server apps User Initial Setup What’s in the box ADF Technologies Sdn Bhd... -
Page 7: Power Up
Power up 1. Power up T1 a. Plug in USB power brick to any b. connect the USB cable to T1. 100v - 240v power point. c. “ADF” logo should appear on T1’s display. 2. Wait for about 1 minute until the device successfully boots. -
Page 8: User Registration (On Mobile Apps)
Sign In Create an account? Sign Up Now Sign Up 3. Sign up a new account, user can either Be a member of T1 Smart Thermostat a. Enter details (email, name, password, phone Email number) Password b. Click the red google button to sign up using... - Page 9 Sign Up Be a member of T1 Smart Thermostat 4. Upon completion, an authentication code will be sent to the email address entered. Authentication code Confirm Sign Up Sign Up Be a member of T1 Smart Thermostat 5. User will need to key in the code to complete sign up process.
-
Page 10: Setup T1 Connect To Internet (With Mobile Apps)
1. T1 smart thermostat app must already be installed in Smartphone. 2. User registration process must be done prior. (See page 8) Step: 1. Power up T1, T1 device should be in “hotspot” mode upon on factory default setting. Sign In Sign in to your account now... - Page 11 4. Connect to T1 Wi-Fi hotspot (XTEC-T1-XXXXXX) a) Using the default password “12345678”. 5. Return to the T1 smart thermostat app. The following page will pop up. ADF Technologies Sdn Bhd...
- Page 12 6. Select your home/office Wi-Fi network and input the SSID password to allow T1 to connect into it. new wifi settings sent T1 Smart Thermostat IMPORTANT NOTE 1. Make sure 4G disabled 2. Verify if XTEC-T1 -xxxxxx is there 3. Make sure wifi-assistant/WIFI + disbled (ANDROID only) 7.
- Page 13 8. Select back your home/office Wi-Fi network and input the SSID password to connect your phone back to your WIFI. 9. user is now successfully connected with T1 smart thermostat. ADF Technologies Sdn Bhd...
- Page 14 10. Check for the confirmation: i. Make sure your device is online (green color symbol) ii. Otherwise, if the device is offline, please reboot T1 device or restart your app. ADF Technologies Sdn Bhd...
-
Page 15: Share Function
Share Function Prerequisite: 1. User must already be registered with a T1 Smart Thermostat account. 2. The device is already connected to internet. Step: 1. Launch T1 Smart Thermostat app. 1. Click on the SHARE button 2. Key in the email address that you would like to share with. - Page 16 3. Once keyed in the email and click OK, the app will display “Synced Shared Device Setting!” 31.6 51.7% 4. It will automatically display “shared” in the user’s application. 28.7 43.4% 33.4 64.4% default:shared 29.2 67.4% ADF Technologies Sdn Bhd...
-
Page 17: Device Placement
Device Placement 1. T1 smart thermostat should be pointed directly into the AC split unit so that it could control the AC unit. ADF Technologies Sdn Bhd... -
Page 18: Oled Hmi Interface
3. For local sensor menu, refer to “Quick Setpoint Menu” below for control. 4. Upon entering into menu, select “OK” to confirm or “cancel” to exit menu. Powering up screen Temperature & Humidity Sensor Screen AC Setpoint Screen • Press enter to change AC Setpoint ADF Technologies Sdn Bhd... - Page 19 Device Version screen Device Info screen • Device IP and MAC address information Factory default screen • Happened when user pressed factory default button for 5 seconds • Press Enter and select YES to perform factory default. ADF Technologies Sdn Bhd...
-
Page 20: View Alarm
Time : 09:15:30 Type : Performance Drop Alarm Setting Alarm Settings Choose Device Device 1 1. In alarm setting, users can use T1 to monitor Temparature Deadband temperature and humidity and alert users Min. Temp during change of temperature. Max. Temp 2.In the settings, users can set the maximum and... - Page 21 ● Alarm working principle: ○ If values happen to go higher/lower than the max/min value, the alarm will be triggered. ○ When triggered, the value must go higher/lower than the dead band value to retrigger the alarm again. ADF Technologies Sdn Bhd...
-
Page 22: Mobile Apps Interface
Mobile Apps Interface Home 1. Display of T1 thermostat conditions. 2. Display of current AC control information. Control air-conditioner Control Setting default 16 C 1. Display of T1 thermostat conditions. 2. From the settings, user can update any settings *AC Off* from the interface and click “change”... -
Page 23: View Trends
1. In the trend page, there would be a sensor trends View All graph and AC log graph. 2. User can view the sensor & AC log. Humidity time 00:00:03 08:11:33 16:23:04 03:47:33 11:59:04 20:10:34 View All ADF Technologies Sdn Bhd... -
Page 24: Schedule
Tuesday 5. While in schedule detail, user can either Wednesday set specific dates or days within a week (Monday, Tuesday, Wednesday... etc) for Thursday the schedule to trigger. Friday Saturday Weekdays (Monday-Friday) Weekend Everyday CANCEL SUBMIT ADF Technologies Sdn Bhd... - Page 25 6. User can set the time for the schedule to trigger. 7. User can set the AC control setting for scheduled event. 8. User can select either to be notified on push notification whenever the event happens. ADF Technologies Sdn Bhd...
-
Page 26: Smart Control Setting
Smart Control Setting * Will only will be allowed to use after T1 runs for 3 days and has gathered enough control and sensor data. 1. To check whether your smart control setting is enabled, go to smart control page. - Page 27 3. Upon Enabling, the control page will be like the following. * User can click on 5 responses ( Very cool, very hot, Slightly cool, slightly hot, comfortable) to indicate current feeling using the AC. Slightly Cool ADF Technologies Sdn Bhd...
-
Page 28: Ac Brand Selection (Auto)Setting
1. Select the device, then choose option for either home/office. Control Setting default 16 C *AC Off* Temperature Humidity 34.0 56.6% 2. Click the 3 line at the top right corner. Current Current Speed :1 Swing Turn ON Sync ON ADF Technologies Sdn Bhd... - Page 29 3) select “Settings” 4) choose Brand Selection ADF Technologies Sdn Bhd...
- Page 30 Auto. 6. Follow the instruction before proceeding. i. Make sure that AC is powered On before IR testing ii. Make sure T1 is aligned to AC IR receiver for proper testing. 7) Start IR Recognition ADF Technologies Sdn Bhd...
- Page 31 8. Device will automatically detect the brand of your AC, then select it to pair with it. 9. Click Try Model for remote recognition. If AC respond, you must click Yes, If no response, click No. ADF Technologies Sdn Bhd...
- Page 32 Device State < < Remote received: 10. The selected model is working. Now, click on the “Try Power” to do the final testing. 11. Upon completion, click OK ADF Technologies Sdn Bhd...
- Page 33 12. User and device are now successfully connected & ready to use. ADF Technologies Sdn Bhd...
-
Page 34: Ac Brand Selection (Manual)
AC brand Selection (Manual) Control Setting default 16 C *AC Off* Temperature Humidity 34.0 56.6% 1. Click the 3 line at the top right corner. Current Current Speed :1 Swing Turn ON Sync ON 2. select “Settings”. ADF Technologies Sdn Bhd... - Page 35 4) Select method to proceed with the IR signal pairing by Manual. Follow the instruction before proceed. *Make sure that AC is powered On before IR testing. *Make sure T1 is aligned to AC IR receiver for proper testing. ADF Technologies Sdn Bhd...
- Page 36 5. Choose the brand of your AC, then select any model to do the testing . 6. Select any model to do the testing. ADF Technologies Sdn Bhd...
- Page 37 Yes, If no response, click No. 8. The selected model is working. Now, click on the “Try Power” to do the final testing. If AC respond, you must click Yes, If no response, click No. ADF Technologies Sdn Bhd...
- Page 38 12. Upon completion, Click OK 13. User and device are now successfully connected & ready to use. ADF Technologies Sdn Bhd...
-
Page 39: Geolocation Functionality
Geolocation Functionality Setup : 1. On device page, select sidebar. 2. Select “Device Home”. 3. Press + button, select add home. ADF Technologies Sdn Bhd... - Page 40 4. Pick the pin and drag to desired home location. 5. Click the + button and select edit home. ADF Technologies Sdn Bhd...
- Page 41 6. Select the new point that just dropped in a. input the new location name. b. Select device to be attached. 7. Upon setup done, press start to begin geolocation checking. ADF Technologies Sdn Bhd...
- Page 42 8. When entering location a. There will a notifications in the screen. b. T1 will turn on the AC 9. Upon Exit location a. There will be a notification as the screen. b. T1 will turn off the AC ADF Technologies Sdn Bhd...
- Page 43 USB power brick, Micro USB cable ● The ADF logo should appear. ● If the power indication LED lights up but the T1 does not power up, power down device, keep pressing the factory default button and power up again.
- Page 44 Wifi setup process failed ● Things to take note during Wifi Setup process ○ Ensure the T1 is placed near enough to the Wifi access point that you wished to set. ○ Ensure Wifi router is powered up and turned on ○...
Need help?
Do you have a question about the T1 and is the answer not in the manual?
Questions and answers