Advertisement
Quick Links
Advertisement

Related Manuals for HOMECHO HMC-MD-035


Summary of Contents for HOMECHO HMC-MD-035
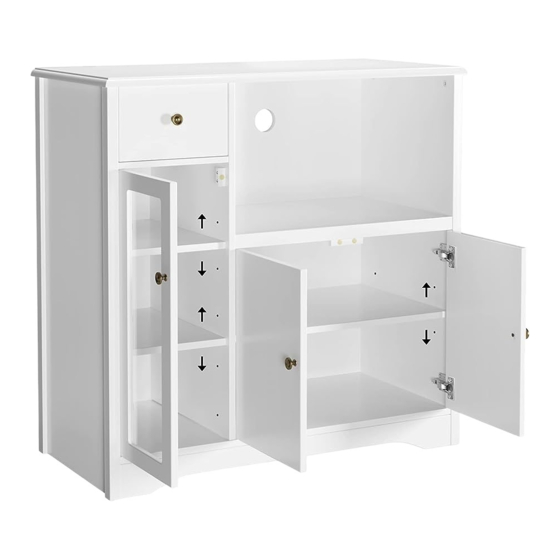
- Page 1 Kitchen Cart with Drawers HMC-MD-035 V1.0...
- Page 2 Thank you for purchase on HOMECHO products. Please contact us if you have difficulty with assembly or need replacement parts. HOMECHO customer service is here to assist you. Email: service@homecho.shop Please attach your User Name or Order ID so that we can assist you better.
- Page 3 Parts List(EN) / Teile Liste(DE) - 2 -...
- Page 4 Parts List(EN) / Teile Liste(DE) 1:00 Φ 24+2PCS 27+2PCS Φ 27+2PCS 4PCS 6×30mm M6×35mm 15×9mm 4PCS 10+1PCS 24+2PCS Φ Φ M4×16mm M3×12mm M4×14mm 6× 8×21mm 4PCS 16+2PCS 16+2PCS M4×35mm 16×16×1mm M3×14mm Φ Φ 12+1PCS 6×30mm M4×40mm 6×17mm 6PCS 5PCS M4×12mm L300mm L300mm L300mm...
- Page 5 Assembly Steps(EN) / Montageschritte(DE) STEP 1 Please refer to the installation method and position on Step 1 - Lock the long side of the L L-shaped metal plate to the ① board with the S short screw. A x 12PCS B x 19PCS S x 1PC L x 1PC...
- Page 6 Assembly Steps(EN) / Montageschritte(DE) STEP 2 B x 1PC F x 4PCS CL x 1PC CR x 1PC H x 1PC - 5 -...
- Page 7 Assembly Steps(EN) / Montageschritte(DE) STEP 3 A x 8PCS B x 2PCS C x 2PCS >90° F x 2PCS P x 1PC STEP 4 A x 2PCS >90° B x 1PC C x 1PC - 6 -...
- Page 8 Assembly Steps(EN) / Montageschritte(DE) STEP 5 >90° C x 2PCS STEP 6 >90° A x 2PCS C x 5PCS - 7 -...
- Page 9 Assembly Steps(EN) / Montageschritte(DE) STEP 7 >90° C x 2PCS STEP 8 >90° C x 5PCS R x 5PCS - 8 -...
- Page 10 Assembly Steps(EN) / Montageschritte(DE) STEP 9 STEP 10 >90° C x 6PCS O x 12PCS - 9 -...
- Page 11 Assembly Steps(EN) / Montageschritte(DE) STEP 11 D x 2PCS E x 2PCS G x 8PCS Q x 4PCS STEP 12 D x 1PCS E x 1PCS G x 4PCS Q x 2PCS - 10 -...
- Page 12 Assembly Steps(EN) / Montageschritte(DE) STEP 13 G x 12PCS - 11 -...
- Page 13 Assembly Steps(EN) / Montageschritte(DE) STEP 14 J x 16PCS K x 16PCS STEP 15 >90° B x 4PCS C x 4PCS - 12 -...
- Page 14 Assembly Steps(EN) / Montageschritte(DE) STEP 16 I x 4PCS D x 1PC E x 1PC F x 4PCS DL x 1PC DR x 1PC STEP 17 - 13 -...
- Page 15 STEP 18 Please refer to Step 19 - Drill a hole in the wall at the required height and position for anti-falling device after product installed, and then put the M plastic part into the hole. WALL >90° M x 1PC STEP 19 Move the cabinet to the appropriate position, and then use the N long screw to lock the plastic part in the wall through the holes of L-shaped...
- Page 16 WARNING Children have died from furniture tipover. To reduce the risk of furniture tipover: ● ALWAYS install tipover restraint provided. ● NEVER put a TV on this product. ● NEVER allow children to stand, climb or hang on drawers, doors, or shelves. ●...
Need help?
Do you have a question about the HMC-MD-035 and is the answer not in the manual?
Questions and answers