
Related Manuals for Mimosa SIGNATURE 3171022

Summary of Contents for Mimosa SIGNATURE 3171022
- Page 1 OUTDOOR GAS HEATER -TABLETOP SILVER Provides warmth and ambiance for outdoor settings AGA Gas Certified 3171022 3171022 JDSTT ODS Important: Please retain these instructions for future use...
- Page 2 Gas Leak Test Gas connections on the heater are leak tested at the factory prior to shipment. A complete gas tightness check must be performed due to possible mishandling in shipment or excessive pressure being applied to the heater gas connections. 1.
-
Page 3: Table Of Contents
Table Of Contents Warning Safety Rules ...............Page 1 Safety Requirements Before Operation......... Page 2 Diagrammatical Representation Of ‘Outdoor Areas’...Page 3 Safety Rules For Outdoor Gas Appliance ......Page 4 Table Heater Stand And Location ..........Page 5 Gas Requirements ..............Page 5 Procedure For Leakage Test ........... -
Page 4: Warning Safety Rules
Warning Safety Rules PLEASE READ THE FOLLOWING SAFETY RULES PRIOR TO OPERATION OF THE HEATER WARNING If you smell gas: 1. Shut off gas to the appliance. 2. Extinguish any open flame. 3. If odour continues test for leaks as detailed on page 8. WARNING 1. -
Page 5: Safety Requirements Before Operation
Safety Requirements Before Operation This appliance shall be installed in accordance with these installation instructions, local gas fitting regulations, municipal building codes and AS/NZS 5601.1 - Gas Installations and any other statutory regulations. This outdoor gas appliance is not intended to be installed in or on recreational vehicles and/or boats. -
Page 6: Diagrammatical Representation Of 'Outdoor Areas
Diagrammatical Representation Of ‘Outdoor Areas’ This appliance shall only be used in an above ground open-air situation with natural ventilation, without stagnant areas, where gas leakage and products of combustion are rapidly dispersed by wind and natural convection. Any enclosure in which the patio heater is used shall comply with one of the following: With walls on all sides, but at least one permanent opening at ground level and no overhead cover (figure 1). -
Page 7: Safety Rules For Outdoor Gas Appliance
Children and adults should be alerted to the hazards of high surface temperatures and should stay away to avoid burns or clothing ignition. Young children should be carefully supervised when they are in the area of the heater. Clothing or other flammable materials should not be hung from the heater, or placed on or near the heater. Any guard or other protective device removed for servicing, the appliance must be replaced prior to operating. -
Page 8: Gas Requirements
Table Heater Stand and Location The garden table heater is for outdoor use only . Always ensure that adequate fresh air ventilation is provided. Always maintain proper clearance to 61 cm combustible materials, i.e. top 46 cm and sides 61 cm minimum. Garden table heater must be fixed on a stable and strong table with a minimum height of 600mm from the floor level. -
Page 9: Procedure For Leakage Test
Procedure For Leakage Test NEVER CONNECT AN UNREGULATED GAS SUPPLY TO THIS APPLIANCE PRECAUTIONS Periodically check the whole gas system for leaks. Immediately check for leaks if smell of gas is detected. Extinguish all open flames during leakage test or when smell of gas is detected. Never smoke while performing leak test. -
Page 10: Operation And Storage
Operation and Storage THE GUARD IS FITTED TO THIS APPLIANCE TO REDUCE THE RISK OF FIRE OR INJURY FROM BURNS AND NO PART OF IT SHOULD BE REMOVED. WHEN LIGHTING HEATER, KEEP FACE AWAY FROM EMITTER GUARD. Variable Control knob TO ST ORE THE HEATER UNIT 1. -
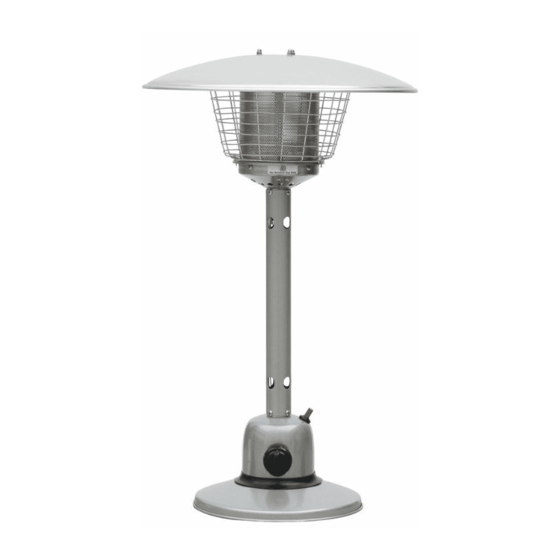
Page 11: Parts And Specification
Parts and Specification Reflector Flame screen guard Main pole Control housing Rubber ring Base Gas hose Safety chain Gas regulator Page 8... -
Page 12: Assembly Parts
A. S pecification For outdoor use only Uses propane gas only Operating Pressure: 2.75kPa Consumption: 12.0MJ/h We ight: 5kg Height: 900 mm approx B.Table of open ings Gas pressure (kPa) Main opening 2.75 1.0mm Assembly Parts Tools needed : Adjustable opening wrench Slip joint pliers Philips s cr e wdriver Spray bottle of soap solution for leakage test... -
Page 13: Assembly Procedure
Assembly Procedure STEP 1: 1-1. Put the base together with the m a in body. 1-2. Use 4 pcs M6×16 mm bolts to join the base and the main body. Main body 1-3. Tighten each of the bolts. Base Bolts STEP 2: STEP 1 2-1. - Page 14 STEP 4: 4-1. Set 3 pcs washers above the 3 pcs supporting bolts. Reflector 4-2. Put reflector canopy onto the top of flame screen aligning through the 3 pcs supporting bolts. Washer STEP 4 STEP 5: 5-1. Place 3 pcs washers & 3 pcs castle nuts on each Castle nut Washer reflector supporting bolts.
- Page 15 STEP 7: 7-1. Connect the regulator to the gas tank and tighten it with adjustable wrench. NOTE: This appliance operates with a gas hose and regulator (supplied), which is designed to supply Propane gas at a pressure of 2.75kPa. Only use the hose and regulator supplied with the appliance.
-
Page 16: Pilot Service
Pilot Service burner and in the pilot burner tube as shown below to clear spider web Insert pipe cleaner here PILOT BURNER Insert pipe cleaner here Insert pipe cleaner here (rear air hole - where included) Page 13... -
Page 17: Problems Check List
Trouble Shooting Check List What ONLY an What you can do authorised (if these do not work, service Problem Possible cause contact an authorised technician can technician) Gas valve may be OFF Pilot will not light Service pilot as shown in this manual Refill gas cylinder Tank fuel empty Purge air from the pilot gas line... -
Page 18: Product Warranty
P R O D U C T W A R R A N T Y Any claim under this warranty must be made within 12 Months of the date of purchase of the product. To make a claim under the warranty, take the product (with proof of purchase) to any Bunnings store (see www.bunnings.com.au or bunnings.co.nz for store locations)
Need help?
Do you have a question about the SIGNATURE 3171022 and is the answer not in the manual?
Questions and answers