Table of Contents
Advertisement
Quick Links
Advertisement
Table of Contents

Summary of Contents for pathway HoverCam Pilot X
- Page 1 USER MANUAL USER MANUAL Pilot X/S Wireless Digital Teaching Station Wireless Digital Teaching Station Intel Intel Core Core ® ® Pilot X Pilot X Intel Intel Core Core ® ® Qualcomm Qualcomm Pilot S Pilot S SC8180XP SC8180XP Powered by Powered by...
- Page 2 Intel and the Intel logo are trademarks of Intel Corporation or its subsidiaries. © Copyright 2022 Hovercam®. All rights reserved.Hovercam® is a trademark Pathway Innovations, Inc. This user guide is subject to change without notice. Depicted product appearance, features and specifications may vary in the final product(s). Hovercam® shall not be liable for technical or editorial errors or omissions contained herein.
-
Page 3: Table Of Contents
Table of Contents 2 Welcome ........................... 3 Main Features l What’s in the Box ................3 Podium Diagram ....................... 4 Tablet Diagram ........................5 Assembling the Podium ....................6-7 Moving and Adjusting the Podium ................. 8 Charging the Podium ...................... 9 Charging the Tablet .................... -
Page 4: Welcome
Welcome Congratulations! With Pilot X/S , you’ve taken a major step in revolutionizing your classroom. Designed by educational technology professionals in California, the Pilot X/S brings every essential educational r, document camera, and wireless podium. Say goodbye to messy cables, because with Pilot X/S, you can wirelessly control your classroom display from anywhere in the room. -
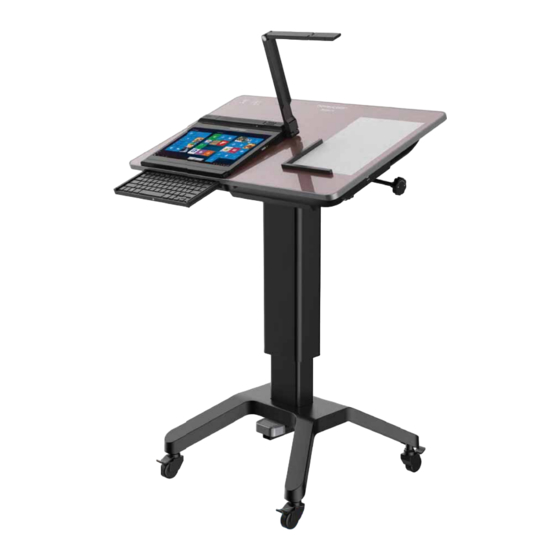
Page 5: Podium Diagram 4
Podium Diagram 4 Podium Audio Line In/Out Magnetic Tablet Dock Pop-Out Keyboard Magnetic Power Port Tilt Adjustment Dial Tablet Bay Charging Actuator x2 Magnetic Anti-Slip Bumpers 4x Lockable Wheels Height Adjustment Foot Pedal Tablet Storage Bay Tablet Bay Key Lock... -
Page 6: Tablet Diagram
Tablet Diagram Tablet Features Camera Controls Connectivity USB 3.0 Type A (2x) - Pilot X Fold-Out Document Camera Zoom-In USB 3.0 Type A (2x) - Pilot S HoverCast Wireless Antenna USB 3.0 Type C (2x) - Pilot X AutoFocus On USB 3.0 Type C (1x) - Pilot S HoverCast Antenna On/Off Image Flip... -
Page 7: Assembling The Podium 6
Assembling the Podium 6 Notice: Two people are required to safely assemble Carefully unpack the Podium Surface, Podium Pedestal, Podium Wheel Base, Step 1 Hardware and Assembly Tools. Stage the components on the included foam packaging, or use a padded surface. Podium Wheel Hardware and Podium Surface... - Page 8 Assembling the Podium Insert the Podium Wheel Base onto the Podium Pedestal, making sure the Height Adjustment Step 4 Foot Pedal is on the same side as the Pop-Out Keyboard. Use the included Hex Driver to secure 4x 4mm bolts as pictured below, being careful not to strip the threads. Optionally, a thread-locking compound may be used to prevent loosening of the bolts over time (not included).
-
Page 9: Moving And Adjusting The Podium 8
Moving and Adjusting the Podium 8 The Pilot X/S Podium is adjustable for a variety of usage models. It can be used as a desk, a presentation lectern, a mobile teaching station, and more. Moving the Podium To move the podium, unlock the 4 wheels on the Podium Wheel Base by pulling up on the levers with the top of your foot. -
Page 10: Charging The Podium
Charging the Podium The Pilot X/S Podium features an internal battery that can charge the tablet while docked or stored in the tablet bay. This dual-charging feature extends the tablet battery life, allowing for up to 6 hours of use (depending on the usage model). -
Page 11: Charging The Tablet 10
Charging the Tablet 10 The Pilot X/S Tablet has an internal battery for wireless operation. The tablet can achieve around 3 hours of standalone use under normal operating conditions. When docked on the podium, the tablet can achieve around 6 hours of use under normal operating conditions. To conserve battery life, make sure the document camera is folded away when not in use (Page 17). -
Page 12: Charging The Tablet Storage Bay L Changing The Combination
Charging the Tablet Charging in the Tablet Storage Bay The Tablet Storage Bay is a convenient and secure place to store and charge the Pilot X tablet overnight. The bay is located on the left side of the podium, and features a dropdown door that is secured by a key lock. -
Page 13: Removing The Tablet L Charging With The Tablet Power Adapter
Charging the Tablet 12 Activate Charging Finally, use the Tablet Storage Bay Charging Actuator to enable charging by pushing-in on the lever. The charging actuator is located on the underside of the podium surface, just below the Pullout Keyboard. The Tablet Charging Indicator is located on the upper left corner of the Podium Surface next to the Podium Charging Indicator receiving a... -
Page 14: Operating The Tablet
To power-on the Pilot X/S Tablet, press and hold the Sleep/Wake Button for approximately 3 seconds, and the HoverCam Pilot X/S boot-up screen will appear. If the tablet does not power-on, ensure that the battery is charged or receiving a charge. -
Page 15: Internal Pc L Windows 10 L Imaging / Formatting
Operating the Tablet 14 Internal PC " Pilot X/S comes fully-integrated with an internal PC. No additional computing device is required to operate INTERNAL PC PILOT X PILOT S Part Number Pilot X: HCPX-I5 Pilot X: HCPX-I7 Pilot S: HCPS 10th Gen. -
Page 16: Tablet Mode L Thumb Strap
Operating the Tablet Tablet Mode For users who want a more touch-friendly experience, removed from the Magnetic Tablet Dock. While in tablet mode, apps will open in full screen, the start menu will replace the desktop, icon sizes will increase, etc. Tablet mode can also be manually switched on or off within the action center on the taskbar. -
Page 17: Using The Pop-Out Keyboard & Digital Keyboard L Using Third Party Accessories
Operating the Tablet 16 Using the Pop-Out Keyboard tablet will connect to the podium’s Pop-Out Keyboard when docked on the Magnetic Tablet Dock. To deploy the keyboard, simply push-in on its front edge and it will automatically extend. To retract, gently push it back into the unit until it locks into place. Using the Digital Keyboard When using the tablet independent of the Magnetic Tablet Dock, the digital keyboard must be used for any typing input. -
Page 18: Document Camera
Document Camera The Pilot X/S tablet comes equiped with a Fold-Out Document Camera. The document camera can be used as a lesson recorder, scanner, webcam, live annotation tool, microscope, show-and-tell device, audio recorder, video logger, and much more. For optimal functionality, use the included Flex 11 software (page 18) to operate the document camera. -
Page 19: Software L Operating
Document Camera 18 Software The tablet comes with two document software programs preinstalled: Flex 11. Questions? Contact HoverCam Technical support for more information at http://www.hovercam.com/support. Flex 11 is a dedicated document camera software for live lesson presentation and annotation, video recording, still image capture, document scanning, digital whiteboarding and much more. -
Page 20: Connecting To A Display: Hovercast
Connecting to a Display: HoverCast HoverCast Wireless HDMI Wireless HDMI Pilot X/S comes equipped with state-of-the-art wireless interactive casting technology called HoverCast. Using the HoverCast Receiver, Pilot X is capable of casting a high Unlike other wireless casting technologies, HoverCast has virtually no loss in image clarity and no noticeable delay does not use a WiFi network or interfere with local WiFi Wireless... - Page 21 Connecting to a Display: HoverCast 20 HoverCast works best when the tablet s HoverCast Wireless Antenna is directly facing the HoverCast Wireless Receiver (which will be placed near the output display). For boosted reception, you can angle the tablet s HoverCast Wireless Antenna forwards by 20º. Increasing the tilt angle of the radio signal can potentially increase signal strength.
-
Page 22: Hovercast Set-Up
Connecting to a Display: HoverCast HoverCast Set-Up While there is no software to set up or passwords to enter, the right steps must be followed in the ology. Install the Receiver: Install the HoverCast Wireless Receiver on or near the intended output display by hand-tightening the retention nut clockwise until the the unit is secure. -
Page 23: Hovercast Faq's L Troubleshooting
Connecting to a Display: HoverCast 22 Switch on the Pilot X/S Tablet via the Tablet Sleep/Wake Button and switch on your output display, making sure the corresponding HDMI input is selected. Next, plug the power line in to turn on HoverCast.The indicator lights will begin a rapid flashing sequence until a connection is formed. -
Page 24: Hovercast Positioning Guide
HoverCast Positioning Guide The HoverCast Wireless Receiver’s front must face Make sure the HoverCast Wireless receiver is not outwards, towards the receiver and away from any walls mounted backwards. The front of the receiver should or cavities. face wherever the tablet will be used most frequently. Front of overCast Rear of overCast Wireless Receiver... - Page 25 HoverCast Positioning Guide 24 Do not tuck the HoverCast Wireless Receiver behind Be sure to mount the HoverCast Wireless Receiver panels or in other enclosed spaces. The receiver should facing away from walls, and in plain sight. be mounted high and within line-of-sight of the antenna. When using with a ceiling-mounted projector, make sure Do not place the HoverCast Wireless Receiver facing the front of the HoverCast Wireless Receiver is directed...
- Page 26 HoverCast Positioning Guide Antenna will llow or aximum ine f ight ith the Antenna can ause ignal HoverCast Wireless Receiver. antenna and receiver. Mount the HoverCast Wireless Receiver as high as Do not mount the HoverCast Wireless Receiver on the possible to aximize ine f ight nd inimize hances...
-
Page 27: Connecting To A Display: Wired 26
Connecting to a Display: Wired 26 The Pilot X/S Tablet can output to an external display using a Type-A to Type-C (Mini) HDMI cable not included). Simply connect the display to the Pilot X/S Type-C (Mini) HDMI-Out on the left side of the Pilot with an HDCP-compatible Type-C (Mini) to Type-A HDMI cable. When used with an interactive display, a USB 2.0 Type A cable can be used to connect the Pilot X/S Tablet Touch-USB port. -
Page 28: Audio Output
Audio Output There are several options for outputting audio from the Pilot X/S Tablet : Built-In Speakers (default) By default, the Pilot X/S Tablet outputs audio through its internal speakers. In the Windows® playback device list, the tablet s internal speakers should be listed as Audio.”... -
Page 29: Tablet / Podium Audio Line In/Out (Wired) L Bluetooth
Audio Output 28 Tablet Audio Line In/Out (wired) The Pilot X/S Tablet features an Audio Line In/Out that can be found on the left side of the tablet. Simply connect the Pilot X/S Tablet to an external audio system with a 3.5mm auxiliary cable. -
Page 30: Built-In Microphone L Auxillary Microphone L Usb Microphone L Bluetooth
Audio Input There are several options for inputting audio to the Pilot X Tablet: Built-In Microphone (default) Tablet features two internal microphones (left and right oriented) that are set as the default audio-input source. They will appear as “Realtek High settings. -
Page 31: Technical Specifications
Technical Specifications INTERNAL PC PILOT X PILOT S Part Number Pilot X: HCPX-I5 Pilot X: HCPX-I7 Pilot S: HCPS Qualcomm SC8180XP 10th Gen. Intel ® Core™ 10th Gen. Intel ® Core™ Processor 2.46GHz Processor i5-1020Y Processor i7-1020Y Processor Operating System Microsoft Windows 10 64-bit (license not included) Microsoft Windows 10 ARM64 (S Mode) Storage... -
Page 32: Service And Support
Service and Support Cleaning and Care When cleaning the HoverCam Pilot X/S, extra care should be given to the touch screen and external components. Glass cleaners are not advised as the moisture may damage or adversely affect touch sensitivity or component functionality. Do not directly spray any liquids (chemicals or clean sealed surfaces while the unit is powered off and unplugged. -
Page 33: Warranty 32
Warranty 32 Limited W arranty: Subject to the terms and conditions set forth below, HoverCam (“HoverCam”) warrants the HoverCam – Wireless Digital Teaching Station (“Product”), you have purchased from HoverCam or from a HoverCam authorized reseller/retailer to be free from defects in materials or workmanship under normal consumer use during the warranty period in the continental United States. - Page 34 Warranty Exclusions This limited warranty does not extend to any Product not purchased from a HoverCam authorized reseller. This limited warranty also does not extend to any product that has been damaged or rendered defective (a) due to normal wear and tear; (b) as a result of use of the Product other than for its normal intended use, or other misuse, abuse or negligence to the Product;...
-
Page 35: Safety Warnings 34
Safety Warnings 34 Power Cords, Power Adapters, Extension Cables, Electrical Outlets WARNING: Use only the power cords and power adapters supplied by the product manufacturer. The power cords shall be safety approved. Never wrap a power cord around a power adapter or other object. - Page 36 Safety Warnings Only recharge the battery strictly according to instructions included in the product documentation. Batteries supplied by HoverCam for use with your product have been tested for compatibility and Battery abuse or mishandling can cause overheat, liquid leakage, or an explosion. To avoid possible injury, do the following: Do not open, dissemble, or service any battery.
- Page 37 Safety Warnings 36 Electrical current safety information WARNING: Electric current from power, telephone, and communication cables is hazardous. To avoid a shock hazard: Do not use your product during a lightning storm. • • of this product during an electrical storm. Connect all power cords to a properly wired and grounded electrical outlet.
-
Page 38: Notices
Notices HoverCam may not offer the products, services, or features discussed in this document in all countries. Consult your local HoverCam representative for information on the products and services currently available in your area. Any reference to a HoverCam product, program, or service is not intended to state or imply that only that HoverCam product, program, or service may be used. -
Page 39: Legal 38
Legal 38 Trademarks HoverCam is a trademark of Pathway Innovations, Inc. in the United States, other countries, or both. Microsoft and Windows are trademarks of the Microsoft group of companies. trademarks of HDMI Licensing LLC in the United States and other countries. - Page 40 Pilot X/S (858) 750-3499 sales@hovercam.com Copyright © 2022 HoverCam ® Pathway Innovations & Technologies 220308...
Need help?
Do you have a question about the HoverCam Pilot X and is the answer not in the manual?
Questions and answers