Advertisement
Quick Links
SESTO SENSO 2 robotic focusing motor
USER MANUAL
VERSION 1.3
Update 24-10-2020
SESTO SENSO 2 is made by PrimaLuceLab SpA (Italy). For any matters relating to the use, service and warranty,
please refer to the addresses given in the relevant documents.
P r i m a L u c e L a b S p A • V i a R o v e r e d o 2 0 / B , 3 3 1 7 0 , P o r d e n o n e
w w w. p r i m a l u c e l a b . c o m
•
Advertisement

Related Manuals for PrimaLuceLab SESTO SENSO 2


Summary of Contents for PrimaLuceLab SESTO SENSO 2
- Page 1 VERSION 1.3 Update 24-10-2020 SESTO SENSO 2 is made by PrimaLuceLab SpA (Italy). For any matters relating to the use, service and warranty, please refer to the addresses given in the relevant documents. P r i m a L u c e L a b S p A • V i a R o v e r e d o 2 0 / B , 3 3 1 7 0 , P o r d e n o n e w w w.
-
Page 2: Quality Control
If improperly handled, SESTO SENSO 2 may damage. So please follow the instructions below: • Do not disassemble • Do not open, damage or subject to electric shock or excessive impact any part of SESTO SENSO 2. Do not drop. • Do not short the electronic elements •... - Page 3 S E S T O S E N S O 2 u s e r m a n u a l Components Identification Contents of the package • SESTO SENSO 2 robotic focusing motor • 5 bushings • Allen keys with grub screws •...
-
Page 4: Technical Specifications
Save the package (it’s in zip format) in the EAGLE or computer you want to use to control the SESTO SENSO 2 and unzip it with the proper unzip software (if you haven’t an unzip software, you can use https://www.winzip.-... - Page 5 Allen screw on the knob. On some plastic-covered focusers, you need to re- move the plastic to access the disassembly screw. Connect one of the bushings you find in the SESTO SENSO 2 box (based on the diameter that fits your focuser) to the small focuser shaft of your focuser.
- Page 6 Finally, use the Allen screw to lock the 3 small grub screws fix the outer ring of SESTO SENSO 2 to your focuser. NOTE: After installing SESTO SENSO 2 on your focuser, check the smoothness of the movement keeping SE- STO SENSO 2 powered off and then manually moving the focus knob of your focuser.
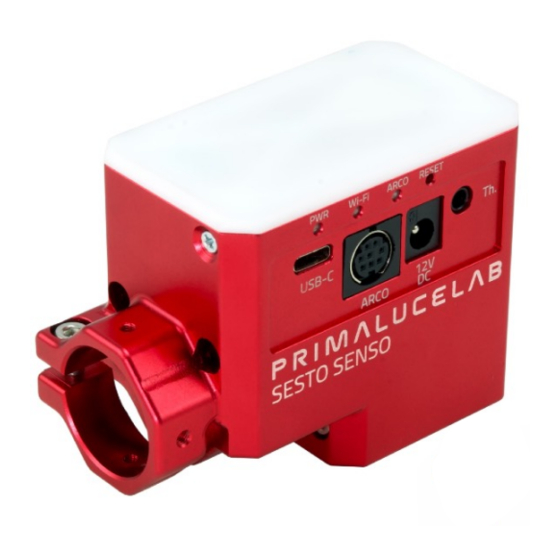
- Page 7 You will see the PWR LED on (this means SESTO SENSO 2 is powered) and, after a few seconds the Wi-Fi LED will be on too and this means that also the SESTO SENSO 2 WiFi connection is ready to be used.
- Page 8 “FOCUSER Manager” (included in the file that you download from the download section of our website) that allows you to control the SESTO SENSO 2 and manage all its functions. Make a double click on FOCUSERManagerSe- tup.exe file to start installation. Click OK to proceed. In the first window that opens, please select your language and...
- Page 9 EAGLE or personal computer assigned to the SESTO SENSO 2. In order to do that, please go to Control Panel -> Device Manager and search for the SESTO SENSO 2 COM port number. This is the num- ber you have to select in the FOCUSER Manager software, before starting the connection.
- Page 10 Before moving SESTO SENSO 2, you have to start the calibration. Please click on the CALIBRATION button and you will see a new window: a) if you installed SESTO SENSO 2 on an external focuser (for example a Crayford or Rack and Pinion focuser), please select“Telescope with external focuser”.
- Page 11 SESTO SENSO 2 motor. b) if you want to SESTO SENSO 2 on an SC type telescope with internal focuser and microfocuser, please select “SCT Telescope with Microfocuser”.
- Page 12 Calibration data is automatically stored in the SESTO SENSO 2 electronics so you don’t need to do it again or you don’t need to make it again if you change the computer to control it.
- Page 13 SESTO SENSO 2 from a smartphone or tablet. SESTO SENSO 2 allows you to change the LED lights intensity and you can even turn them off completely (please note, if you turn them off you won’t be able to check the SESTO SENSO 2 status without controlling it via the provi- ded software).
- Page 14 S E S T O S E N S O 2 u s e r m a n u a l The third option in the SESTO SENSO 2 settings win- dow allows you to change the unit of measurement of temperature from °C (Celsius) to °F (Fahrenheit).
- Page 15 WiFi control, please follow this guide (that has been created on a smartphone with iOS operative system but it’s similar for Android devices) After you power up the SESTO SENSO 2, turn on the WiFi of your device (that can be a smartphone or a tablet). You will see the SESTOSENSO2xxx-...
- Page 16 Moving the SESTO SENSO 2 focuser with the SESTO SENSO 2 Virtual HandPad is very easy. You can do this in different ways: 1. move the slider until you reach the desired position and tap on the GO button 2.
- Page 17 USB port and without power, press the “RST” reset button (keep it pressed for 10 seconds) and, at the same time, connect to power. The SESTO SENSO 2 will reboot and it will be reset to factory settings.
- Page 18 Quick Settings: In order to simplify SESTO SENSO 2 settings, we created some preset profiles from which you can start to create the ideal configuration based on the weight load applied to the focuser and the moving speeds you want.
- Page 19 S E S T O S E N S O 2 u s e r m a n u a l Advanced Settings: In the first set of commands, the operating currents of the SESTO SENSO 2 motor are reported, the values that can be set range from 0 to 10.
- Page 20 Controlling SESTO SENSO 2 with ASCOM drivers and third party softwares In order to control your telescope focus with SESTO SENSO 2 you can also use third party softwares instead of the FOCUSER Manager described in the previous paragraphs. In order to do this, you can use SESTO SENSO 2 ASCOM drivers.
- Page 21 SESTO SENSO 2 and press the OK button. This will start the connection to the SESTO SENSO 2 and you will see position, temperature (if you connect the optional temperature probe) and movement buttons in the “Focus Control” tab (to the right of the above image).
- Page 22 “Focuser” area. This will open a new window asking for the COM port number. Select the COM port related to SESTO SENSO 2 and press the OK button. This will start the connection to the SESTO SENSO 2 and you will see position and temperature (if you connect the optional temperature probe).
- Page 23 COM port number. Select the COM port related to SESTO SENSO 2 and press the OK button. This will start the connection to the SESTO SENSO 2 and you will see position and temperature (if you connect the optional temperature probe). ...
- Page 24 Controlling 2 SESTO SENSO 2 units at the same time Starting by firmware 1.2, you can control 2 SESTO SENSO 2 units at the same time, by using ASCOM drivers and third party software (not with FOCUSER Manager software) that supports the use of more focusers at the same time (in this example we used MaximDL software).
- Page 25 By using FOCUSER Manager (starting by version 1.2) you can also update the SESTO SENSO 2 firmware. In or- der to apply the latest firmware update, SESTO SENSO 2 has to be correctly powered with the 12V port and con- nected to the USB port of the computer where FOCUSER Manager is installed.
- Page 26 Then take the red adapter and connect to your focuser, by fixing it with the provided screws. Then you will be able to connect the SESTO SENSO 2 main body, by following the instructions you at page 4. ...
-
Page 27: Troubleshooting
A: Please check that, after selecting the COM port of your SESTO SENSO 2 focusing motor, you press the “Open/ Close” button. If the SESTO SENSO 2 doesn’t still connect, this may be related to the USB-C cable that is not wor- king. - Page 28 P r i m a L u c e L a b S p A S E S T O S E N S O 2 u s e r m a n u a l Q: When I start my autofocus routine, focusing graph looks flat instead of creating the V-curve. A: This happens when, in the autofocusing routing of the software you choose, the step size is too small.
-
Page 29: Information To Users
The abusive disposal of the product by the user implies the application of the administrative sanctions as per D.Lgs. 152/2006. Compliance with the RAEE legislation (D.Lgs. 49/2014) PrimaLuceLab is registered to AEE Register with number IT17030000009790 PrimaLuceLab adheres to Sistema Collettivo ERP Italia for the com- pliance to RAEE legislation. p a g e 2 8... -
Page 30: Warranty
S E S T O S E N S O 2 u s e r m a n u a l WARRANTY 1) The PrimaLuceLab product warranty is effective from the date of purchase and is valid only if it is with the invoi- ce (or receipt) of purchase. ...
Need help?
Do you have a question about the SESTO SENSO 2 and is the answer not in the manual?
Questions and answers