Advertisement
Quick Links
WAHL
®
H O M E
P R O D U C T S
Keep it Running Like New!
The blades of your new
clipper and trimmer
should be oiled every
few haircuts. For best
results, place three
drops on front of the
blades and one drop on
each side of blade as
shown.
Use only the Wahl Clipper Oil included in the
pack. Do not use hair oil, grease or any oil mixed
with kerosene or any solvent.
Goof- Proof!
Adding Attachment Guards
Align guard onto blade then press down on
guard where guard number is located until you
hear a snap.
Removing
Attachment Guards
From underneath, lift
tab up to release
from blade.
Haircutting Tips & Techniques
Section 4: Top of the head
Section 2: Under the rim
of the head
Haircutting Tips & Techniques
When you cut your hair, you should visualize
the head as if it were divided into four
sections. Image above shows the different
sections. Using proper techniques when
moving from one section to the next will help
you blend the sections together for profes-
sional looking results. See instruction book
for more tips.
Use brush included to clean out excess hair on clipper and between blades (don't clean with running water)
Quick Start Guide
Section 3:The rim or side
Section 1: The neckline
SAFETY FIRST! Please read instruction book first before using clipper
Too Noisy?
(A) Oil blades as noted on this sheet.
(B) The power screw was adjusted for peak
efficiency before leaving the factory. However, if
voltage in your home is too high or low; the
clipper power screw may need adjustment.
Adjust Power Screw to Reduce Clipper Noise
(excessive clattering):
1. Peel back soft grip sleeve on right side of
clipper to expose power screw.
2. Turn your clipper "ON"
3. Use the
end of the detail brush
or a screwdriver to turn
power screw in a
COUNTER CLOCKWISE
direction until clatter
goes away.
Max Power!
Adjusting Power Screw for Max Power Setting
1. Turn your clipper "ON"
2. Use the end of the cleaning brush or a
screwdriver to turn power screw in a CLOCKWISE
direction until you hear a clattering noise.
3. Then turn power screw in opposite direction
(COUNTER CLOCKWISE) until clattering stops.
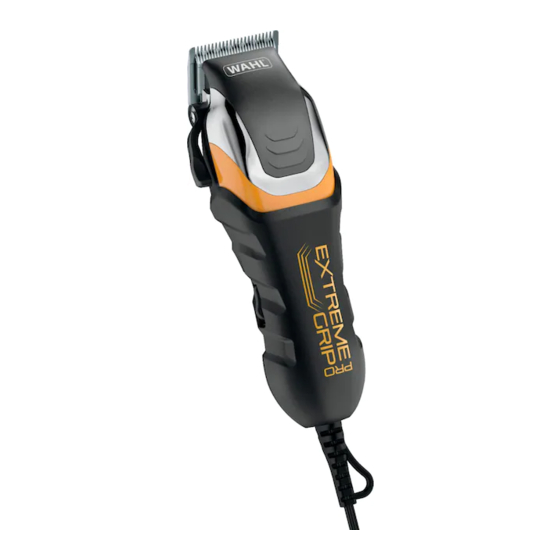
Your New Clipper
Fade Lever
On/Off Switch
Blend it!
Use for blending between different hair lengths.
The fade lever adds versatility to your clipper by
allowing you to gradually change the closeness of
your cut.
Up = closest
Down = longest
Helpful Hints
Blades
Power Screw
Soft Grip Sleeve
Cord
closest
cut
longest
cut
©2018 part no: 92365-2101
v. 06.2018
Advertisement

Related Manuals for Wahl EXTREME GRIP PRO


Summary of Contents for Wahl EXTREME GRIP PRO
- Page 1 1. Peel back soft grip sleeve on right side of clipper to expose power screw. Use only the Wahl Clipper Oil included in the pack. Do not use hair oil, grease or any oil mixed 2. Turn your clipper “ON”...
- Page 2 Thank You! Thank you for purchasing this Wahl haircutting kit. We appreciate your support and we hope you enjoy your new clipper! SMOOTH CUT GUARDS If you have any questions, please Guards for superior comfort & cut quality. contact one of our USA based SECURE SNAP ™...
Need help?
Do you have a question about the EXTREME GRIP PRO and is the answer not in the manual?
Questions and answers