Table of Contents
Advertisement
Quick Links
Advertisement
Table of Contents

Summary of Contents for Perla Barb PBJJ
- Page 1 65cc PERLA BARB TILLER PBJJ USE 25:1 TWO STROKE MIX...
-
Page 2: Table Of Contents
SERIOUS Troubleshooting Guide --------------------- 15 INJURY. Specifications READ AND UNDERSTAND THE RULES FOR Model -- PBJJ SAFE OPERATION AND ALL INSTRUCTIONS IN Overall size (LxWxH )----------35.5x37.5x51cm THIS MANUAL. WEAR HEARING PROTECTION. Dry weight w/o acc--------------14 KGS Engine type -------------------2-stroke fuel. - Page 3 In time due to abrasion , etc. It is your 3. Thoroughly inspect the area where responsibility to replace the decals when they equipment is to be used and remove all become hard to read. . The location of these objects , that can be thrown by the machine.
-
Page 4: Assembly Instructions
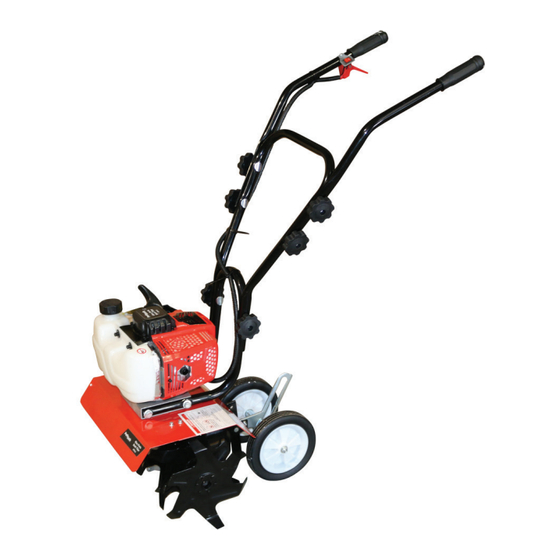
14. Always inspect your unit before each use Don’t leave the engine running while the and ensure that all handles .guards and tiller / cultivator is unattended , stop engine fasteners are secure. Operating, and in before putting the tiller / cultivator down or place . - Page 5 WARNING DANGER IMPROPER ASSEMBLY THIS TILLER Key Description Qty key Description CULTIVATOR CAN RESULT IN SERIOUS INJURY Engine MAKE SURE FOLLOW ALL INSTRUCTIONS CAREFULLY,IF YOU HAVE ANY QUESTIONS CONTACT Middle Safety handle guard YOUR LOCAL REDMAX DEALER. Cap screw wheel 2.How to Assemble Wheels.
- Page 6 2. Remove the clevis pin from the axle assy. Clevis Pin Brocket Assy 3. Remove the axle assy from the Tiller / Cultivator 6. Attach the wheel cup to the wheel assy. Repeat on other side. 4. Place two wheel assy onto the axle assy. Please Notice the direction of the wheel assy.
-
Page 7: Fuel Mix
3. How to assemble handles How to mix fuel: 1. Attach the middle handle to the lower handle 1. Pour 2.5 liters of the gasoline into a safe using the knobs and bolts provided. The knobs container. Do not mix the fuel and oil in should be on the outside. -
Page 8: Starting Instructions
WARNING DANGER FUEL IS EXTREMELY FLAMMABLE. HANDLE IT WITH CARE KEEP AWAY FROM IGITION SOURCES.DONOT SMOKE WHILE FUELING YOUR EQUIPMENT. IMPORTANT NOTE: DO NOT use old or stale oil/gasoline mixture Always use the proper oil/gasoline mixture, If 5.Locate the purge bulb on the upper right of you do not, your engine will suffer rapid, the engine, in the front of the fuel tank. -
Page 9: Additional Information
8. Move the choke lever to the close(choke) Simply push the start / stop switch to “ stop.” position. This will stop the engine instantly. If it should ever fail to do so. Just pull out the choke button. The engine will stop at once. 9. -
Page 10: What To Do Just In Case
Sputters. Open the choke ( push the choke WARNING DANGER button in ) and pull the cord a few times. The IF ENGINE DOES NOT STOP WHEN SWITCH IS PUT engine should start and run. IN THE STOP POSITION. RELEASE THE THROTTLE 2. -
Page 11: Tilling
Step 2 through 6 . Let your tiller / cultivator rock back and forth IMPORTANT NOTE: over the tough spot, until the tines slice Never use starting fluids. Starting fluids will through the weed or root. cause permanent engine damage. Using them WARNING DANGER will void the warranty. -
Page 12: Maintenance
trying to clear them. WARNING DANGER IF YOUR TINES GET JAMMED OR ENTANGLED, SHUT OFF THE ENGINE AT ONCE. REMOVE THE ORSTRUCTION WHILE THE ENGINE IS OFF NEVER TRY TO REMOVE AN OBSTRUCTION WHILE THE ENGINE IS RUNNING. SERIOUS INJURY CAN RESULT Maintenance How to check, Clean and change the air Filter... - Page 13 Intake Air cooling vent Never touch the cylinder, muffler , or spark plugs with your bare hands immediately after stopping the engine . The engine can become very hot when in operation, and doing so could result in severe burns. When checking the machine to make sure that it is okay before using it , check the area around the muffler and remove any...
- Page 14 Maintenance cont. (ENGINE) System / component procedure Before Every Every Every Note hours hours hours Fuel leaks, Fuel spillage Wipe out Fuel tank, air filter, Inspect, clean Replace Fuel filter necessary Idle adjusting screw See adjusting Replace Idling speed carburetor (pg.9) If necessary Spark plug...
-
Page 15: Storage
Storage 11. Store your tiller / cultivator – in an Each fall – or before you store your tiller / upright position – in a clean , dry place, cultivator for any long period – be sure to take 12. Do you have fuel left over from last season ? Dispose of it properly . -
Page 16: Troubleshooting Guide
Troubleshooting Guide Case 1. starting failure check Probable cause Action Fuel tank Incorrect fuel Drain it and fill with correct fuel Fuel filter Fuel filter is clogged Clean Carburetor Out of normal range Adjust to normal range Adjustment screw Sparking (no Spark plug is fouled/wet Clean / dry correct (GAP: 0.6~0.7 Spark) - Page 17 Parts list Tiller / cultivator assembly...
- Page 18 The parts list of tiller / cultivator Key# Part Number Description QTY Key Part Number Description CG415D.3-1 Grip 3WG430.5-2 Washer 3WG430.8-1 Throttle lever GB/T276 Roller bearing GB/T896 Circlip 3.5 GB/T301 Worm thrust bearing GB/T97.1 Washer 5 3WG430-1 Worm shaft 3WG430.8-2 Throttle GB/T9074.13 Bolt M6*18...
- Page 19 Engine assembly...
- Page 20 NO Part no. Part name Part no. Part name...
- Page 21 1E36FE.9-3 Screw 1E36F-3 Wahser B 1E36FE.9-4 Ratchet 1E36F-E-1 Spring 1E36FE.9-1 Starter rope reel 1E40-5.6A-1 Expander 1E36FE.9-5 Starter rope 1E40-5-11 Washer 1E36FE.9-7 Recoil spring 1E40F-5-12 Screw pin 1E36FE.9-8 Starter cover ass’y 1E40F-5-9 Fan cover GB9074.4 Screw M5*20 1E40F-5.9 Oil-seal 1E40FP3-Z.4-2 Start handle GB9074.13 Screw m5*25 1E40FP3-Z.4-10...
- Page 22 qty No. Part no Part name Part no Part name 1E40F-5A-1 Gasket 1E40F-E.1A Carburetor 65-1 Thimble 65-2 Main needle 65-3 Screw 65-4 GB/T823 Ring 3.5 65-5 Turn frame 65-6 GB896 Airproof ring 65-7 Nut m6 65-8 65-9 GB/T6172 Bracket 65-10 Fixed board 65-11 Spring...
Need help?
Do you have a question about the PBJJ and is the answer not in the manual?
Questions and answers