
Summary of Contents for PI S5-TimeServer
- Page 1 S5/S7-TimeServer user manual V1.00 English User manual compatible with software V1.00 or higher! © Copyright by PI 2022...
-
Page 2: Table Of Contents
Content 1 General....................4 1.1 About the manual................4 1.2 Requirements to the user..............5 1.3 Use for intended purpose..............5 1.4 Particularities...................5 2 System requirements................6 2.1 Hardware..................6 2.2 Software...................6 3 Commissioning..................7 3.1 Connect to the device..............7 3.2 Access to the web server..............8 4 Control elements..................9 4.1 status LEDs..................9 4.2 buttons...................10 4.3 web server..................11... - Page 3 5 Technical data..................30 page manual S5/S7-TimeServer V1.00...
-
Page 4: General
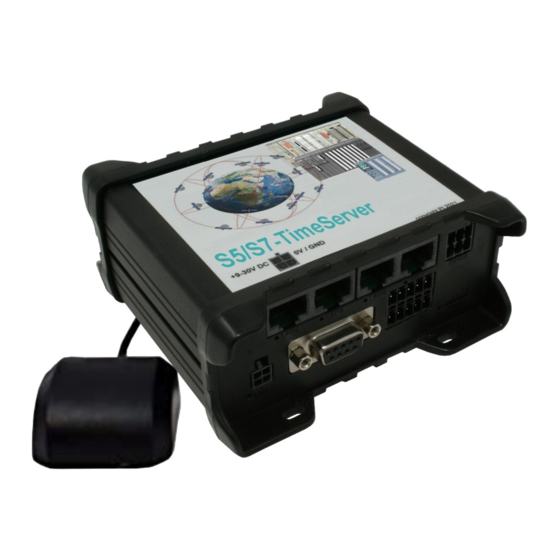
1 General 1.1 About the manual This manual describes the device S5/S7-TimeServer, sometimes only named device within the following pages. The device has build in GPS, WLAN and LTE and is available in an Europe and a World edition. Furthermore the S5/S7-TimeServer has some integrated digital and analog IO ports which can be used for small controlling and messaging tasks additionally to the function as a time server. -
Page 5: Requirements To The User
1.2 Requirements to the user The product / system which belongs to this manual should only be used from qualified staff, which should respect this documentation and the in this documentation included safety and warn notes. Qualified staff has the possibilities due their education and experience to detect risks and possible dangers. -
Page 6: System Requirements
2 System requirements 2.1 Hardware Before you can start to use the device, you have to supply power to it. For this you will need the included plug-in power supply. Furthermore you will need to connect the GPS antenna to device and make sure that you have a GPS signal on the location of the antenna. -
Page 7: Commissioning
3 Commissioning Please make sure that all requirements who are listed within the chapter “System requirements” are met. Afterwards you can connect to the device and then access the web server of it. Important: This chapter describers the factory defaults of the device. Via the web interface you can configure the single interfaces individually, so an access to the web interface is also possible via another interface. -
Page 8: Access To The Web Server
3.2 Access to the web server As soon as your PC has a valid IP address you can now access the integrated web server of your device. For this you have to open a web browser and enter the IP address 192.168.1.1 into the address line. Now you should see the start page of the device. -
Page 9: Control Elements
4 Control elements 4.1 status LEDs The S5/S7-TimeServer has multiple different status LEDs on the front side of the device. The first green LED is located on the bottom left corner next to the power connector and lights when the device is powered. For a simple diagnostic of the RJ45 interfaces every connector has its own green LED. -
Page 10: Buttons
green blinks every 1s LTE connection without data connection lights / blinks LTE connection with data connection (blinks on data transfer) 4.2 buttons The device has a single button on the rear of the case, which can be pressed with the help of the supplied needle or a paper clip. The usage of the button can be individually configured on the web interface from Teltonika. -
Page 11: Web Server
4.3 web server The operation of the device for configuration and status checking is done via the integrated web server. The access to the web server is possible via all enabled interfaces who have an IP configuration. 4.3.1 page structure All pages consists of a header, a footer and a content area. -
Page 12: Access Protection
4.3.2 access protection To avoid an inadvertent change of the configuration as well as enabling, disabling or triggering a time adjust for a station the complete web page can be protected with a password. The configuration of the password is done on the page “configuration”. If an empty password is specified, as it is the case on factory defaults, no password query will be shown and all pages can be accessed directly. -
Page 13: Page Stations
Hint: If you have executed a device restart or the loading of factory defaults, no log out have to be done, because thereby all users are getting logged out automatically. 4.3.3 page stations The page “stations” is the start page of the device and allows you the diagnosis as well as configuration of the PLC stations where a time adjust should be executed. -
Page 14: List With Stations
4.3.3.1 list with stations Every configured station will be shown as one entry in the list. On the left side the symbols shows the current state of the station: time adjust was not executed yet time adjust is currently executed time adjust was executed successfully time adjust was not successful Next to the status symbol the name and IP address is shown in the first... -
Page 15: Settings Of A Station
4.3.3.2 settings of a station If you add a new station or open the settings of an existing station a dialog with the following parameters will be shown: name: A freely definable name for the station which is used for display only. IP address: The IP address of the PLC, the CP or the S5-LAN++ or S7-LAN module. - Page 16 • PLC clock: directly into the hardware clock of the PLC (only S7-300/400) • DB S7 DATE_AND_TIME: into a DB with the S7 format DATE_AND_TIME / DT (only S7-300/400/1500) • DB S7 LDT: into a DB with the S7 format LDT (only S7-1500) •...
-
Page 17: Diagnosis Of A Station
daylight saving time active (bit 0) time adjust executed (bit 0) structure of format “DB ASCII” address description example year (four digits) '2' '0' '2' '2' month (two digits, 1 till 12) '0' '3' day (two digits, 1 till 31) '2' '5' hour (two digits, 0 till 23) '1' '0'... -
Page 18: Page Configuration
last result: The result (success or corresponding error) of the last time adjust. last time adjust: The time of the last time adjust. next time adjust: The time for the next automatically time adjust. With the button “adjust time manually” you can trigger a time adjust for this station manually. -
Page 19: System
4.3.4.1 system The group “system” in the first place shows some information about the device. The update of the software can be done on the page “software update”. With the parameter “device name” you are able to give your device an individual name. -
Page 20: General
4.3.4.3 general Within the area “general” you can execute a restart of your device or set it back to factory defaults. Therefore you only need to click on the corresponding button and confirm the safety message. The button “create file for support” can be used for creating and downloading a file in your browser which contains the configuration and status of your device. -
Page 21: Lan Settings
Hint: On the NTP protocol the UTC time, thus without the time zone, is used always. If needed you will have to configure the time zone on the devices who query the time from the S5/S7-TimeServer separately. 4.3.4.5 LAN settings The settings in this group are used for the network attachment and belong to the LAN interface: MAC address:... - Page 22 When you want to connect the device via the LAN interface do an already existing network you may want to disable the DHCP server, if you don't want that the S5/S7-TimeServer offers IP address to other network participants. Important: Within the delivery status from the S5/S7-TimeServer the device offers an own WLAN network.
-
Page 23: Wlan Settings
4.3.4.6 WLAN settings In the group “WLAN settings” you can specify the configuration of the WLAN interface: deactivate WLAN: Specifies if the WLAN interface should be disabled or not. interface: Specifies if the interface should be used. MAC address: The MAC address of the interface (this value can't be changed). - Page 24 client The device refers an IP address from a DHCP server. server The device is reachable via the specified address and provides IP addresses to other devices. IP address: The IP address of the device. subnet mask: The subnet mask of the device. gateway: The IP address of the gateway (optional).
- Page 25 After a few seconds a list with all available WLAN networks is shown: To select the configuration of one of the founded WLAN networks you have to click on the row of the entry in the table. Now all required fields (mode, SSID, security type and channel) are filled in with the information.
- Page 26 Furthermore you will find the subordinate group “WLAN-AP settings” with some more parameters to configure the WLAN network which is offered by the device from default and belongs to the LAN interface: deactivate WLAN-AP: Specifies if the WLAN-AP should be disabled or not.
- Page 27 If your device does not respond within the next 5 seconds the following message will be shown: This message indicates that the device is currently not available under the current IP address (e. g. because the IP address or the WLAN network has changed).
-
Page 28: Page Software Update
4.3.5 page software update If you want to update the software of your device you should click on the menu item “software update”. On this page you can see your current version of the device and have the possibility to select a file. After you have selected a software file (this is a file with the extension .ipk) you can click on the button, which will starts the update process. - Page 29 If the file was uploaded and verified as valid software, you will see the following message: The update process takes about 1-2 minutes. If the process has completed you should be redirected to the start page automatically. page manual S5/S7-TimeServer V1.00...
- Page 30 5 Technical data Supply voltage: 9-30V DC Power consumption: 7 watt Display: web browser status LEDs Handling/Configuration: web browser Interfaces: 4 x 10/100BaseT RJ45-ethernet-plug (3 x LAN, 1 x WAN) 2 x Antenna-connector RP-SMA(f) (2.4 GHz IEEE 802.11 b/g/n) 2 x Antenna-connector SMA(f) (FDD LTE / TDD LTE / 3G / 2G) 1 x Antenna-connector SMA(f) (GNSS / GPS) 1 x RS485 port via plug-connector...
Need help?
Do you have a question about the S5-TimeServer and is the answer not in the manual?
Questions and answers