
Summary of Contents for Accuris MW9600
- Page 1 MW9600 Microplate Washer User Manual Version 1.1 Accuris Instruments is a division of Benchmark Scientific.
- Page 2 Thank you for purchasing our MW9600 Microplate Washer. This user manual describes how the instrument functions, and also includes an operation guide and important safety information, please read it carefully before operating and keep this manual for future reference. Initial check...
- Page 3 Safety warning and guidelines 1 Important guidelines In order to avoid injury, please read this manual completely before operating the instrument. Pay special attention to all safety tips. This instrument is intended for research only. 2 Safety This product is for indoor use only. Warning: Risk of biological contamination.
- Page 4 Always make sure to use the correct input voltage. If the power cable is damaged, replace it with same type. This instrument should be operated in a low humidity, low dust environment, away from direct sunlight, heat and magnetic fields. Turn off the power and unplug the instrument if not being used for a long period of time.
-
Page 5: Table Of Contents
Chapter 6 Preparing Wash and Waste Bottles............17 Chapter 7 Creating a new wash protocol............... 18 Chapter 8 Running a wash protocol................ 22 Chapter 9 Importing, Exporting and Deleting Programs........25 Chapter 10 Power Off....................28 Chapter 11 Maintenance..................... 29 Chapter 12 Trouble Shooting..................30 Appendix:MW9600 diagram..................31... -
Page 6: Chapter 1 Introduction
Chapter 1 Introduction Chapter 1 Introduction The MW9600 Microplate Washer is an accessory to a Microplate Reader, and is designed for accurate and efficient washing and preparation of ELISA plates prior to reading. The MW9600 is compatible with standard 96-well, SBS-footprint microplates. -
Page 7: Chapter 2 Specifications
Operating temperature range:4C 45C Operating relative humidity:≤70% Power supply: AC 90-240V 50/60Hz Parameters and features Parameters Model MW9600 Wash heads 8 channel or 12 channel Wash modes 1 point,2 point,or 3 point aspiration Compatible Micro 96 wells, standard SBS dimensions... -
Page 8: Chapter 3 Instrument Overview
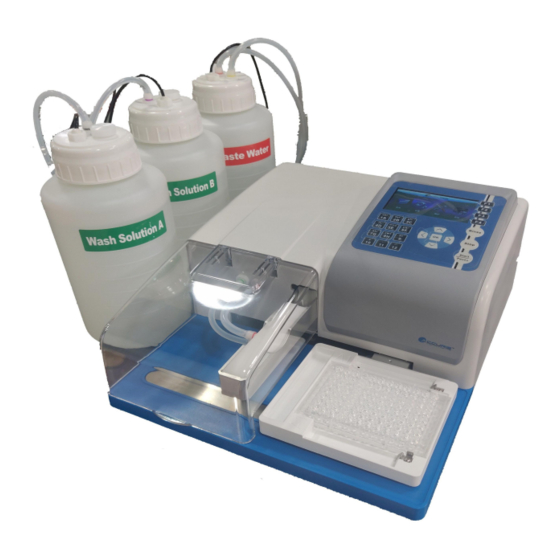
Microplate Washer User Manual Chapter 3 Instrument Overview Chapter 3 Instrument Overview Wash bottle A Wash bottle B Wash bottle R Waste bottle W Transparent Cover LCD display Wash Display housing Rear housing Plate holder Platform ─ ─... - Page 9 Bottle R fluid level warning Bottle W fluid level warning Connect a flash drive to the USB port to transfer programs between USB port different MW9600 washers. Wash head 2 wash heads available:1X8 channel and 1X12 channel: 1X8 channel wash head 1X12 channel wash head ─...
-
Page 10: Chapter 4 Installation
Microplate Washer User Manual Chapter 4 Installation Chapter 4 Installation Initial Inspection Thoroughly check the package and instrument upon receipt. Please contact your distributor or Benchmark Scientific immediately if: The package has been damaged or deformed during shipping. The packaging is wet. ... - Page 11 Microplate Washer User Manual Chapter 4 Installation Wash head installation Connect the silicone tubes per the following picture: Insert the wash head into the rack and connect the silicone tubing to instrument as pictured below. (1X8 and 1X12 wash heads are installed in the same manner). ─...
- Page 12 Microplate Washer User Manual Chapter 4 Installation Wash bottles connections: Connect bottle tubing and level detection lines according to the charts: Instrument Instrument Silicone Tube Level detection Connection Color Connection from: line: Port Port Bottle W Bottle A fluid level Non- Alert A non-pressure...
-
Page 13: Chapter 5 Start Up And Software
Microplate Washer User Manual Chapter 5 Start Up and Software Chapter 5 Start Up and Software Start Up Self-Test When the power is first turned on, the system will perform a quick self-test. Do not turn off the power, or insert or remove a flash drive during the self-test. - Page 14 Microplate Washer User Manual Chapter 5 Start Up and Software Browse with the direction keys. Push and hold any key for the cursor to move faster in the direction you choose. F1, F2, F3, F4 are shortcut keys. Push the start/Pause button in the main menu, it will start to run the program;...
- Page 15 Microplate Washer User Manual Chapter 5 Start Up and Software The bold numbers and letters on the keypad correspond to the columns of wells on the ELISA plate when selecting the columns to be washed. Numbers 1-12 are used for the 1x8 head, letters A to H when using the 1x12 head).
- Page 16 Microplate Washer User Manual Chapter 5 Start Up and Software See Chapter 7 for Creating a wash program and Chapter 8 for Running a wash program 2. Settings: Setting options include: Purge volume setting, sensor setting, injection index, beeper switch setting, and purge at power on. Purge Volume setting: Choose “Purge Volume”...
- Page 17 Microplate Washer User Manual Chapter 5 Start Up and Software Liquid Sensor: This allows turning on or off the sensors A, B, and R. Note: Sensor W for Waste Liquid Level cannot be set to off. Injection Index: This is for calibrating the set dispensing volume. The range of the Injection Index is 0-2.00, and can be adjusted in increments ±0.01.
- Page 18 Microplate Washer User Manual Chapter 5 Start Up and Software recommended that wash solution bottle R is filled with distilled water, and this is used for rinsing after using the microplate washer. It is recommended to use the rinse function before powering off the instrument if it will not be used for a while.
- Page 19 Microplate Washer User Manual Chapter 5 Start Up and Software Left deviation: Left deviation means the distance between the starting position of the dispensing needle to the center of the left row of wells of the micro plate. Choose the left deviation function in the calibration menu, then push OK button.
- Page 20 Microplate Washer User Manual Chapter 5 Start Up and Software Top deviation allows adjusting the distance between the wash head bottom to the photoelectric switch. Choose the top deviation function in the calibration menu, then push OK button to enter. Push UP and DOWN to adjust the distance. The distance between the needle bottom and the top of the micro plate should be approximately 2-3mm.
- Page 21 Microplate Washer User Manual Chapter 5 Start Up and Software 4. System: The System Menu includes date & time settings, language setting, reset and system upgrade. Available languages: English and Chinese. Reset: All settings will be restore factory settings if press “Reset”,except calibration interface,Time&Date,and languages setting .
-
Page 22: Chapter 6 Preparing Wash And Waste Bottles
Microplate Washer User Manual Chapter 6 Preparing Wash and Waste Bottles Chapter 6 Preparing Wash and Waste Bottles Filling, washing, and connecting bottles Unscrew the bottle caps, fill or empty the bottles with appropriate solutions as required. Screw the caps firmly onto each bottle, and securely connect the tubing to the bottles and appropriate ports on the instrument. -
Page 23: Chapter 7 Creating A New Wash Protocol
Microplate Washer User Manual Chapter 7 Creating a new wash protocol Chapter 7 Creating a new wash protocol Starting from the Protocol File List interface, press the function button F1 to choose “New” to create a new wash protocol. It is also possible to open an existing protocol from the list, and then modify is as needed. - Page 24 Microplate Washer User Manual Chapter 7 Creating a new wash protocol Well Type: can be set per the shape of the well bottoms on the microplate to be used. Wash Head: Choose the wash head that is installed (1x8 or 1x12 channel) Steps: Selecting the “Steps”...
- Page 25 Microplate Washer User Manual Chapter 7 Creating a new wash protocol Wash Liquid: Choose the wash liquid from bottle A, B, or R, the default is B. Wash Volume (µL): Set the wash solution volume to be dispensed per well, from 50μl to 2000μl, in increments of step by 50μl.
- Page 26 Microplate Washer User Manual Chapter 7 Creating a new wash protocol on the well type selected. One position: There is one aspiration position in the center of the well. Two positions: There are two positions, left and right on the well bottom. Three positions: There are three positions, left middle and right.
-
Page 27: Chapter 8 Running A Wash Protocol
Microplate Washer User Manual Chapter 8 Running a wash protocol Chapter 8 Running a wash protocol Note: Before running a wash protocol, make sure that the dispensing lines and washing heads are properly purged and free of bubbles. Use the Rinse function to purge the dispensing lines to be used. - Page 28 Microplate Washer User Manual Chapter 8 Running a wash protocol Cancel a run If any errors occur during a wash run, the instrument will automatically stop, and an error warning will appear on the display. Pressing the “Stop” button will also stop the instrument. Fluid level warning During a programmed run, a warning window at the bottom of the display shows fluid level status of each bottle (A,B,R and W), the sensors in the...
- Page 29 Microplate Washer User Manual Chapter 8 Running a wash protocol Using Rinse function to prime the tubing and wash heads press the Rinse button on the panel. Starting from the Maintenance/Wash interface, This will initiate a priming rinse of the selected tubing (from bottle A, B, or R) and will run for the selected time.
-
Page 30: Chapter 9 Importing, Exporting And Deleting Programs
Microplate Washer User Manual Chapter 9 Importing, Exporting and Deleting Programs Chapter 9 Importing, Exporting and Deleting Programs Import programs from a USB flash drive Insert the USB flash drive From the Program File List interface, press the F3 button (Impt&Expt). The below dialog box will be displayed. - Page 31 Microplate Washer User Manual Chapter 9 Importing, Exporting and Deleting Programs Select the protocol to import, and then press F1 to import. Export protocol Insert a USB flash drive From the Program File List interface, press the F3 button (Impt&Expt) on the panel and a dialog box will open stating “USB Drive Found”.
- Page 32 Microplate Washer User Manual Chapter 9 Importing, Exporting and Deleting Programs Select the protocols to export, then press F1 to complete the export to the USB flash drive. Delete programs From the Program File List interface, highlight a protocol to delete, and press the F2 button (Delete) to delete the file.
-
Page 33: Chapter 10 Power Off
Microplate Washer User Manual Chapter 10 Power Off Chapter 10 Power Off Steps for powering off Remove the plate from the plate holder. Rinse the tubing with rinse solution (it is recommended to use bottle R for rinsing, and this bottle to be filled with distilled water). From the Protocol interface, press “Rinse”, and select rinsing from bottle R. -
Page 34: Chapter 11 Maintenance
Microplate Washer User Manual Chapter 11 Maintenance Chapter 11 Maintenance Tubing maintenance The Rinse function can be used to clean out the tubing. Wash head maintenance and cleaning Remove the wash head and detach the silicone tubing, remove the sealing screws at the ends of the wash head, submerge the wash head to into 75% alcohol to water solution. -
Page 35: Chapter 12 Trouble Shooting
Microplate Washer User Manual Chapter 12 Trouble Shooting Chapter 12 Trouble Shooting Faulty phenomenon Possible Causes Solution Power connection Check the power connection Fuse blown Replace the fuse Display not lit when powered on Switch damaged Change the switch Screen damaged Contact Service Buttons not reacting Control panel damaged... -
Page 36: Appendix:mw9600 Diagram
Microplate Washer User Manual Appendix Appendix:MW9600 diagram Power switch Drive board Main Interface Main board Sensors Photoelectric switches Solenoid valves Liquid pump pump Y-axis motor X-axis motor ─ ─... - Page 37 Note ─ ─...
Need help?
Do you have a question about the MW9600 and is the answer not in the manual?
Questions and answers