Table of Contents
Advertisement
Quick Links
V
V
Dear User, Thank you for choosing and using our Parking sensor. We are going to
provide the best products and the best services to you.
To insure the best performance and avoid any false alarm or function failure, please
kindly read this manual carefully and install accordingly.
We reserve all rights for our parking sensor, including the designs and the software.
Any unauthorized copy or translation is prohibited. And the products' specification and
information related in the Manual provide the references only, and the content of the
Manual will be renewed according to the process of the products without advance
information, and the final explaination rights of the Manual is reserved by us.
Please note that this system is designed to be a driver's aid and should not replace
the need to drive carefully, we accept no liability for damage or loss resulting from
importer installation or use of this product, infringement of the vehicle manufacturer's
warranty or injury or loss resulting from any accidents however caused. If in doubt
please consult aqualified auto electrician.
Date: 15/04/2014
i
d
e
o
P
a
r
i
d
e
o
P
a
r
Ord.code: KL30944
k
i
n
g
S
e
n
k
i
n
g
S
e
n
s
o
r
s
o
r
Page 1/7
NM_KL30944_000_15042014_EN
Advertisement
Table of Contents

Summary of Contents for Molpir KL30944
- Page 1 Ord.code: KL30944 Dear User, Thank you for choosing and using our Parking sensor. We are going to provide the best products and the best services to you. To insure the best performance and avoid any false alarm or function failure, please kindly read this manual carefully and install accordingly.
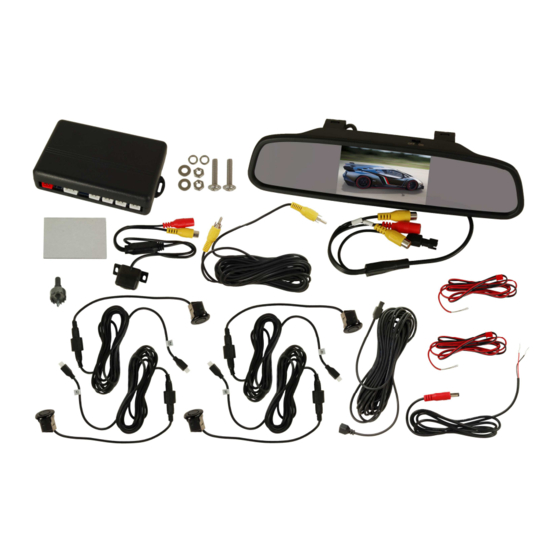
- Page 2 Packaging list Display Sensors Cables Drill bit Control unit Camera Manual Function 4.3“ TFT monitor can display the back image 2 ways video input, one is connect to the back camera, the other is connect to the DVD/VCD The 4 sensors can detect obstacles when reversing, and show the obstacle distance colorfully in monitor, step-up buzzer alarm.
- Page 3 Option A Display Back-up Light Camera Option B Sensors Control Box Monitor Red to back-up light +12V Black to GND Parking Sensor Camera Red to ACC +12V Black to GND Sensor Tools Small flat-tip Screwdriver Drill #2 Phillips Screwdriver Tape Measure Drill Bit Pliers Multimeter...
- Page 4 Sensor Installation Masking Tape 30~40cm 50~80cm Mark idealy:55cm First locate where you are goingto intall the sensors and place a piece of masking tape. Measure and mark the position of the holes. Nothing Blocking Make sure that there is Drilling position must be As you push, wiggle the nothing blocking the area perpendicular...
- Page 5 In some special cases, the display may not be the same as the real condition due to the sensor position, obstacle shape, reflection condition and so on. Some examples are given below If the vehicle is equipped with If another vehicle bumper is too high-power radio antenna.
- Page 6 Rearviev mirror Installation Prepare for installing Installing Installed Please put this product is properly installed in your car on the original rearview mirror. Control Box Installation Camera Remove the necessary back Pls adjust the available panels to mount the control angle for the camera once box in a safe place, away finish installing...
- Page 7 5. Do you have a minimum of (+) 12V and ground at the display? False warning tone or false display. 1. Is the sensor mounted too low or pointing to the ground? Sensor do not detect any objects. 1. Is the vehicles exhaust smoking? Correct or allow it to clear before procedding with testing.
Need help?
Do you have a question about the KL30944 and is the answer not in the manual?
Questions and answers