Table of Contents
Advertisement
Quick Links
Advertisement
Table of Contents

Related Manuals for Sovereign GT5614


Summary of Contents for Sovereign GT5614
- Page 1 Hand Push Cylinder Mower GT5614 OPERATING INSTRUCTIONS Sep 2014 Rev A...
-
Page 2: Safety Instructions
ORIGINAL INSTRUCTIONS INTRODUCTION Avoid injury, do not place hands or feet Thank you for purchasing a Hand Push near the rotating blade. Cylinder Mower . We would you like to be completely satisfied with your new product and hope you will enjoy using this tool for many years. -
Page 3: Work Area Safety
ORIGINAL INSTRUCTIONS i) Do not put hands or feet near rotating parts while the mower is being operated. 4. MAINTENANCE a) Keep all nuts, bolts and screws tight to be sure the equipment is in safe working condition. b) Check the grass catcher frequently for wear or deterioration. - Page 4 ORIGINAL INSTRUCTIONS Customer Helpline 01904 727503 www.gardenservicecentre.co.uk...
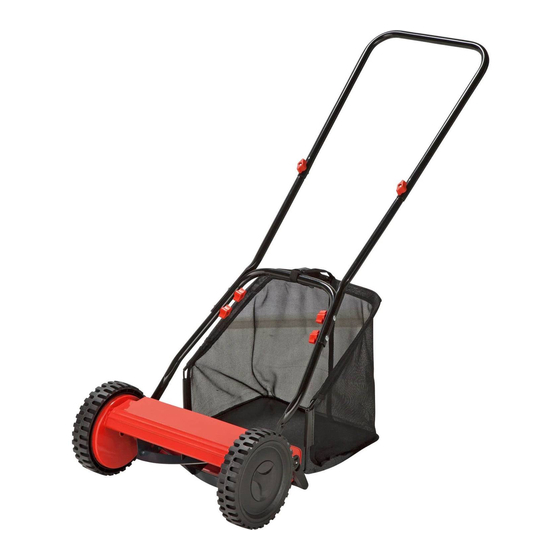
- Page 5 ORIGINAL INSTRUCTIONS 1. Upper handle 2. Handle extensions 3. Lower handle 4. Cylinder blade 5. Mower body 6. Grass collecting box 7. Cutting height adjustment knob 8. Wheels 9. Grass collecting box support strap Customer Helpline 01904 727503 www.gardenservicecentre.co.uk...
-
Page 6: Fitting The Handle
ORIGINAL INSTRUCTIONS 7. USE AND CARE Slide the upper handle over the two handle extensions until the holes are lined up, then a) Do not force the machine. Use the correct secure using the nuts and screws provided. machine for your application. (See Fig.A) The correct machine will do the job better and safer at the rate for which it was designed. - Page 7 ORIGINAL INSTRUCTIONS Fig.B3 Fig.D1 Insert the metal frames into the plastic holes (See Fig.D2, D3 & D4) Fig.C Fig.D2 Now the handle is fully assembled, and ready to be attached to the mower head. To attach the handle to the mower head, locate the two metal lugs found forward of the cutting bar adjustment knobs.
- Page 8 ORIGINAL INSTRUCTIONS Wrap the metal frams by the plastic hems (See WARNING! Fig.D5, D6 & D7) The grass collection box must be fitted before using the mower. Attach the box to the lawn Fig.D5 mower body by sliding the holes in them front of the box over the attachment hooks in front of the cutting height roller, also fit the grass box support strap such that the rear of the box is...
-
Page 9: Adjusting The Cutting Height
ORIGINAL INSTRUCTIONS FIXED BLADE SETTING EMPTYING THE GRASS COLLECTING BOX Caution: This operation will have to be done whilst carefully turning the cylinder blade. We strongly recommend that thick gardening gloves are worn. The fixed blade must be set correctly in order for the lawnmower to work efficiently. -
Page 10: Techinical Data
After mowing/storage clean the exterior of the machine thoroughly using a soft brush and cloth. Do not use water, solvents or polishes. Store the lawnmower in a dry place. Do not place other objects on top of the machine. TECHINICAL DATA Model No. GT5614 Grass collecting box 23 litres Cutting width 30cm... - Page 11 ORIGINAL INSTRUCTIONS 8. Examine the blade edges. If they look sharp, wash off all the valve compound with soapy water and rinse thoroughly. 9. Test for sharpness. Insert a sheet of newspaper between the blades and the cutting bar, and rotate the reel forward.
Need help?
Do you have a question about the GT5614 and is the answer not in the manual?
Questions and answers