Advertisement
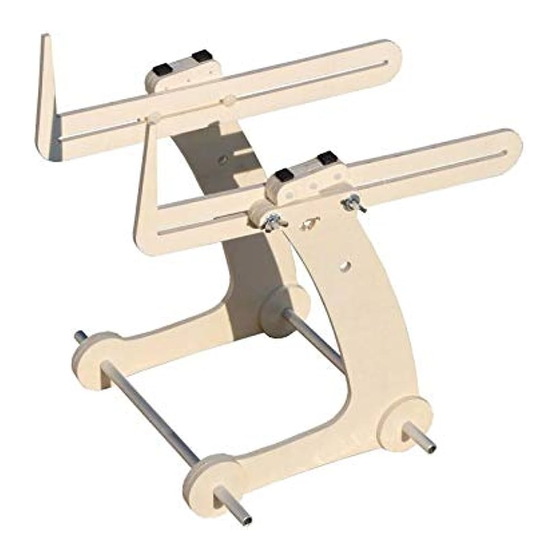
Schwerpunktwaage
# C3363
Balance Scale
Balance centre de gravité
Bilancia baricentro
---------------------------------------------------------------------------------------------------------------------------------------------
[DE] ANLEITUNG
1. Lösen Sie die Bauteile mit einem scharfen Messer aus (Abb. 1) und schleifen Sie die Kanten z.B. mit der
Extron Sandpapierfeile (Abb. 2).
2. Kleben Sie die runden Scheiben mittig mit Holzleim an die Stützen (Abb. 3). Nach dem Trocknen können
Sie mit einem Bohrer (falls nötig) die Holzteile aufbohren und so die Alurohre exakt einpassen (Abb. 4).
Die Alurohre sollten verschiebbar bleiben aber nicht in den Löchern wackeln.
3. Montieren Sie die Längsträger an die Stützen (Abb.5).
4. Bauen Sie eine Wippe aus den drei Holzteilen (Abb.6) und stecken Sie die Schrauben durch (Schrauben
evtl. kürzen). Lagerbuchsen in die Bauteile entsprechend einsetzen, auf Leichtgängigkeit achten.
5. Wir empfehlen die Schwerpunktwaage zur Imprägnierung gegen Schmutz und Feuchtigkeit mit PALETTI
Klarklack zu lackieren (Abb. 7).
6. Kleben Sie zum Schutz der Tragflächen Moosgummistücke auf die Wippe (Abb. 8).
Um den Schwerpunkt am Flugmodell auszuwiegen setzen Sie das fertig montierte, flugfertige Modell auf
die Schwerpunktwaage mit den Tragflächen bis zum Anschlag. Stellen Sie den gewünschten Schwerpunkt
auf beiden Seiten der Schwerpunktwaage millimetergenau ein (Die genaue Angabe des Schwerpunkts
erhalten Sie von Ihrem Modellhersteller). Wenn das Modell genau ausbalanciert in der Waage liegt,
stimmt der Schwerpunkt. Hängt das Modell nach hinten, ist es schwanzlastig bzw. wenn das Modell nach
vorne hängt ist es kopflastig. Bei Elektromodellen hilft häufig das Verschieben des Flugakkus. Ansonsten
muss entweder vorne oder hinten Trimm Ballast (Abb.9) hinzugefügt werden.
---------------------------------------------------------------------------------------------------------------------------------------------
[DE] INSTRUCTIONS
1. Loosen the components with a sharp knife (Fig. 1) and grind the edges, e.g. with the Extron sandpaper file (Fig. 2).
2. Glue the round discs to the center of the supports with wood glue (Fig. 3). After drying, you can drill out the wooden parts with a
drill (if necessary) and thus fit the aluminum tubes exactly (Fig. 4). The aluminum tubes should remain movable but not wobble in
the holes.
3. Assemble the side members to the supports (Fig.5).
4. Build a seesaw out of the three wooden parts (Fig. 6) and insert the screws (shorten the screws if necessary). Insert the bearing
bushes into the components accordingly, making sure they move easily.
5. We recommend painting the balance scales with PALETTI clear coat to impregnate them against dirt and moisture (Fig. 7).
6. Glue pieces of foam rubber to the rocker to protect the wings (Fig. 8).
In order to weigh the center of gravity on the flight model, place the fully assembled, ready-to-fly model on the center of gravity
balance with the wings up to the stop. Set the desired center of gravity on both sides of the center of gravity scales with millimeter
precision (you can get the exact details of the center of gravity from your model manufacturer). If the model is exactly balanced,
Advertisement
Table of Contents

Subscribe to Our Youtube Channel
Related Manuals for Pichler C3363

Summary of Contents for Pichler C3363
- Page 1 Schwerpunktwaage # C3363 Balance Scale Balance centre de gravité Bilancia baricentro --------------------------------------------------------------------------------------------------------------------------------------------- [DE] ANLEITUNG 1. Lösen Sie die Bauteile mit einem scharfen Messer aus (Abb. 1) und schleifen Sie die Kanten z.B. mit der Extron Sandpapierfeile (Abb. 2). 2. Kleben Sie die runden Scheiben mittig mit Holzleim an die Stützen (Abb. 3). Nach dem Trocknen können Sie mit einem Bohrer (falls nötig) die Holzteile aufbohren und so die Alurohre exakt einpassen (Abb.
- Page 2 the center of gravity is correct. If the model hangs backwards, it is tail-heavy or if the model hangs forwards, it is top-heavy. With electric models, moving the flight battery often helps. Otherwise either front or rear trim ballast (Fig.9) must be added. --------------------------------------------------------------------------------------------------------------------------------------------- [FR] INSTRUCTIONS 1.
- Page 4 PICHLER Modellbau GmbH 84307 EGGENFELDEN GERMANY www.pichler-modellbau.de www.extron-modellbau.de...
Need help?
Do you have a question about the C3363 and is the answer not in the manual?
Questions and answers