Table of Contents
Advertisement
Quick Links
WELCOME TO THE WORLD OF
Congratulations you have joined one of the many people who have chosen the HomeMix TT-1000M for all their mixing needs. As usual we ask you to
study this entire manual to familiarise yourself with the operating controls of the unit, however we also realise that most people only read this manual
when something goes wrong! So especially for you, we have provided the following easy to understand 'fast set up diagram', plus we have included a
separate 'fast set up sheet', which will ensure you are mixing in the fastest possible time. For further in depth knowledge of how to use the HomeMix
TT-1000M, please read the contents of this manual in its entirety, taking special note of the next two pages which list some very important safety
information.
CONTENTS
Pg1 Welcome
1
Advertisement
Table of Contents

Summary of Contents for HomeMix TT-1000M
-
Page 1: Table Of Contents
WELCOME TO THE WORLD OF Congratulations you have joined one of the many people who have chosen the HomeMix TT-1000M for all their mixing needs. As usual we ask you to study this entire manual to familiarise yourself with the operating controls of the unit, however we also realise that most people only read this manual when something goes wrong! So especially for you, we have provided the following easy to understand ‘fast set up diagram’, plus we have included a... -
Page 2: Pack Contents
PACK CONTENTS 1) 2 x HomeMix TT1000 turntables containing: • Turntable Platter • Slip Mat, Dust Cover • 45-RPM adaptor • Counterweight • Headshell • RCA Phono + Ground Lead 2) 1 x Mix2 DJ Mixer containing 9v AC Power supply •... -
Page 3: Before Use
BEFORE USE LINE VOL T AGE SELECTION The desired voltage may be set with the VOLTAGE SELECTOR switch on the chassis, using a screwdriver. Do not twist the VOLTAGE SELECTOR switch with excessive force as this may cause damage. If the VOLTAGE SELECTOR switch does not move smoothly, please contact a qualified service centre. -
Page 4: Safety Instructions
SAFETY INS TRUCTIONS PLUG FITTING INS TRUCTIONS (UK; TT1000 Only) For your convenience a mains plug with a fuse has been fitted to this appliance. For your safety please observe the following information. 1. Should the fuse fail in the plug remove the plug from the wall socket and replace the fuse with a 3 Amp ASTA approved BS1 362 fuse. -
Page 5: Features: Tt1000
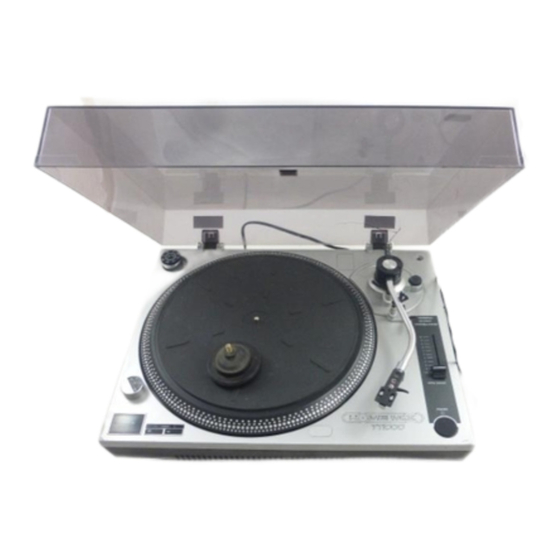
FEA TURES: TT1000 1) Large spindle adaptor - for use with 14) Counterweight - allowing the correct 8) Speed select button - Change the speed of records (vinyl) that have a large aperture. tracking weight to be excerted on the stylus the platter between 33 1/3 and 45 RPM. -
Page 6: Turntable Setup
TURNT ABLE SETUP 1. Attach the belt: Turning the platter over, connect the belt to the turntable drive. Place the platter on the spindle and spin the platter until the belt position holes (the two larger holes nearest to the belt) are showing the motor drive shaft in the top right corner. -
Page 7: Features: Mix 2 Top Panel
FEA TURES: MIX 2 TOP PANEL 1. Channel 1 gain - allows adjustment of the input level for different sources to match signals before mixing. 2. Channel 1 treble & bass controls - allows adjustment of the high and low frequencies of the music content. 3. -
Page 8: Features: Mix 2 Rear Panel
FEA TURES: MIX 2 REAR PANEL use this connection when using turntables. Your 16. Power connector - input socket to connect turntable cable should have a grounding wire, if 9v AC power adaptor supplied. this is not connected you will hear a loud buzz 17. -
Page 9: Setup Diagram
SETUP DIAGRAM The Mix2 will allow you connect two turntables and two line input sources. It is necessary to connect the Mix2 to an external amplifier for correct sound reproduction. ��� ������ Study this setup diagram. Make sure all faders are at “zero”... -
Page 10: Getting Going
GETTING GOING PRODUCING SOUND Having ensured that all connections to the Mix2 and TT1000s are correct, and that a record (vinyl) is FROM THE TT1000M playing on the TT1000, you are now able to produce sound from the system. Initially we suggest that the master level control (15, Pg 7) is adjusted to approximately 10 o’clock (a third of its travel). - Page 11 GETTING GOING USING THE CROSSFADER The Mix2 is equipped with a user replaceable crossfader (5, Pg 7). The function of the crossfader is to allow a seamless mix from one music channel to the other by moving the crossfader from one side to the other. If the crossfader is placed in its central position both Ch 1 and 2 can be heard.
- Page 12 GETTING GOING Having plugged the microphone in to the socket (1, Pg 7) on the front of the Mix 2, USING THE it is now ready for use. MICROPHONE There is one control on the Mix2 which will effect the microphone: Mic level control (11, Pg 7).
-
Page 13: Troubleshooting
TROUBLESHOOTING This section of the manual is designed to help you if you are experiencing problems with the HomeMix TT1000M mixing kit unit: PRODUCTS DO NOT POWER UP • check to ensure the mains plug is pushed firmly into the wall, and the other end is secure in the back of the turntable and mixer. - Page 14 (11, Pg 7) is raised. GET IN TOUCH These are basic troubleshooting areas, if you are still experiencing problems with your HomeMix unit, then please call our helpline where an operator will be happy to assist:...
-
Page 15: Specifications
SPECIFICA TIONS MIX 2 SENSITIVITY OF INPUT (LEVEL/IMPEDANCE): LINE -14dB / 12KΩ ±3dB PHONO -50dB / 47KΩ ±3dB -54dB / 3KΩ ±3dB OUTPUT (LEVEL/IMPEDANCE): MASTER (RCA) 0dB / 47KΩ ±3dB PHONES (LOAD=32Ω) -3dB / 33KΩ ±3dB MAX. OUTPUT (LOAD=47K, THD=5%) MASTER (RCA) MORE THAN 18dB (8V) PHONES (LOAD=32Ω)
Need help?
Do you have a question about the TT-1000M and is the answer not in the manual?
Questions and answers