Table of Contents
Advertisement
Quick Links
Advertisement
Table of Contents

Summary of Contents for rock space C1
- Page 1 Smart Wireless Camera Model No. C1 User Manual...
-
Page 2: Table Of Contents
Contents 1. In the box -----------------------------------------01 2. Product overview -----------------------------02 3. Specifications ----------------------------------03 4 . Charge the camera -------------------------------03 5. Indicator light status -------------------------03 6. Set up the camera -------------------------------04 7. Select a good spot-------------------------------07 8. Mount the camera------------------------------08 9. Share the camera------------------------------10 10. -
Page 3: In The Box
Thank you for choosing rock space! Please read over this User Manual before using your camera. If you have any questions, please visit https://rockspaceworld.com or contact us at service@rockhomelife.com to find help and more information. In the box 1. Camera *1 2. -
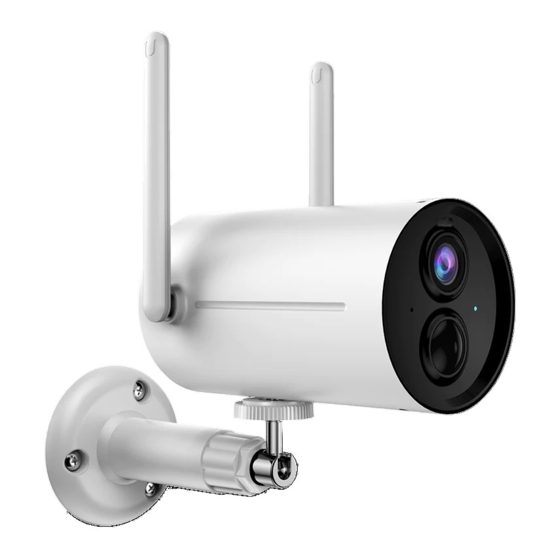
Page 4: Product Overview
Product overview Wi-Fi antenna Spotlight Lens Indicator light Infrared light Infrared human body sensor Micro-USB port Power button Reboot button DC-5V Micro-SD card... -
Page 5: Specifications
Specifications Item Status Horizontal: 96° Vertical: 56° Field of view Diagonal: 128° Image resolution Max. 1920×1080 Video bitrate Adaptive Storage media Micro SD card (Up to 128GB) Battery capacity 9000mAh Adapter requirement 5V/1.5A Size 71.2×93.4×121.2 (mm) Charge the camera Before you mount the camera on a wall or ceiling, make sure your camera is fully charged. -
Page 6: Set Up The Camera
Set up the camera 1. Download rockhome All the functions can be performed using the rockhome app. Get the app from the App Store or Google Play, or scan the QR code below to download directly. Get it on Google Play Download on the App Store Scan for rockhome... - Page 7 Power button 4. Add the camera Click Add Camera Now in the rockhome app and follow app instructions to configure your camera and add it to your network. Note: To ensure a long distance connection, the camera only supports 2.4 GHz Wi-Fi with stronger wall penetration capability and does not support enterprise Wi-Fi.
- Page 8 Troubleshooting When you hear "Wi-Fi Password Error", please check whether the Wi-Fi password you entered in the rockhome app is correct; When you hear "Authentication error", please ensure that your Wi-Fi network is not an enterprise network, and the camera supports only the network with a security level below WPA-2;...
-
Page 9: Select A Good Spot
Select a good spot Select a good spot for your camera, place or install the camera in a position where its view is not blocked, and ensure that it is within the coverage of your Wi-Fi network. Check your camera's video stream with the rockhome app. -
Page 10: Mount The Camera
Mount the camera You can simply place the camera on a horizontal surface like a shelf or you can mount it to the mounting plate. 1. Install the mounting plate Hold the plate against where you want to mount your camera and mark the holes with a pencil. - Page 11 2. Fix the camera Align the bracket screw with the screw hole of the camera and then rotate it clockwise to tighten the camera. 3. Adjust the view Use the rockhome app to check the view while you adjust the camera angle.
-
Page 12: Share The Camera
Share the camera The one who set and configure the camera is the administrator. If you are the camera's administrator, you can share the camera with up to 50 members at no extra cost. Members can access live stream and playback, and talk to people near the camera. 1) Find the camera you want to share on rockhome app homepage or camera setting page. - Page 13 2) Tap Camera sharing, and a QR code will be generated for sharing. Camera sharing...
- Page 14 3) For the member you want to share, go to rockhome app and tap Add Friend's Camera on the User page. Then scan the QR code. abcc@gmail.com 4) The administrator will receive a request after the member scans the QR code, tap Accept. Now the member can view the camera's stream in their own app.
-
Page 15: F I R M W A R E U P G R A D
"location permission" for the app in the system settings and change it to "allow when using." Q2: How rock space cameras store recorded videos? A: App storage: rockhome app offers 7-day (≤1GB) free app storage service. As long as there is network connection, video clips will be recorded and uploaded to the rockhome app automatically. - Page 16 WPA2-PSK or other lower level of security method. A password is required. Q6: Can rock space cameras work without Wi-Fi? A: Yes, they can! After setup, as long as an SD card is inserted into the camera, it can record videos even if there is no Internet connection.
-
Page 17: Fcc Warning
FCC warning device complies with part 15 of the FCC Rules. Operation is subject to the following two conditions: (1) this device may not cause harmful interference. (2) this device must accept any interference received,including interference that may cause undesired operation.Any changes or modifications not expressly approved by the party responsible for compliance could void the user's authority to operate the equipment. - Page 18 V1.0...
Need help?
Do you have a question about the C1 and is the answer not in the manual?
Questions and answers