Table of Contents
Advertisement
Quick Links
Advertisement
Table of Contents

Related Manuals for iCleanse Swift UV

Summary of Contents for iCleanse Swift UV
- Page 1 User Guide for Your Swift UV...
-
Page 2: Table Of Contents
About Your iCleanse Swift Unit Important Safety Instructions Meet Your Swift UV Tech Specs Getting Started Assembly and Installation of Your Swift UV Assembling the Floor Stand Mounting Swift UV to the Floor Stand Attaching the Hand Sanitizer Mounting Plate Mounting the Hand Sanitizer... -
Page 3: About Your Icleanse Swift Unit
About Your iCleanse Swift UV Important Safety Instructions READ ALL INSTRUCTIONS BEFORE USING THIS DEVICE Note the warning and information labels on the device. CAUTION: This device emits high intensity ultraviolet radiation. This device has been designed to contain the UV exposure. To avoid eye and skin exposure do not attempt to make modifications to the device or attempt to look directly at the UV source while it is in operation. - Page 4 Any service must be performed by an authorized service representative. Unauthorized opening of the device or repair work carried out improperly could result in considerable danger to the user and could void your warranty. In case of noncompliance, ReadyDock, Inc. dba iCleanse excludes all liability. On/Off Switch Symbols...
-
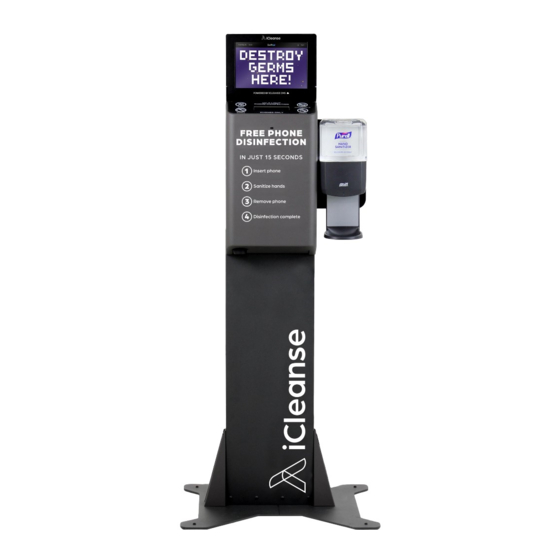
Page 5: Meet Your Swift Uv
15 seconds killing 99.99% of pathogens that can lead to sickness. The Swift UV has been designed for minimal contact with both the user and what you place in it, allowing maximum surface coverage by germicidal light during the disinfection cycle. -
Page 6: Tech Specs
About Your iCleanse Swift UV Tech Specs Swift UV with Stand and Model Swift UV Wall-Mount Sanitizer Dispenser 56.5 in x 23 in x 23 in / 143.5 cm x 26 in x 10.75 in x 4 in / 66 cm x 27.3 Dimensions 58.4 cm x 58.4 cm... -
Page 7: Assembly And Installation Of Your Swift Uv
About Your iCleanse Swift UV Assembly and Installation of Your Swift UV This section describes the steps to be taken to assemble and install the device. Included Hardware 4x 1/2” Long Button 6x 5/16” Long Button 4x 5/8” Long Flat 2x 1/2”... -
Page 8: Assembling The Floor Stand
About Your iCleanse Swift UV Assembling the Floor Stand Step 1: Lay the vertical stand on top of the shipping box with the iCleanse logo facing up (Figure 01.). Step 2: Take the baseplate marked “R” and align it to the right side of the stand, also marked with an “R”. - Page 9 Getting Started Step 6: To install the corner braces, remove the two pre-installed 5/16” long button head hex screws on each side of the stand. Line up the two holes on each brace with the two holes on each side of the stand and secure with the previously removed screws (Figure 03.).
-
Page 10: Mounting Swift Uv To The Floor Stand
1/4” of the threading exposed (Figure 04.). Step 2: Carefully hang the Swift UV on the two upper screws taking care to align them with the two mounting points on the back of the Swift UV (Figure 05.). - Page 11 Getting Started Step 3: Loosen the two recessed screws on the right side of the Swift UV’s main housing with the provided Phillips screwdriver and rotate the main housing open (Figure 06.). Step 4: Reinstall the lower right screw and tighten the two upper screws (Figure 07.).
- Page 12 Getting Started Step 5: Loosen the two thumb screws on the right side of the disinfection chamber. Rotate the fan duct out (Figure 08.) then rotate the disinfection chamber out to gain access to the back panel (Figure 09). Figure 08. Figure 09.
- Page 13 Getting Started Step 6: Reinstall and tighten the final screw in the lower left corner then reach into the access hole in the back of the Swift UV and plug the power cable into the power inlet terminal (Figure 10.).
- Page 14 Getting Started Step 8: Turn the power switch to the “ON” position (I) (Figure 11.). Step 9: Close the main housing of the Swift UV and tighten the two recessed Phillips screws. Step 10: Plug the power cord into a grounded receptacle.
-
Page 15: Attaching The Hand Sanitizer Mounting Plate
Getting Started Attaching the Hand Sanitizer Mounting Plate Step 1: Remove the two 5/16” long button head hex screws that are pre-installed on the upper right side of the floor stand. Step 2: Attach the hand sanitizer mounting plate with the two previously removed screws (Figure 12.). -
Page 16: Mounting The Hand Sanitizer
Phillips screwdriver and 3/8” wrench. Note: The Swift UV does not come with the hand sanitizer fluid. To purchase hand sanitizer please contact your distributor, or visit: www.icleanse.com/refills... -
Page 17: Wall Mounting Your Swift Uv
Getting Started Wall Mounting the Swift UV Note: This method requires roughed in electrical prior to installation which must be centered 33.5” from the floor to comply with ADA requirements. Please adhere to all local and national building codes when installing the wall installation power cable. - Page 18 Getting Started Step 3: Carefully hang the Swift UV on the two upper screws taking care to align them with the two mounting points on the back of the Swift UV (Figure 13). Caution: Ensure that the Swift UV is fully seated on the two screws.
- Page 19 Getting Started Step 6: Loosen the two thumb screws on the right side of the disinfection chamber. Rotate the fan duct out (Figure 16.) then rotate the disinfection chamber out to gain access to the back panel (Figure 17.). Figure 16. Figure 17.
- Page 20 Getting Started Step 7: Install and tighten the final screw in the lower left corner in accordance with the anchors being used (Figure 18.). Step 8: Connect the power cord whip to the rough electrical within the junction box and store any excess cabling in the junction box (Figure 19.). Brown lead to line voltage (usually black or brown in color) Blue lead to neutral wire (usually white or blue in color) Green/yellow lead to the ground wire (usually bare copper or green in color)
- Page 21 Getting Started Step 9: Plug the power cable into the power supply terminal on the Swift UV (Figure 20). Step 10: Rotate the disinfection chamber and fan duct back into position and secure the two thumb screws on the right side.
-
Page 22: Swift Uv Network Requirements
Not Recommended: Guest and open networks typically have lease times that require reconnection at set intervals determined by your network configuration. If your Swift UV goes offline due to an expired lease it will not be able to receive updates or other communications from the CMS. -
Page 23: Connecting Your Swift Uv
When the Swift UV is plugged in for the first time, it will automatically launch into the setup screen. Follow the on-screen steps to configure the Swift UV, connect it to Wi-Fi, you will then be prompted to add a pass code from the Swift UV into your Swift UV online portal. -
Page 24: Accessing Swift Uv Menu Settings
Getting Started Accessing Swift UV Settings Menu To access the settings menu contact iCleanse support for instructions. Device Setting Screen: From this menu you can access Wi-Fi Settings, Language/Locale, Status Bar Configuration, Display Settings, Menu Tutorial, and Device Settings (disinfection time, user detection distance, and user detection timeout). -
Page 25: Using And Maintaining Your Swift Unit
Using and Maintaining Your Swift UV Disinfecting To start a disinfection cycle, walk up to the Swift UV - The proximity sensor will detect a presence and the door at the top will open. Place the phone into the opening - The Swift UV will detect the phone is present and will start to lower the phone inside the chamber, close the door and start the disinfection cycle. -
Page 26: Guidelines For Use
Germicide is an agent that kills germs, like pathogenic microorganisms. Cleaning vs Disinfecting: The Swift UV unit’s germicidal LED’s will not penetrate dirt and grime, therefore it is highly recommended that you still periodically clean your devices. -
Page 27: Servicing Your Swift Uv
Servicing Your Swift UV Opening the Main housing of the Swift UV Step 1: Loosen the two recessed screws on the right side of the Swift UV’s main housing with the provided Phillips screwdriver and rotate the main housing open (Figure 22. and Figure 23.). - Page 28 Using and Maintaining Your Swift UV Accessing and replacing the LED modules Step 1: With the main housing open, ensure the power switch is in the “OFF” position (O) and loosen the two thumb screws on the right side of the disinfection chamber.
- Page 29 Using and Maintaining Your Swift UV Accessing the inside of the disinfection chamber Step 1: Rotate the hand knob clockwise until the elevator reaches the bottom (Figure 27.). Step 2: With the main housing open and the power switch in the “OFF” position (O), rotate the fan duct out (Figure 28.) then open the disinfection chamber (Figure 29.).
- Page 30 Using and Maintaining Your Swift UV Cleaning the inside of the disinfection chamber Step 1: Using a soft lint free towel and a 70/30% Isopropyl Alcohol solution, gently clean the inside of the disinfection chamber to remove any residue or dirt. It is recommended to clean the inside of the disinfection chamber once a month for optimal performance.
-
Page 31: Troubleshooting
Check that the power cable is securely in place, that the power switch is in the “ON” position (I), and the fuse on the inside of the Swift UV unit located in the power inlet receptacle is not blown. A replacement fuse is provided within the inlet receptacle holder. -
Page 32: Warranty And Registration
Warranty and Registration Warranty and Registration For iCleanse Swift UV Warranty Each Swift UV comes with a full 1-year warranty upon registration of your product. For more info visit: www.icleanse.com/warranty. Registration Please visit www.icleanse.com/warranty to register your new Swift UV unit within 30 days of your purchase to activate your one year warranty. -
Page 33: Customer Support
We’re Here to Help iCleanse offers comprehensive support 800.969.1166 from our in-house customer experience team. Available Monday thru Friday icleanse.com/support 9:00am - 5:00pm EST. support@icleanse.com Please keep your model number, serial number, and purchase date on hand for any future support. - Page 34 Connect with Us Follow our social media accounts for the most up to date news. @_icleanse @_icleanse /icleanse /icleansellc icleanse.com © 2022...
Need help?
Do you have a question about the Swift UV and is the answer not in the manual?
Questions and answers