Table of Contents
Advertisement
Advertisement
Table of Contents

Related Manuals for Casio LK-100


Summary of Contents for Casio LK-100
- Page 1 USER’S GUIDE GUÍA DEL USUARIO LK100ES1A...
- Page 2 • Do not short-circuit the battery terminals. • The product is not intended for children under 3 years. • Use only CASIO AD-5 adaptor. • The AC adaptor is not a toy. • Be sure to disconnect the AC adaptor before cleaning the product.
-
Page 3: Safety Precautions
Safety Precautions Congratulations on your selection of the CASIO electronic musical instrument. • Before using the instrument, be sure to carefully read through the instructions contained in this manual. • Be sure to keep all user documentation handy for future reference. - Page 4 2. If you are using the AC adaptor for power, unplug it from the wall outlet. 3. Contact your original retailer or an authorized CASIO Service Provider. AC Adaptor Misuse of the AC adaptor creates the risk of fire and electric shock.
- Page 5 2. If you are using the AC adaptor for power, unplug it from the wall outlet. 3. Contact your original retailer or an authorized CASIO Service Provider. Disassembly and Modification Never try to take this product apart or modify it in any way. Doing so creates the risk of electric shock, burn injury, or other personal injury.
- Page 6 CAUTION AC Adaptor Misuse of the AC adaptor creates the risk of fire and electric shock. Always make sure you observe the following precautions. • Do not locate the electric cord near a stove or other sources of heat. • Never pull on the cord when unplugging from the electrical outlet.
- Page 7 Display Screen • Never push on the display screen’s LCD panel or subject it to strong impact. Doing so can cause the LCD panel’s glass to crack, creating the risk of personal injury. • Should the LCD panel ever crack or break, never touch the liquid inside of the panel.
-
Page 8: Main Features
Main Features On-screen fingering and timing indicators • Easy-to-understand on-screen indicators help to simplify keyboard play, even for novices. 100 amazingly realistic tones Enhanced auto-accompaniment function for greater versatility • 50 built in auto-accompaniment patterns. 100 Built-in Song Bank tunes •... -
Page 9: Table Of Contents
Contents Safety Precautions ... E-1 Main Features ... E-6 General Guide ... E-8 Attachment of Score Stand ... E-9 Quick Reference ... E-10 Power Supply... E-11 Using batteries ... E-11 Using the AC Adaptor ... E-11 Auto Power Off ...E-12 Power On Alert ...E-12 Care of Your Keyboard ... -
Page 10: General Guide
General Guide ** ** 662A-E-010A... -
Page 11: Attachment Of Score Stand
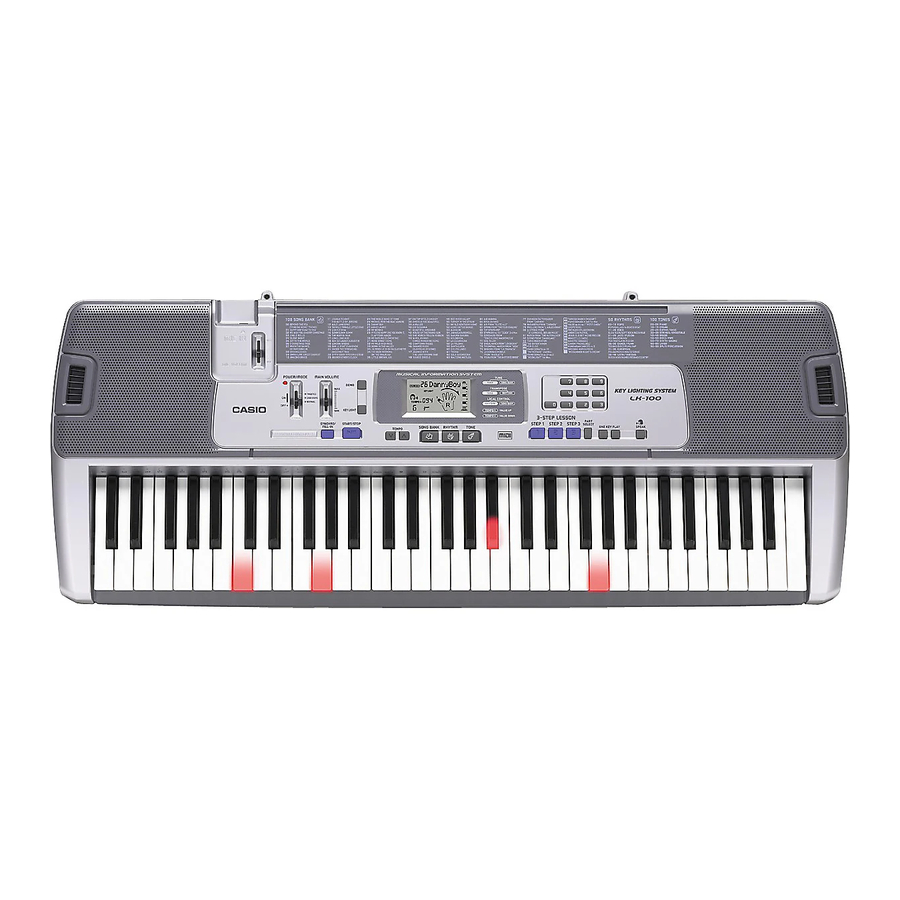
1 MIC VOLUME slider 2 POWER/MODE selector 3 Power indicator 4 MAIN VOLUME slider 5 DEMO button 6 KEY LIGHT button RHYTHM CONTROLLER 7 SYNCHRO/FILL-IN button 8 START/STOP button 9 TEMPO buttons 0 SONG BANK button A RHYTHM button B TONE button C Percussion instrument list D CHORD root names E Speakers... -
Page 12: Quick Reference
Quick Reference This section provides a quick overview of keyboard operation using steps one and two of the 3-step lesson feature. See page E-21 for detailed explanations of these steps. Set the POWER/MODE selector to NORMAL. Press the SONG BANK button. Find the tune you want to play in the Song Bank list, and then use the number buttons to input its two-digit number. -
Page 13: Power Supply
Power Supply This keyboard can be powered by current from a standard household wall outlet (using the specified AC adaptor) or by batteries. Always make sure you turn the keyboard off whenever you are not using it. Using batteries Always make sure you turn off the keyboard before loading or replacing batteries. -
Page 14: Auto Power Off
6 minutes. When this happens, move the POWER/MODE selector to the OFF position and then back to NORMAL, CASIO CHORD, or FINGERED to turn power back on. NOTE •... -
Page 15: Connections
See the user documentation that comes with your audio equipment for full details. Musical Instrument Amplifier (Figure 3 ) Use a commercially available connecting cord to connect the keyboard to a musical instrument amplifier. -
Page 16: Accessories And Options
IMPORTANT! • Be sure to use the microphone’s on/off switch to turn off the microphone and to disconnect the microphone from the keyboard whenever you are not using it. Recommended Microphone Type • Dynamic microphone (standard plug) IMPORTANT! • Be sure to disconnect the microphone from the keyboard whenever you are not using it. -
Page 17: Basic Operations
Basic Operations MAIN VOLUME POWER/MODE SYNCHRO/FILL-IN START/STOP This part of the manual provides you with the basic information you need to use your keyboard. To switch power on and off Set the POWER/MODE selector to NORMAL. Press the keyboard keys. Use the MAIN VOLUME slider to set the volume to a relatively low level. -
Page 18: Other Useful Functions
BASS DRUM SIDE STICK ACOUSTIC SNARE HAND CLAP ELECTRIC SNARE LOW FLOOR TOM CLOSED HI-HAT HIGH FLOOR TOM PEDAL HI-HAT LOW TOM OPEN HI-HAT LOW MID TOM HIGH MID TOM CRASH CYMBAL 1 HIGH TOM RIDE CYMBAL 1 CHINESE CYMBAL RIDE BELL TAMBOURINE SPLASH CYMBAL... -
Page 19: Playing The Demo Tunes
DEMO button. To tune the keyboard A simple operation lets you tune the keyboard to another musical instrument. While in any mode besides the Song Bank Mode (indicated when the SONG BANK indicator is lit), hold down the TONE button and press the SONG BANK button. -
Page 20: Playing Rhythms
You get a choice between two different methods for chord play. FINGERED lets you play chords as you normally do, while CASIO CHORD makes it possible to play fully formed chords with one finger. About the accompaniment keyboard The lower (left) 1.5 octaves are reserved for use as an... -
Page 21: Using The Casio Chord System
Using the CASIO CHORD system The CASIO CHORD system lets you easily play the four main types of chords. Play of chords is simplified as shown in the chart below. Keys Type Pressing one Major accompaniment chord (C Major Chord) -
Page 22: Improvising With The Preset Patterns
You can start the rhythm and accompaniment pattern at the same time, with your play of the accompaniment keyboard. To do this, follow the steps below. Set the POWER/MODE selector to the CASIO CHORD or FINGERED position. Select an auto-rhythm. -
Page 23: 3-Step Lesson System
3-Step Lesson System KEY LIGHT START/STOP Using 3-Step Lesson System Even individuals who cannot play the keyboard at all can follow along with the 100 built-in Song Bank tunes with the ONE KEY PLAY buttons. You can also use the 3-Step Lesson System to learn at your own pace. - Page 24 To stop Song Bank tune play, press the START/ STOP button again. To exit the Song Bank Mode, press the SONG BANK button again. • When you do, the SONG BANK indicator goes out. NOTE • Always enter two digits for the Song Bank number. •...
- Page 25 Key Lighting System Operation and Display Contents During 3-step Lesson Play Whenever you select an Auto Accompaniment tune (00 to 83) for 3-step lesson play, the key lighting system shows you which keys to press, while the display shows you the fingerings.
- Page 26 Turning Off Key Lighting Press the KEY LIGHT button. • The KEY LIGHT indicator disappears when the key light system is turned off. • Press the KEY LIGHT button again to turn key lighting back on. KEY LIGHT indicator NOTE Key lighting turns on automatically in any of the following cases: •...
-
Page 27: Step 3: Play At Normal Speed
Step 2: Master the melody Press the STEP 2 button. • When you do, the STEP 2 indicator appears. • After a count sounds, the keyboard stands by and waits for you to play the first note of the tune. If the tune includes intro measures, the keyboard enters standby after the intro measures are complete. -
Page 28: To Practice The Left Hand Part
To practice the left hand part Once you master right hand part play, you can use the two- hand tunes (numbers 84 through 99) to practice left hand part. Press the SONG BANK button until the SONG BANK indicator appears. •... -
Page 29: Midi
MIDI What is MIDI? The letters MIDI stand for Musical Instrument Digital Interface, which is the name of a worldwide standard for digital signals and connectors that makes it possible to exchange musical data between musical instruments and computers (machines) produced by different manufacturers. - Page 30 LOCAL CONTROL (Default: on) /GM mapping (Default: off) This setting determines whether or not the keyboard and sound source of this keyboard are connected internally. When recording to a computer or other external device connected to this keyboard’s MIDI IN/OUT terminal, it helps if you turn LOCAL CONTROL off.
-
Page 31: Technical Reference
2. Volume setting is too low. 3. Headphones are plugged into the keyboard. 4. The POWER/MODE selector is in the CASIO CHORD or FINGERED position. 5. Tone “99 PERCUSSION” is selected and you are pressing keys that are not assigned tones. - Page 32 * Multiple digital samples are taken for the low range, middle range, and high range of the original musical instrument. Because of this, there may be a very slight difference in tonal quality and volume between sample ranges. Action •...
-
Page 33: Specifications
1 tune repeat playback On/Off 50 presets Adjustable, (216 steps, = 40 to 255), initial value; 120 Two systems; CASIO CHORD, FINGERED Fill-in pattern, Synchro start 100 tunes Tone, Auto Accompaniment, Song Bank numbers and names; tempo, 3 step lesson display, chord name, fingering, timing indicator, key lighting, voice... -
Page 34: Appendix
Appendix/Apéndice GM Tone Map List Lista de asignaciones de sonido GM Tone No./Tone Name de sonido/Nombre de sonido 00 GRAND PIANO 01 BRIGHT PIANO 02 HONKY-TONK 03 E GRAND PIANO 04 ELEC PIANO 1 05 ELEC PIANO 2 06 ELEC PIANO 3 07 ELEC PIANO 4 08 HARPSICHORD 09 CLAVI... -
Page 35: Rhythm List
Rhythm List Lista de ritmos POPS CLUB POP FUNKY POP SOUL BALLAD POP BALLAD LITE POP 16 BEAT FUNK 8 BEAT POP POP ROCK DANCE POP POP FUSION FOLKIE POP ROCK ROCK WALTZ SLOW ROCK SOFT ROCK 50’S ROCK 60’S SOUL 4 BEAT ROCK ROCK TWIST... -
Page 36: Fingered Chord Charts
Fingered Chord Charts Cuadros de acordes digitados This table shows the left-hand fingerings (including inverted forms) for a number of often-used chords. Esta tabla muestra las digitaciones (incluyendo las formas invertidas) para varios de los acordes más a menudo usados. : Left hand finger numbers : Números de los... - Page 37 Cannot be specified in FINGERED setting because of accompaniment keyboard limitations, but augmented and diminished (seventh) chords made up of the same component notes (with different base note) can be used instead. Chords with same component notes as B aug ... D aug, F aug Chords with same component notes as B aug ...
- Page 38 662A-E-070A...
- Page 39 662A-E-071A...
- Page 40 This recycle mark indicates that the packaging conforms to the environmental protection legislation in Germany. Esta marca de reciclaje indica que el empaquetado conforma a la legislación de protección ambiental en Alemania. CASIO COMPUTER CO.,LTD. 6-2, Hon-machi 1-chome MA0603-A Printed in China Shibuya-ku, Tokyo 151-8543, Japan...