Table of Contents
Advertisement
Quick Links
Advertisement
Table of Contents

Summary of Contents for Peraqua iQntrol DOS-ECO
- Page 1 INSTRUCTIONS AND USER MANUAL DOS-ECO www.peraqua.com...
-
Page 2: Table Of Contents
Instructions and user manual DOS-ECO NOT041ENV01_FP1 SOMMAIRE 1 WARNING AND ADVICES ..................4 Guarantee and Warning ..................... 4 Shipping and transporting ....................5 Proper use of the pump ..................... 5 Risk ............................. 5 Toxic and/or dangerous liquid dosage ................6 Assembling and dismantling the pump ................ - Page 3 Instructions and user manual DOS-ECO NOT041ENV01_FP1 Installation of a long probe (120 mm) ..................32 Peristaltic tube replacement ....................33 Wintering ..........................33 7 AFTER SALE SERVICE ..................... 34 8 SPARE PARTS LIST ....................35...
-
Page 4: Warning And Advices
The shipping costs are charged of the customer. If the repair is carried out as part of the warranty, return is supported by Peraqua. The wear parts excluded of the warranty are: pH or redox probe (except for the validation of the warranty extension), injection valve, foot filter and peristaltic hose. -
Page 5: Shipping And Transporting
Instructions and user manual DOS-ECO NOT041ENV01_FP1 Shipping and transporting L’expédition No matter what the means of transport employed, delivery of the pump, even when free to purchasers or the addressee’s domicile, is always at the purchaser’s risk. Claim for any missing materials must be made within 10 days of arrival, while claims for defective materials will be considered up to the 30th day following receipt. -
Page 6: Toxic And/Or Dangerous Liquid Dosage
Instructions and user manual DOS-ECO NOT041ENV01_FP1 In case of damage of power supply cord please ask the repair to our technical assistance or qualified and authorized personnel, to avoid any hazard. When you decide to make no further of an installed pump, make sure to disconnect it from the power supply. Before carrying out any service on the item, check: 1) Disconnect the plug from the mains. -
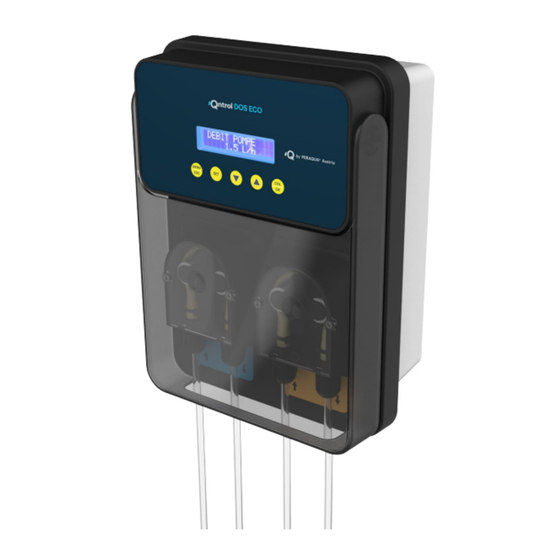
Page 7: Dos-Eco Description
Instructions and user manual DOS-ECO NOT041ENV01_FP1 2 DOS-ECO DESCRIPTION The DOS-ECO is characterized by its ability to measure the pH (0 to 14 pH) with its probe placed in the filtration circuit which analyzes the water of your pool. Depending on the measured value, the DUO will inject the amount of product needed to maintain the water balance of the pool thanks to its dosing pump. -
Page 8: Buttons Description
Instructions and user manual DOS-ECO NOT041ENV01_FP1 2.2 Buttons description Buttons Type d’appuis Actions - Decrease a numerical value Short press - Scroll a list of selections - Decreases a numerical value quickly Long press - Increase a numerical value Short press - Scroll a list of selections - Increases a numerical value quickly Long press... -
Page 9: Dos-Eco Plugs Description
Instructions and user manual DOS-ECO NOT041ENV01_FP1 2.3 DOS-ECO plugs description pH low level 230V power supply cable pH probe plug Filtration detection cable 230V Chlorine low level Chlorine probe 3 RECOMMENDATIONS AND INSTALLATION 3.1 Recommandations 1.1.1 Nameplate Power supply (230V ~) Supply frequency (50 Hz) Power (10W) Max flow rate (1,5 l/h) -
Page 10: Hydraulic And Electrical Installation Principle
Instructions and user manual DOS-ECO NOT041ENV01_FP1 3.2 Hydraulic and electrical installation principle Description des repères A- DOS-ECO connected to a permanent power supply and filtration detection B-H 2 in 1 probe holder : B- pH probe holder: supports the pH probe and the injection valve H- Probe holder for Rx: supports the redox probe and the injection valve C- Chemicals tanks D- Electrical control box for the control of the swimming pool circulation pump... -
Page 11: Device Dimensions
Instructions and user manual DOS-ECO NOT041ENV01_FP1 3.3 Device Dimensions Height: 260 mm Width: 220 mm 260 mm Depth: 130 mm 220 mm 3.4 Device installation STEP 1 : Mounting the housing... - Page 12 Instructions and user manual DOS-ECO NOT041ENV01_FP1 STEP 2 : Prepare the sensor for start-up 2) Leave the sensor submerged 1) Remove the sensor's in tap water for at least 20 protective cap and minutes, before proceeding keep it to re-use it for with the calibration.
- Page 13 Instructions and user manual DOS-ECO NOT041ENV01_FP1 Positioning on a vertical pipe...
- Page 14 Instructions and user manual DOS-ECO NOT041ENV01_FP1 STEP 4 : Preparation of the probe holder Mount the O-ring (H) under the support flange (B). Remove the cap and store...
- Page 15 Instructions and user manual DOS-ECO NOT041ENV01_FP1 STEP 5 : Position the support flange by inserting the injection pipe in the direction of flow.
- Page 16 Instructions and user manual DOS-ECO NOT041ENV01_FP1 STEP 6 : Attachment to the pipe Ø50 pipe Ø63 pipe...
- Page 17 Instructions and user manual DOS-ECO NOT041ENV01_FP1 STEP 7 : Electrical connection Filtration sensing cable and power cable 1° Plug the cable i (without plug) for filtration detection into the electrical box D on your pool: - Either on the terminals of an auxiliary contact to the relay of the filtration pump - Either on terminals A1 and A2 in parallel with the coil of the filter pump relay The voltage to be applied to this cable is 230V~.
- Page 18 Instructions and user manual DOS-ECO NOT041ENV01_FP1 STEP 9 : OPTIONAL Connecting the suction lances to the unit 2 protective covers for Jack sockets Remove the 2 protective covers Plug the Jack plug into the socket from the sockets Jack If you remove the suction lances for a long period of time : replace the protective covers on the jacks.
- Page 19 Instructions and user manual DOS-ECO NOT041ENV01_FP1 STEP 10 : Calibrating the pH probe Remove the probe from its soaking water in STEP 2 and remove the excess water. ↓6.9pH 720mV↑ PRESS THE ESC KEY AT ANY TIME TO EXIT THE CALIBRATION PROCEDURE 720mV ↑...
- Page 20 Instructions and user manual DOS-ECO NOT041ENV01_FP1 STEP 11 : Calibration of redox sensor Remove the sensor from its soaking water indicated in STEP 2 and remove any excess water.. ↓6.9pH 720mV↑ PRESS THE ESC KEY AT ANY TIME TO EXIT THE CALIBRATION PROCEDURE 720mV↑...
- Page 21 Instructions and user manual DOS-ECO NOT041ENV01_FP1 STEP 12 : Installation of the probe pH (J ) and Rx (J...
- Page 22 Instructions and user manual DOS-ECO NOT041ENV01_FP1 STEP 13 :Hydraulic circuit Cut tube J to connect foot filter E to the left inlet of the pump and probe holder D to the right inlet of the pump. Place foot filter E in the bottom of the tank. Repeat the same operation with the other probe holder.
-
Page 23: Advanced Device Settings
Instructions and user manual DOS-ECO NOT041ENV01_FP1 4 ADVANCED DEVICE SETTINGS pH setpoint ↓6.9pH 720mV ↑ To adjust the chlorine setpoint, press one more time the MENU / ESC. 720mV ↑ ↓6.9pH Setting range of 6.5 to 7.6 pH SETPOINT 7.4pH WHEN THE SET BUTTON IS RELEASED, THE VALUE WILL BE MEMORIZED Redox setpoint... -
Page 24: Activation Type
Instructions and user manual DOS-ECO NOT041ENV01_FP1 Activation type 4.3.1 Principle of operation In order to allow the chemical product to be mixed in the pool and therefore not to overdose, the device has activation and pause times for dosing. When it activates its dosing, the / symbol appears. When it is in dosing pause time, the symbol appears. -
Page 25: Dos-Eco Settings
Instructions and user manual DOS-ECO NOT041ENV01_FP1 iQntrol DOS-ECO settings 4.4.1 pH menu ↓ 7.5pH 720mV↑ Tip PRESS THE ESC KEY AT ANY TIME TO EXIT MENU. 720mV ↑ ↓7.5pH LANGUAGES : FRANÇAIS ENGLISH DEUTSCH NEDERLANDS LANGUAGE ENGLISH PORTUGUES ESPAGNOL ITALIANO... - Page 26 Instructions and user manual DOS-ECO NOT041ENV01_FP1 4.4.2 REDOX menu ↓ 7.5pH 705mV↑ Tip PRESS THE ESC KEY AT ANY TIME TO EXIT MENU 705mV↑ LANGUAGES : FRANÇAIS ENGLISH DEUTSCH NEDERLANDS LANGUAGE PORTUGUES ESPAGNOL ITALIANO ENGLISH CONFIGURATION : CONFIGURATION REDOX / pH / SYS REDOX OUTLET TYPE : PUMPE EXTERNAL / SALT CHLORINATOR / SOLENOID...
- Page 27 Instructions and user manual DOS-ECO NOT041ENV01_FP1 4.4.3 System menu « SYS » Tip PRESS THE ESC KEY AT ANY TIME TO ↓ 7.3Ph 120mV/↑ EXIT MENU LANGUAGES : FRANÇAIS ENGLISH DEUTSCH NEDERLANDS LANGUAGE PORTUGUES ESPAGNOL ITALIANO ENGLISH CONFIGURATION : REDOX / pH / SYS CONFIGURATION STARTUP DELAY: 30 minute (by default)
- Page 28 Instructions and user manual DOS-ECO NOT041ENV01_FP1 4.4.4 Overdose alarm The pump blocks its dosing and displays an alarm message when it has dosed in 4 consecutive hours more than the volume indicated in the alarm menu. This alarm allows the dynamic monitoring of a possible overdose. In the overdosing alarm menu, see access in §...
-
Page 29: Duo Standby Mode
Instructions and user manual DOS-ECO NOT041ENV01_FP1 Duo standby mode To place the DUOin standby mode, press the ▲and ▼ keys simultaneously for 5 seconds. To exit standby mode, repeat the same operation. DOS-ECO priming 1° Place the DUO in standby mode by pressing the ▲ and ▼ keys simultaneously for 5 seconds. 2°... -
Page 30: Alarms And Displayed Symbols
Instructions and user manual DOS-ECO NOT041ENV01_FP1 Alarms and displayed symbols Message Meaning Action / and \ alternatives The pump is currently dosing Dosing has stopped : Wait for: Either in the pause cycle The end of the pause cycle Either by the activation The end of the activation delay delay CALIBRATION ERR. -
Page 31: Maintenance
Instructions and user manual DOS-ECO NOT041ENV01_FP1 6 MAINTENANCE Parts of wear of the pump To protect the quality of your device, we advise you (*) to change the rooms of following wears: MEASURED PRODUCTS FREQUENCY CODE NAME pH- or pH+ Peristaltic tube 6*9mm 2 years Crystal PVC tube, 4x6... -
Page 32: Installation Of A Long Probe (120 Mm)
Instructions and user manual DOS-ECO NOT041ENV01_FP1 6.3 Installation of a long probe (120 mm) -
Page 33: Peristaltic Tube Replacement
Instructions and user manual DOS-ECO NOT041ENV01_FP1 Peristaltic tube replacement Removal of the old tube Setting up the new tube Ensure that the tube is properly lubricated with silicone grease. Wintering 6.5.1 Pum wintering It is important to know that for the winter shutdown of your unit, it is the peristaltic tube that needs protecting. It is then recommended to pump clean water to rinse the peristaltic tube. -
Page 34: After Sale Service
Instructions and user manual DOS-ECO NOT041ENV01_FP1 6.5.2 Device stand-by To set the DOS-ECO onstand-by, press simultaneously during 5 seconds ▲and ▼ buttons. 6.5.3 Probe Wintering For the winter shutdown, the sensor must be removed from the installation and stored in non-freezing conditions. -
Page 35: Spare Parts List
Instructions and user manual DOS-ECO NOT041ENV01_FP1 8 SPARE PARTS LIST Fig. 14 Code Description des pièces pH and RX power supply cardboard Supply circuit Duo pH 1.5L/h Rx 3L/h Power supply link cable – Display Display cardboard Black PPF/P 1,5L/h SANTOPRENE and transparent cover Black PPF/P 3L/h SANTOPRENE and transparent cover 10 RPM 230-240 Vac motor(1.5L/h pump) 10 RPM 230-240 Vac motor(3L/h pump) - Page 36 Instructions and user manual DOS-ECO NOT041ENV01_FP1 NOTES PERAQUA - Handelsstraße 8 – 4300 St. Valentin - Austria Mail : info@peraqua.com - Web : www.peraqua.com Instruction and user manuals are included with new products.
Need help?
Do you have a question about the iQntrol DOS-ECO and is the answer not in the manual?
Questions and answers