Advertisement
Quick Links
Product models covered: All models of Biomass/Corn/Wood pellet MagnuM & Country Flame appliances.
Topic: This informational bulletin will be addressing the glass in your appliance. What never should be
done with glass, how to clean the glass, how to remove broken or damaged glass. What causes the glass to
be dirty and the different glass options.
What never should be done with glass:
Never:
♦ Operate unit with broken glass.
♦ Slam the door shut.
♦ Strike the glass.
♦ Use abrasive cleaners.
♦ Clean when glass is hot.
♦ Substitute original factory glass. (Always use only factory authorized glass (high
temperature, ceramic glass, and 5mm thick.))
Cleaning the glass:
If smoke accumulates on the glass, before the fire gets hot, open the door and wipe the glass with a
damp rag. If after constant use, the glass is dirty; you must clean the glass so that it will not become etched
with the fly-ash. Once the glass has cooled off, take a damp rag, put a little fly-ash from the unit on the rag
and clean the glass. If this does not clean the glass use a special glass cleaner, you can obtain this
information from your local dealer. (AES has found that Amway crème glass & chrome cleaner works really
well. Do not use abrasives such as steel pads, steel wool, or oven cleaner as they will scratch the glass.
Removal of broken or damaged glass:
The glass is surrounded on the edges with a gasket and seated in a glass channel. It is held in place
with two (2) clips on the top and two (2) clips on the bottom. Open the door and lift door off of hinges. If
the door is tight, tap gently on the bottom of the door with your hand or a rubber hammer. Lay the door
down on newspaper with the glass clips facing you. Using a number two (#2) Phillips screwdriver, loosen
the screws and take the glass clips off. Remove the broken or damaged glass carefully. If glass is broken
discard. Make sure to clean gasket area. Check to make sure the gasket material under the glass is in good
shape. This material can be obtained from an authorized dealer or direct from the factory, if it needs to be
replaced. Tempered or ordinary glass will not withstand the high temperatures of MagnuM & Country
Flame appliances. Reverse the above listed procedure for replacing new glass. When installing the new
glass make sure that the glass is not sitting on top of any obstruction or binding or hitting any corners. The
glass will brake if screws are over tightened.
Dirty glass is caused by;
Poor air quality, poor fuel quality, improper air adjustment, air-wash is out of adjustment.
Glass options:
MagnuM Appliances:
There are different options of glass to choose from such as, plain glass or etched glass with different
designs; an eagle, pheasant, chickadee, wood ducks, rose border, flower deco or the white tailed deer etched
glass.
Country Flame Appliances:
There are different options of glass to choose from such as, plain glass or etched glass with two (2)
different designs; wheat or forest scene.
Always contact your local dealer is you have any questions or concerns.
American Energy Systems Inc
Information Bulletin
Glass
AES Informational Bulletin # I-0024 Date of Issue 06/06/2007, rev 6/21/10
Advertisement

Summary of Contents for Magnum Country Flame MF3626
- Page 1 This material can be obtained from an authorized dealer or direct from the factory, if it needs to be replaced. Tempered or ordinary glass will not withstand the high temperatures of MagnuM & Country Flame appliances. Reverse the above listed procedure for replacing new glass. When installing the new glass make sure that the glass is not sitting on top of any obstruction or binding or hitting any corners.
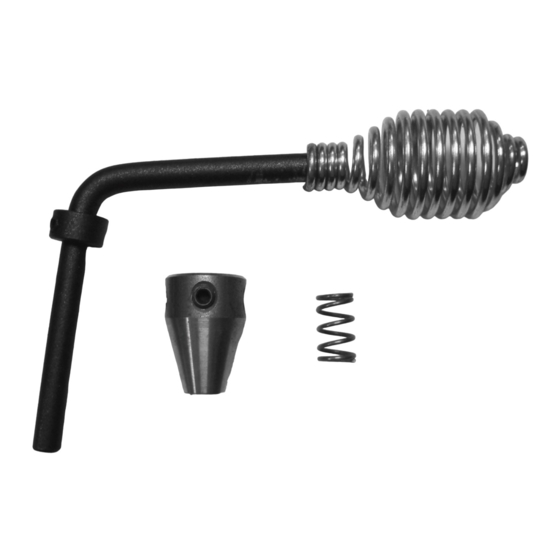
- Page 2 Door Handle Assemble Kit Part #MF3626 For Models Baby Countryside & Winchester units • Verify the collar is adjusted to 2 ¼” from the end as shown. Dimple on door handle • Slide the handle through the door and into the spring and cam as shown.
- Page 3 Operation: Attach door (continued) NOTE: The top and bottom hinge pins can be moved in or out to adjust the amount of pressure on the rope gasket when the door is closed. They also balance the gasket pressure between the left and right sides.
- Page 4 Operation: Attach door (continued) 6. The 3 test confirms that the rope gasket is adequately centered on the doorframe when the door is latched tight. Open the door and see that the chalk lines are Chalk the doorframe approximately centered on as shown and then the gasket.
Need help?
Do you have a question about the Country Flame MF3626 and is the answer not in the manual?
Questions and answers