
Summary of Contents for Puretec WaterMark Sparq S6
- Page 1 User Guide Sparq S6 WMTS 105 Certificate No. 23291 Sparkling, Chilled & Hot Water Filter System Australian Certification Services For correct operation & installation, it is essential to observe these instructions. JUN2022...
-
Page 2: Table Of Contents
Figure 7 - How To Use Quick Connect Fittings ................13 Figure 8 - SmartTee™ Quick Connect Fitting ...................14 Installation................................15 Hot Water Commissioning .........................17 Cold & Sparkling Water Commissioning ....................18 Gas Replacement ............................19 Filter Replacement ............................20 Troubleshooting ...............................21 Warranty ................................22 Installation & Operation Manual Copyright © Puretec Pty Ltd 2022... -
Page 3: Puretec Customer Service
Introduction Puretec Customer Service Thank you for purchasing a Puretec Sparq S6 Drinking Water Appliance. The Sparq S6 is a proven performer manufactured from only quality materials and components. It will give years of reliability and trouble-free operation if maintained properly. -
Page 4: Before Installation
The Sparq S6 system is designed for mains/towns warter supply only. • The Puretec Sparq S6 is designed for domestic use only. Non-domestic use will result in voided warranty. Caution: Do not use with water that is microbiologically unsafe or without •... -
Page 5: Parts Included
Note: Where maximum line pressure exceeds 500 kPa, the supplied multivalve must be installed to comply with Australian Plumbing Standards. (Ref. AS/NZS 3500.1:2021, Clause 3.3.4) ˇGlass size is based on 200ml. ⁺Cup size is based on 167ml. Copyright © Puretec Pty Ltd 2022 Puretec Sparq S6 User Guide... - Page 6 System Identification Figure 1 - Dimensions 93 mm min. 230 mm 110 mm 150 mm air gap 197 mm A Ø26mm hole is required for faucet (Max. 30mm). 45 mm Installation & Operation Manual Copyright © Puretec Pty Ltd 2022...
- Page 7 System Identification Figure 2 - CO Bottle Pressure Gauge Pressure Regulator Tube (Black) Bottle TOP VIEW Pressure Gauge Pressure Regulator Bottle SIDE VIEW Copyright © Puretec Pty Ltd 2022 Puretec Sparq S6 User Guide...
- Page 8 Clearance Envelope Warm air IN via cabinet floor cutout or kickboard ventilation grille. NOTE: Clearance at the back of the until from the wall needs to be 150 mm. Installation & Operation Manual Copyright © Puretec Pty Ltd 2022...
- Page 9 Fit the upper cabinet rail (where the cabinet door rests) with 3 mm silicon door buffers. This will allow for the warm air to be expelled from the cabinet (see Fig. 4). Copyright © Puretec Pty Ltd 2022 Puretec Sparq S6 User Guide...
-
Page 10: Ventilation
(not included) in place of the kickboard ventilation grille. Figure 5 - Cutouts C. Cabinet Floor Cutout A. Cabinet Floor Cutout B. Kickboard Ventilation Cutout Kickboard Ventilation Grille 10 Installation & Operation Manual Copyright © Puretec Pty Ltd 2022... - Page 11 WATER OUT WATER IN Multivalve (Pressure Limiting Valve) Unit Power Supply Z1 Filter Cartridge & Water Inlet Connection Mounting Bracket (Blue) Note: All cold water lines are 1/4" tube. Copyright © Puretec Pty Ltd 2022 Puretec Sparq S6 User Guide...
-
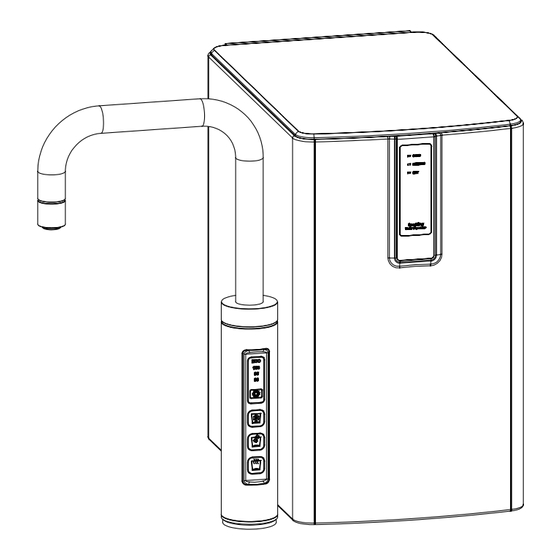
Page 12: How To Operate The Tap
A concealed light sensor on the back of the tap automatically turns the boiler off when the room is dark and restarts the boiler when the room is light. 12 Installation & Operation Manual Copyright © Puretec Pty Ltd 2022... - Page 13 O-Ring seal being damaged. 3. Tube is secured in DISCONNECTION PROCEDURE position. 4. Push collet against body and slide tube out of fitting. Copyright © Puretec Pty Ltd 2022 Puretec Sparq S6 User Guide...
- Page 14 5. Turn the quick connect nut on the SmartTee™ 6. Push the collet against the quick connect nut and slide tube anticlockwise to release the collet. out of fitting. 14 Installation & Operation Manual Copyright © Puretec Pty Ltd 2022...
-
Page 15: Installation
Note: For thin bench tops or a sink mount, use the supplied spacer, slipping it up the thread, followed by the black nut to tighten. 8. Connect the straight connector to the white tube on the tap (see Fig.6). Copyright © Puretec Pty Ltd 2022 Puretec Sparq S6 User Guide... - Page 16 The SPARQ-CO2 is NOT refillable. 19. Ensure the regulator is in the off position by turning the black knob fully counterclockwise (-) until home (see Fig.2). 16 Installation & Operation Manual Copyright © Puretec Pty Ltd 2022...
-
Page 17: Hot Water Commissioning
Tap and release the cog button to cycle through the temperature settings until the desired temperature is illuminated. Tap and release the hot button once to lock in the temperature setting. Copyright © Puretec Pty Ltd 2022 Puretec Sparq S6 User Guide... -
Page 18: Cold & Sparkling Water Commissioning
The temperature is preset to 2-10 degrees within the tank. It takes approx 20-30 minutes to complete its chill cycle dependent on incoming water temperature and ambient surrounds of the unit. 18 Installation & Operation Manual Copyright © Puretec Pty Ltd 2022... -
Page 19: Gas Replacement
Note: A small amount of water will come out after using the sparkling feature for 1-2 seconds. This is normal as the CO is purged from the line. Check with your local governing bodies for any disposal requirements and discard the empty bottle. Copyright © Puretec Pty Ltd 2022 Puretec Sparq S6 User Guide... -
Page 20: Filter Replacement
(It is normal for black fines, cloudiness or micro-bubbles to come through during the filter flush). Check for leaks, if any, rectify them before leaving the unit. 20 Installation & Operation Manual Copyright © Puretec Pty Ltd 2022... -
Page 21: Troubleshooting
Turn on the soda power switch. line needs re- Follow the Soda/Sparkling commissioning. Water Commissioning steps. Not enough bar pressure. Slightly increase CO pressure. DO NOT exceed 4 bar. Copyright © Puretec Pty Ltd 2022 Puretec Sparq S6 User Guide... -
Page 22: Warranty
This product is warranted to be free of defect of material and workmanship for 2 years from date of purchase. Puretec is renowned for its quality and after-sales support so if you have any issues please call 1300 140 140 (AU) or 0800 130 140 (NZ). To make a warranty claim, contact us directly or the place of original purchase. - Page 23 Warranty WARRANTY / AUSTRALIA This warranty is given by Puretec Pty Ltd, ABN 44 164 806 688, 37-43 Brodie Road Lonsdale SA 5160, telephone no. 1300 140 140 and email at sales@puretec.com.au. This warranty is provided in addition to other rights and remedies you have under law: Our goods come with guarantees which cannot be excluded under the Australian Consumer Law.
Need help?
Do you have a question about the WaterMark Sparq S6 and is the answer not in the manual?
Questions and answers