
Related Manuals for Transcension LED Master 64

Summary of Contents for Transcension LED Master 64
- Page 1 LED Master 64 Order code: BOTE04 Manual Please read these instructions carefully before use...
-
Page 2: Table Of Contents
In the box: 1 x LED Master 64 DMX Controller 1 x Power adaptor 1 x USB gooseneck lamp 1 x Pair of 19” rack ears 1 x Manual Contents 1. Features ........................2 2. General Instructions ....................3 3. Overview 3.1 Front View ...................... -
Page 3: Features
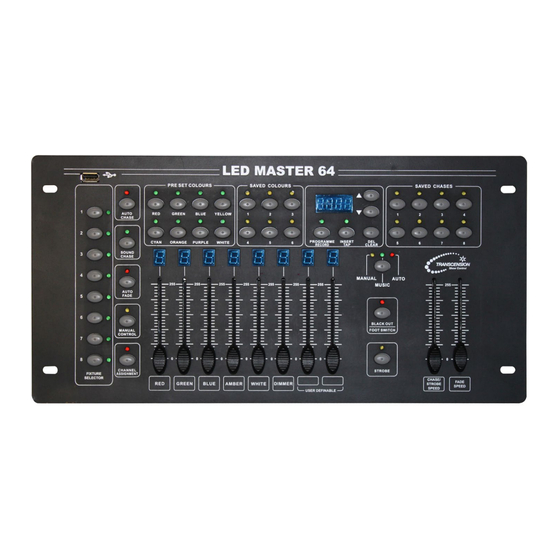
1. Features 1. The LED Master 64 is a user-friendly LED controller 2. Designed to control all LED lighting fixtures with up to 8 channels 3. Control up to 64 channels of 8 LED groups 4. 8 individual buttons for selecting 8 groups of lighting fixtures 5. -
Page 4: General Instructions
NEVER use the unit under the following conditions: excessive dryness or humidity (ideal conditions are between 35% and 80%), vibrations or bumps, or in places with a temperature of over 45°C/113°F or less than 2°C/35.6°F. DO NOT dismantle or modify the unit. LED Master 64 manual... -
Page 5: Overview
20. STROBE Activates strobe on all fixtures 21. CHASE/STROBE SPEED Use to adjust the chase speed and set the strobe speed 22. FADE SPEED Use to adjust the fade speed as a percentage of the run time LED Master 64 manual... -
Page 6: Rear View
RJ 45 Cable port ○ 6 CA-8F FOOT CONTROLLER CA-8F connector 4. Operation Guide When you turn on the power to the LED Master 64, it will continue running the last function/programme from when it was previously powered down. 4.0 Enter Programming mode... -
Page 7: Channel Assignment
4.1 Channel Assignment The ability to assign/patch the 8 channels of the LED Master 64 is one of its most powerful features. This gives you the option of customising the controller to the DMX channels of your lighting fixtures. For example: If you have a lighting fixture with the following channels: 1 –... -
Page 8: Store Saved Colours
5 Press UP/DOWN button to choose bank 1-6 to store saved color (Jump this step if you have chosen a bank before). 6 Press SAVED COLOURS button, and all LED indicators will blink 3 times and then go out, the corresponding LED will then be LED Master 64 manual... -
Page 9: Delete Saved Colours
2 Press CHASE 1-8 button to choose chase which you want to store in. 3 Press FIXTURE SELECTOR 1-8 button to choose units, using fader 1-8 to adjust the light effect, or open a previously saved colour. LED Master 64 manual... -
Page 10: Insert Step Into A Chase
(If you want to insert a fifth step, you should set the present step to be ‘ST05’). 5 Press FIXTURE SELECTOR 1-8 button to choose fixture, use UP/DOWN button to choose saved color or push the FADER 1-8 to adjust the lighting effect. LED Master 64 manual... -
Page 11: Delete Step From A Chase
Delete all steps, and then it will show “NULL”.) 6 Repeat steps 4-6 to delete more steps. 7 Hold PROGRAM/REC button for 3 seconds to exit programming LED Master 64 manual... -
Page 12: Delete Chase
LEDs will stop blinking indicating the factory reset has been successful. 4.9 Manual Mode 1 Ensure the LED above the BLACK OUT button is off. 2 Press FIXTURE SELECTOR 1-8 button to choose units desired. 3 Push FADER 1-8 to adjust the effect. LED Master 64 manual... -
Page 13: Run Saved Colours
2 Press CHASE 1-8 button to run the CHASE, the display will show the present CHASE selected. 3 Press the MANUAL/MUSIC/AUTO button until the MANUAL LED is on indicated manual mode has been selected. 4 Press the UP/DOWN button to step through the chase scene by scene. LED Master 64 manual... - Page 14 CHASE speed via INSERT/TAP button. When running the CHASE, press the INSERT/TAP button and the indicator will be blinking, then press the INSERT/TAP button and the indicator will go off, the blinking time will then be the CHASE speed. LED Master 64 manual...
-
Page 15: Run Pre Set Colours
1. Ensure the LED indicator above the BLACK OUT button is off. 2. Press the AUTO FADE button, the LED indicator above it will be on indicating that the Auto Fade Mode has been selected. 3. Use the FADE SPEED to adjust the fade time. LED Master 64 manual... -
Page 16: Manual Control
LED Master 64. 4.16 Foot Switch (CA- 8F) The LED Master 64 will work with the CA-8F, when the CA-8F is connected to the LED Master 64, hold the BLACKOUT/FOOT SWITCH button for 3 seconds and the LED Master 64 manual... -
Page 17: Update By Usb Drive
LED display will show ‘UPDAP OK’. You can restart the unit and the unit has been updated successfully. NOTE: Please use memory stick of between 1GB-2GB. The format of the memory disk should be FAT16 or FAT32 and the memory disk should be clear before starting. LED Master 64 manual... -
Page 18: Upload Files To Usb Memory Stick
NOTE: If no data is saved onto the USB memory stick and you try to download, the display will show ‘LOAD’ and no transfer will take place. 4.19 DMX Address Fixture Number DMX Start Address Fixture 1 Fixture 2 Fixture 3 Fixture 4 Fixture 5 Fixture 6 Fixture 7 Fixture 8 LED Master 64 manual... - Page 19 CE mark in accordance with the provision of the Electromagnetic Compatibility (EMC) Directive 89/336/EEC. EN55103-1:199601-2; EN55103-2:1996; EN61000-3-2:2000+A2:2005; EN61000-3-3:1995+A1:2001+A2:2005. & Harmonized Standard EN 60598-1: 2004 IEC 60598-1:2003+ corrigendum 2004 Part 1:General requirements and test Following the provisions of the low voltage directive 73/23/EEC and 93/68/EEC LED Master 64 manual...
- Page 20 LED Master 64 manual...
Need help?
Do you have a question about the LED Master 64 and is the answer not in the manual?
Questions and answers