
Related Manuals for ACD M2Smart SE

Summary of Contents for ACD M2Smart SE
- Page 1 Brief Overview/Resumen breve/ Aperçu rapide ® Accessories – M2Smart Accesorios – M2Smart ® Accessoires – M2Smart ® Version/ Versión: 1.02 ® M2Smart SE_Set_Brief Overview_V1.02_en_es_fr 1 / 32...
- Page 2 © Copyright ACD Group All Rights Reserved This document may not be duplicated or made accessible to third parties without written permission by ACD. Todos los derechos reservados Este documento no se puede reproducir ni facilitar a terceros sin consentimiento por escrito de ACD.
-
Page 3: Table Of Contents
Table of Contents/Índice/Table des matières English Introduction ....................4 Transportation and Storage ................6 Scope of Delivery ..................6 Commissioning and Operation of M2Modules ..........6 M2Modules ........................ 6 4.1.1 Intended Use ......................6 4.1.2 Security Advices ....................6 4.1.3 Attaching and removing the modules .............. -
Page 4: Introduction
Français Mise en service et fonctionnement des M2Modules ........32 M2UHF-RFID Shortrange ..................32 9.1.1 Exposition aux RF ....................32 M2UHF-RFID Midrange ..................32 9.2.1 Exposition aux RF ....................32 Español 1 Introduction Read all instructions first before using the Mobile Handheld Computer! Use Original Spare Parts Only. - Page 5 ® ® Figure 3: DS2Smart Charging and transmission box Figure 4: DS2Smart Charging box ® Figure 5: DS2Smart Developer box Figure 6: DSBattery 2-fold Figure 7: M2Grip5 Figure 8: M2 logistics protective caps Figure 9: Replacement Battery ® M2Smart SE_Set_Brief Overview_V1.02_en_es_fr 5 / 32...
-
Page 6: Transportation And Storage
Please read the following warning and safety notices. They are for your safety and to ensure that the various modules are ready to use. Only ACD original power supplies may be used for operation of the modules! The use of components that have not been approved can cause the destruction of the modules or the main device. - Page 7 ATTENTION Before using the modules, any connection cables must be checked for damage. Damaged parts must be replaced. For this, please contact ACD Elektronik GmbH. ATTENTION Before use, the contacts of the modules and the contacts of any plugs present must be checked for dirt and cleaned if necessary.
-
Page 8: Attaching And Removing The Modules
4.1.3 Attaching and removing the modules The upper plug-in module and the lower plug-in module can be attached and removed as shown in the following figures. Figure 10: Attaching and removing the upper plug-in module Figure 11: Attaching and removing the lower plug-in module When attaching and removing the modules, please do not reach into the area of the plug-in sliding mechanism, as there is a risk of injury due to jamming during sliding. -
Page 9: M2Uhf-Rfid Shortrange
4.2 M2UHF-RFID Shortrange The M2UHF-RFID Shortrange is described below. It is a plug-in module for reading UHF-RFID tags, which can be used for the upper plug-in sliding mechanism. Figure 12: M2UHF-RFID Shortrange 4.2.1 Security Advices The M2UHF-RFID Shortrange is designt for occupational use only. ATTENTION Removal of the plug-in module on the upper plug-slide mechanism of the device:... -
Page 10: Handling
4.2.2 Handling After the M2UHF-RFID Shortrange attachable module has been plugged into the main device on the upper plug-slide mechanism, it can be used for reading UHF-RFID tags. To do this, start a software application to initialize the module. Then the read process can be carried out with the software application. -
Page 11: Technical Data M2Uhf-Rfid Shortrange
4.2.3 Technical Data M2UHF-RFID Shortrange The table below includes the technical data for the M2UHF-RFID Shortrange plug-in module. Technical Data Housing ABS/PC Protection class IP54 Operating -20 °C to 50 °C/-4 °F to 122 °F temperature Condensation of the device must be avoided. Storage temperature -20 °C to 60 °C/-4 °F to 140 °F Rel. -
Page 12: Security Advices
M2UHF-RFID Midrange The M2UHF-RFID Midrange is described below. It is a plug-in module for reading UHF-RFID tags, which can be used for the upper plug-in sliding mechanism. Figure 14: M2UHF-RFID Midrange 4.2.7 Security Advices The M2UHF-RFID Midrange is designt for occupational use only. ATTENTION Removal of the plug-in module on the upper plug-slide mechanism of the device:... -
Page 13: Handling
4.2.8 Handling After the M2UHF-RFID Midrange attachable module has been plugged into the main device on the upper plug-slide mechanism, it can be used for reading UHF-RFID tags. To do this, start a software application to initialize the module. Then the read process can be carried out with the software application. -
Page 14: Technical Data M2Uhf-Rfid Midrange
4.2.9 Technical Data M2UHF-RFID Midrange The table below includes the technical data for the M2UHF-RFID Midrange plug-in module. Technical Data Housing ABS/PC Protection class IP54 Operating -20 °C to 50 °C/-4 °F to 122 °F temperature Condensation of the device must be avoided. Storage temperature -20 °C to 60 °C/-4 °F to 140 °F Rel. -
Page 15: Docking Station Ds2Smart Charging And Transmission Box, Ds2Smart Charging Box And Ds2Smart Developer Box
4.3.1 Security Advices Only ACD original power supplies and rechargeable batteries approved by ACD may be used for the operation of the Mobile Handheld Computer and docking station! The use of components that have not been approved can cause the destruction of the ATTENTION backhand scanner or docking station. -
Page 16: Inserting The Replacement Rechargeable Battery In And Removing It From The Docking
Place the docking station correctly on a smooth and clean underground, which is not exposed to direct sunlight. ATTENTION The charging and communication contacts are very sensitive! The Mobile Handheld Computer and the replacement rechargeable battery may only be inserted in and removed from the docking station as described above. -
Page 17: Status Leds
Place the docking station correctly on a smooth and clean underground, which is not exposed to direct sunlight. ATTENTION The charging and communication contacts are very sensitive! The Mobile Handheld Computer and the replacement rechargeable battery may only be inserted in and removed from the docking station as described above. -
Page 18: Disposal Of The Ds2Smart
4.4.1 Security Advices Only ACD original power supplies and rechargeable batteries approved by ACD may be used for the operation of the Mobile Handheld Computer and docking station! The use of components that have not been approved can cause the destruction of the ATTENTION backhand scanner or docking station. -
Page 19: Inserting The Replacement Rechargeable Battery In And Removing It From The Docking
4.4.2 Inserting the replacement rechargeable battery in and removing it from the docking station To insert the replacement rechargeable battery in the device, tip it diagonally downward and place it in the rechargeable battery compartment. Insert the rechargeable battery so that the contacts are aligned with the contacts of the docking station. -
Page 20: Status Leds
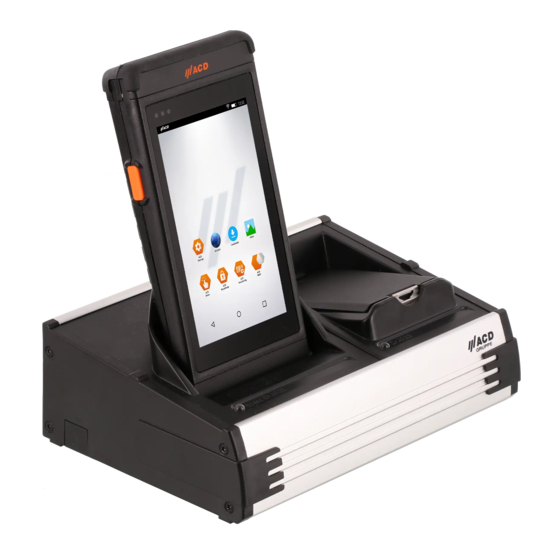
4.4.3 Status LEDs The status LEDs of the DS2Battery docking station will be described below. Figure 22: Status LEDs of the DS2Battery Charging cradle for replacement rechargeable battery CHARGE LED lit red: Replacement battery is being charged CHARGE LED lit green: Replacement battery is fully charged There is no replacement battery inserted in the docking CHARGE LED not lit:... -
Page 21: M2Grip5
4.5 M2Grip5 ® ® A handle is available as an accessory for the M2Smart SE. It can be attached to the M2Smart SE without tools. Figure 23: M2Grip5 The upper and lower slide mechanisms remain untouched and can therefore still be used for different ®... -
Page 22: Removing M2Grip5 From The M2Smart Se
® 4.5.3 Removing M2Grip5 from the M2Smart To remove the M2Grip5, slide the side sections of the M2Grip5 off the device. Then you can guide the M2Grip5 out of the upper retaining strap attachment. ® ® Figure 25: Removing M2Grip5 from M2Smart SE (1/2) Figure 26: Removing M2Grip5 from M2Smart SE (2/2) -
Page 23: M2 Logistics Protective Caps
SE, place it over the corresponding blind cap. The upper logistics protective cap is marked by the ACD logo and also has a recess for the scanner. Figure 28: Attaching the upper logistics protective cap The lower logistics protective cap is identified by the recess for the retaining strap and the charging contacts. -
Page 24: Removing M2 Logistics Protective Caps From The M2Smart Se
Figure 29: Attaching the lower logistics protective cap ® 4.6.3 Removing M2 logistics protective caps from the M2Smart ® To remove the upper and lower M2 logistics protective caps from the M2Smart SE, remove them from the blind caps. Figure 30: Removing the upper logistics protective cap First loosen the retaining strap, then remove the lower logistics protective cap and reinsert the retaining strap. - Page 25 Figure 31: Removing the lower logistics protective cap ® M2Smart SE_Set_Brief Overview_V1.02_en_es_fr 25 / 32...
-
Page 26: Replacement Battery
(greater than 60 °C/140 °F). Only ACD original power supplies and rechargeable batteries approved by ACD may be used for the operation of the Mobile Handheld Computer and docking station! The use of components that have not been approved can cause the destruction of the ATTENTION backhand scanner or docking station. - Page 27 To insert the rechargeable battery in the device, tip it diagonally downward and place it in the rechargeable battery compartment. Insert the rechargeable battery so that the contacts are aligned with the contacts of the device. Then the rechargeable battery can be folded downward so that the lock snaps in. Then the hand strap can be hooked back in.
-
Page 28: Instructions For Cleaning And Care
5 Instructions for Cleaning and Care Clean the module by setting it down on a surface (e.g. table). This way, you can hold it securely and the module cannot slip out of your hands during the cleaning process. Do not use any corrosive chemicals, cleaning solutions or strong cleaning agents in order to clean the Mobile Handheld Computer, battery and docking station. -
Page 29: Support
6 Support If you need additional assistance, please contact our support hotline: ///ACD Elektronik GmbH Engelberg 2 88480 Achstetten, Germany Tel.: +49 7392 708-488 E-mail: support.technik@acd-elektronik.de Web: https://www.acd-gruppe.de/en/ The support hotline is available for you Monday to Thursday from 8:00 am to 5:00 pm (CET) and Friday from 8:00 am to 3:00 pm (CET). -
Page 30: Manufacturer's Representations And Warranties
Fax: +49 7392 708-190 These Representations and Warranties are applicable to all customers (the “Customers” and each, individually, a “Customer”) purchasing products (the “Products”) manufactured by ACD Elektronik GmbH (the “Company”). 1. Warranty and Limitations: 1.1 Company warrants solely to the original purchaser of the Products that for the Warranty Period (as defined below), the Products will be free from defects in materials and workmanship under normal use, and will conform to Company’s published specifications of the Products. - Page 31 1.9 All requests and notices under this Warranty shall be directed to: ACD Elektronik GmbH Engelberg 2 88480 Achstetten Germany Phone: +49 7392 708-0 Email: info@acd-elektronik.de 1.10. THE WARRANTY SET FORTH IN SECTION 1.1 IS MADE IN LIEU OF ALL OTHER WARRANTIES (WHETHER EXPRESS OR IMPLIED), RIGHTS OR CONDITIONS, AND CUSTOMER ACKNOWLEDGES THAT EXCEPT FOR SUCH LIMITED WARRANTY, THE PRODUCTS ARE PROVIDED “AS IS.”...
- Page 32 9 Mise en service et fonctionnement des M2Modules L’émetteur/récepteur exempt de licence contenu dans le présent appareil est conforme aux CNR d’Innovation, Sciences et Développement économique Canada applicables aux appareils radio exempts de licence. L’exploitation est autorisée aux deux conditions suivantes : L’appareil ne doit pas produire de brouillage;...
Need help?
Do you have a question about the M2Smart SE and is the answer not in the manual?
Questions and answers