
Related Manuals for Bauhn ASIP-0622


Summary of Contents for Bauhn ASIP-0622
- Page 1 Smart Indoor Planter with WiFi connectivity MODEL: ASIP-0622 User Manual AFTER SALES SUPPORT tempo.org/support 1300 002 534 MODEL: ASIP-0622 PRODUCT CODE: 710124 06/2022...
-
Page 2: Welcome
Welcome Congratulations on your purchase! This manual tells you all you need to know about using your new BAUHN product. ® Please take special note of any important safety and usage information presented with the symbol. All products brought to you by BAUHN are manufactured to the highest standards of performance and safety and, ®... -
Page 3: Table Of Contents
Contents Welcome Troubleshooting Unpack and Prepare Specifications What's in the box Compliance and Responsible Disposal Setting up the Container Warranty Information Setting up the Grow Light Repair and Refurbished Product Overview Goods or Parts Notice Container Connecting the Container and Grow Light Connecting to a Power Source Operation Filling the water tank... -
Page 4: Unpack And Prepare
Unpack and Prepare What's in the box Before setting up your new Soundbar, check you have everything: A. Smart Indoor Planter B. Stand Set (Bar & Base) C. Growing Medium x 2 (2L Vermiculite each) D. Soluble Fertiliser (20g) E. Grow Light F. -
Page 5: Setting Up The Container
Setting up the Container • Insert the spray nozzles on top of the container as illustrated, ensuring they are firmly locked in. Insert the nozzles so that they are facing towards the inside of the container. Setting up the Grow Light •... -
Page 6: Product Overview
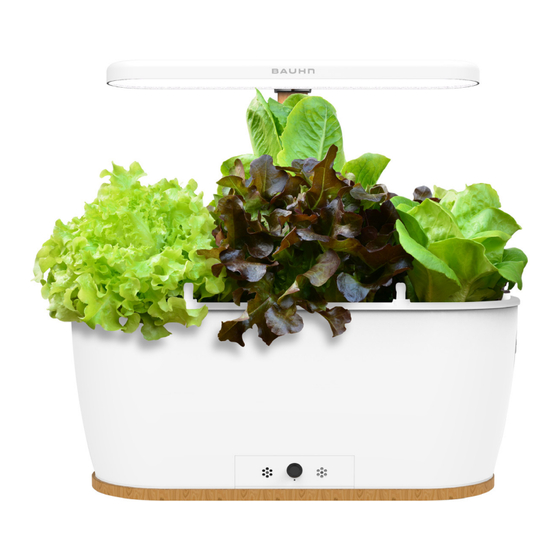
Product Overview Container 7. Indicator light 1. Grow Light 8. Humidity and fertility sensor 2. Bar 5 6 7 9. Drainage hole 3. Spray nozzles x 4 10. Water filling port 4. Temperature sensor 11. Water waste tank 5. Light sensor 6. -
Page 7: Connecting The Container And Grow Light
Connecting the Container and Grow Light • Connect one side of the grow light power cable into the black socket located on the underside of the container. Bottom View Grow light DC input port (black) Grow light DC DC input port output port (black) (white) Connecting to a Power Source... -
Page 8: Operation
Operation Filling the water tank • Before filling the water tank with water, ensure the container and grow light have been set up and the power adaptor is connected to a wall plug. • Open the water tank port on the side of the container. Pour roughly 2L of water of mixed with the soluble fertiliser supplied with the product. -
Page 9: Tuya Smart App
Tuya Smart App For Android For iOS Search for the Tuya Smart app in the app store to download, or scan the QR code (right) for installation. Google Play and the Google Play logo are trademarks of Google LLC. Apple, the Apple logo, iPhone, and iPad are trademarks of Apple Inc., registered in the U.S. - Page 10 Connect the Planter to the app • Tap on the "+" icon or "add device." • Select "Small Home Appliances" from the categories then select "Plant Grower (Wi-Fi)." • Ensure you are connected to a 2.4G Wi-Fi network and select "Next." •...
- Page 11 • From the app, you can monitor the temperature, illumination, humidity and fertility. • Select "Set Param" to select the parameters for each to desired value. • The plant status below displays when the seed was planted, estimated growing time and the expected time for the fruits/vegetables to be ripe.
- Page 12 Go to the settings page on the app to change the below: • Power Indicator LED switch - Switch between having the power indicator LED on/off. • No Alarm and Watering At Night - Between 8:00pm to 8:00am the following day, the app will not alert the user that the planting environment exceeds the set parameter range, and will not water automatically.
-
Page 13: Troubleshooting
• Plug in the power adaptor into the white socket and the grow light power cable plug into the grow light DC light function input port (black socket). Other issues • Please check bauhn.com.au for the latest user manual For more information and updates to the software, please go to the following link or scan the QR code. https://bauhn.com.au/smart-indoor-planter/... -
Page 14: Specifications
Specifications Power adaptor (AC input power) 100-240VAC, 50/60 Hz Power adaptor (DC output) 12VDC, 1A Power consumption Grow light power 12VDC, 0.5A Growing medium capacity Water tank capacity Dimensions with grow light (W x H x D) 400mm x 190mm x 380mm Weight 1.9kg For Technical Support:... -
Page 15: Compliance And Responsible Disposal
Compliance and Responsible Disposal Packaging Compliance The packaging of your product has been This product complies with the Australian Safety selected from environmentally friendly Standard AS/NZS 60335.1 to ensure the safety of the materials and can usually be recycled. Please ensure product. -
Page 16: Warranty Information
Warranty Information The product is guaranteed to be free from defects in workmanship and parts for a period of 12 months from the date of purchase. Defects that occur within this warranty period, under normal use and care, will be repaired, replaced or refunded at our discretion, solely at our option with no charge for parts and labour. -
Page 17: Repair And Refurbished
Repair and Refurbished Goods or Parts Notice Unfortunately, sometimes faulty products are manufactured, which need to be returned to the supplier for repair. Please be aware that if your product is capable of retaining user-generated data (such as files stored on a computer hard drive, telephone numbers stored on a mobile telephone, songs stored on a portable media player, games saved on a games console or files stored on a USB memory stick) during the process of repair, some or all of your stored data may be lost. - Page 18 Notes...
- Page 19 Notes...
- Page 20 Online support Visit bauhn.com.au for the latest User Manual for information on the updated features. Warranty returns tempo.org/support Should you for any reason need to return this product for a warranty claim, make sure to include all accessories with the product.
Need help?
Do you have a question about the ASIP-0622 and is the answer not in the manual?
Questions and answers