Table of Contents
Advertisement
Quick Links
Digital Blood
Pressure Monitor
Upper Arm
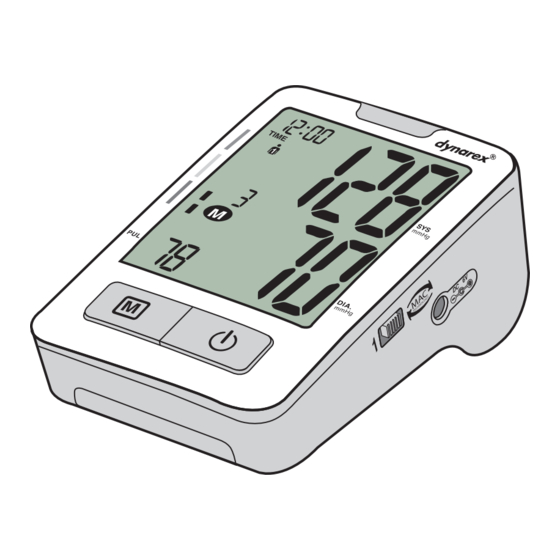
MAC switch
MAC mode
1
DC
6V
Standard single mode
Time and Date
Traffic Light Display
User
MAC Mode
Pressure unit
Memory Set No.
Memory Symbol
Heart Arrhythmia Indicator
Low Battery Warning
Heart Symbol
Pulse
TABLE OF CONTENTS
1. Introduction...................................................................................................2
1.1. Features of the Digital Blood Pressure Monitor....................................2
1.2. Important Information about Self-Measurement...................................2
2. Blood Pressure Measurement......................................................................2
2.1. How Does High/Low Blood Pressure Arise? ........................................2
2.2. Which values are normal?....................................................................2
3. Operation......................................................................................................2
3.1. Inserting the Batteries ..........................................................................2
3.2. Setting the Date/Time/Pressure Unit ....................................................3
3.3. User Selection ......................................................................................3
4. Carrying Out a Measurement .......................................................................3
4.1. Before the Measurement......................................................................3
4.2. Common Sources of Error....................................................................3
4.3. Fitting the Cuff ......................................................................................3
4.4. Measuring Procedure: Standard Single Mode and
MAC Mode (two-measurement mode) .................................................4
4.5. Discontinuing a Measurement..............................................................4
4.6. Memory – Storage and Recall of the Measurements ...........................4
4.7. Memory Full..........................................................................................4
4.8. Memory – Cancellation of All Measurements .......................................4
5. Error Messages/Malfunctions....................................................................4-5
6. Care and Maintenance, Recalibration ..........................................................5
7. Guarantee ....................................................................................................5
8. Service Life...................................................................................................5
9. Battery Life ...................................................................................................5
10. Safety, Care and Disposal.........................................................................5-6
11. Reference to Standards ...............................................................................6
12. Technical Specifications ...............................................................................6
13. Declaration – Electromagnetic Emissions ....................................................6
Reorder No. 7096
1.1. FEATURES OF THE DIGITAL BLOOD PRESSURE MONITOR
The Digital Blood Pressure Monitor (with integrated time/date display) is a fully
automatic, digital blood pressure measuring device for use on the arm, which
enables very fast and reliable measurement of the systolic and diastolic blood
pressure as well as the pulse frequency by way of the oscillometric method of
measuring. The device offers a very high and clinical tested measurement
accuracy and has been designed to provide a maximum of user-friendliness.
The device is intended for self-use at home. Before using, please read through
this instruction manual carefully and then keep it in a safe place. For further
questions on the subject of blood pressure and its measurement, please contact
your doctor.
1.2. IMPORTANT INFORMATION ABOUT SELF-MEASUREMENT
• Substitution of a different component might result in measurement error.
• Cuff is replaceable only by an original.
• Do not use with neonatal patients.
• It will cause harmful injury to the patient or effect the blood pressure due to
connection tubing kinking.
• Too frequent measurements can cause injury to the patient due to blood flow
interference.
• The application of the cuff over a wound can cause further injury.
• The application of the cuff and its pressurization on any limb where intravascu-
lar access or therapy, or an arteriovenous (A-V) shunt, is present because of
temporary interference to blood flow and could result in injury to the patient.
• Do not let the cuff and its pressurization on the arm on the side of a mastecto-
my.
• The need to check that operation of the automated sphygmomanometer does
not result in prolonged impairment of patient blood circulation.
• Not intended to be used together with HF surgical equipment.
• Do not forget: self-measurement means control, not diagnosis or treatment.
Unusual values must always be discussed with your doctor. Under no circum-
stances should you alter the dosages of any drugs prescribed by your doctor.
• The pulse display is not suitable for checking the frequency of heart pacemak-
ers!
• In cases of cardiac irregularity (Arrhythmia), measurements made with this
instrument should only be evaluated after consultation with the doctor.
MAC Mode
Electromagnetic interference
Standard Single Mode
The device contains sensitive electronic components (Microcomputer).
Therefore, avoid strong electrical or electromagnetic fields in the direct vicinity
of the device (e.g. mobile telephones, microwave cookers). These can lead to
ON/OFF Button
temporary impairment of the measuring accuracy.
Memory Button
2.1. HOW DOES HIGH/LOW BLOOD PRESSURE ARISE?
The level of blood pressure is determined in a part of the brain, the so-called
circulatory centre, and adapted to the respective situation by way of feedback via
the nervous system. To adjust the blood pressure, the strength and frequency of
the heart (Pulse), as well as the width of circulatory blood vessels is altered. The
latter is effected by way of fine muscles in the blood-vessel walls.
The level of arterial blood pressure changes periodically during the heart
activity: During the «blood ejection» (Systole) the value is maximal (systolic
blood pressure value), at the end of the heart's «rest period» (Diastole) minimal
(diastolic blood pressure value).
The blood pressure values must lie within certain normal ranges in order to
prevent particular diseases.
2.2. WHICH VALUES ARE NORMAL?
Blood pressure is too high if at rest, the diastolic pressure is above 90 mmHg
and/or the systolic blood pressure is over 160 mmHg. In this case, please
consult your doctor immediately. Long-term values at this level endanger your
health due to the associated advancing damage to the blood vessels in your
body.
Should the systolic blood pressure values lie between 140 mmHg and 160
mmHg and/or the diastolic blood pressure values lie between 90 mmHg and 100
Systolic
mmHg, likewise, please consult your doctor. Furthermore, regular self-checks
Value
will be necessary.
With blood pressure values that are too low, i.e. systolic values under 100 mmHg
and/or diastolic values under 60 mmHg, likewise, please consult your doctor.
Diastolic
Even with normal blood pressure values, a regular self-check with your blood
Value
pressure monitor is recommended. In this way you can detect possible changes
in your values early and react appropriately. If you are undergoing medical
treatment to control your blood pressure, please keep a record of the level of
your blood pressure by carrying out regular self-measurements at specific times
of the day. Show these values to your doctor. Never use the results of your
measurements to alter independently the drug doses prescribed by your doctor.
Table for classifying blood pressure values (unit: mmHg) according to World
Health Organization:
Range
Optimum
Normal
Slightly High
Too High
Far Too High
Dangerously High
Further information
• If your values are mostly standard under resting conditions but exceptionally
high under conditions of physical or psychological stress, it is possible that you
are suffering from so-called «labile hypertension». Please consult your doctor
if you suspect that this might be the case.
• Correctly measured diastolic blood pressure values above 120mmHg require
immediate medical treatment.
3.1. INSERTING THE BATTERIES
a) Insert the batteries (4 x size AA 1.5V), thereby observing the indicated
polarity.
b) the battery warning
power to warn user the batteries will be run out.
c) If the battery warning
and must be replaced by new ones.
Attention! After the battery warning
the batteries have been replaced.
• Please use «AA» Long-Life or Alkaline 1.5V Batteries.
• If the Digital Blood Pressure Monitor is left unused for long periods, please
remove the batteries from the device.
1. INTRODUCTION
2. BLOOD PRESSURE MEASUREMENT
Systolic
Diastolic
Measures
100-120
60-80
Self-check
120-130
80-85
Self-check
130-140
85-90
Consult your doctor
140-160
90-100
Seek medical advice
160-180
100-110
Seek medical advice
180 and up
110 and up
Urgently seek medical advice!
3. OPERATION
appears in the display, the batteries remain 20%
appears in the display, the batteries are empty
appears, the device is blocked until
3. OPERATION (Cont.)
3.2. SETTING DATE/TIME
How to enter to the setting mode:
a) after batteries are inserted, the device will automatically enter to the
setting mode.
b) press and hold "
" (ON/OFF) button for 5 seconds, the device will enter
to the setting mode
The setting procedure as follows:
Year
Month
Day
Hour
Min.
It is essential to set date and time. Otherwise, you will not be able to save
your measured value correctly with a date and time.
Use the
button to make adjustments.
If you press and hold the
button, you can set the values more quickly.
1. Year setting: the year flashes on the display
Choose the desired year with the
button and confirm with "
(ON/OFF) button.
2. Month setting: the month flashes on the display
Choose the desired month with the
button and confirm with "
(ON/OFF) button.
3. Day setting: the day flashes on the display
Choose the desired day with the
button and confirm with "
(ON/OFF) button.
4. Hour setting: the hour flashes on the display
Choose the desired hour with the
button and confirm with "
(ON/OFF) button.
5. Minute setting: the minute flashes on the display
Choose the desired minute with the
button and confirm with "
(ON/OFF) button.
6. Unit setting: the unit "kPa" or "mmHg" flashes on the display
Choose the desired minute with the
button and confirm with "
(ON/OFF) button.
NOTE: the clock will begin to run from 2016-01-01 01:01, and unit in mmHg,
if no key is pressed within 20 seconds.
3.3. USER SELECTION
Press and hold the
memory button for 2 seconds,
display. Press
to choose the desired user.
4. CARRYING OUT A MEASUREMENT
4.1. BEFORE THE MEASUREMENT
• Avoid eating, smoking as well as all forms of exertion directly before the
measurement. All these factors influence the measurement result. Try and
find time to relax by sitting in an armchair in a quite atmosphere for about ten
minutes before the measurement.
• Measure always on the same arm (normally left).
• Attempt to carry out the measurements regularly at the same time of day,
since the blood pressure changes during the course of the day.
4.2. COMMON SOURCES OF ERROR
NOTE: Comparable blood pressure measurements always require the same
conditions! These are normally always quiet conditions.
• All efforts by the patient to support the arm can increase the blood pressure.
Make sure you are in a comfortable, relaxed position and do not activate any
of the muscles in the measurement arm during the measurement. Use a
cushion for support if necessary.
• The performance of the automated sphygmomanometer can be affected by
extremes of temperature, humidity and altitude.
• Avoid compression or restriction of the connection tubing.
• A loose cuff causes false measurement values.
• With repeated measurements, blood accumulates in the respective arm,
which can lead to false results. Correctly executed blood pressure measure-
ments should therefore first be repeated after a 5 minute pause or after the
arm has been held up in order to allow the accumulated blood to flow away
(after at least 3 minutes).
4.3. FITTING THE CUFF
Insert air connector into air outlet shown in the
photo and please make sure the fitting of the air
connector completely and properly to avoid air
leakage.
a) The distance between the edge of cuff and
the elbow should be approx. 2~3 cm.
b) Secure the cuff with the Velcro fastener,
so that it lies comfortably and not too tight,
whereby no space should remain between
the cuff and the arm.
c) Lay the arm on a table, with the palm
upwards. Support the arm a little with a rest
(cushion), so that the cuff rests at about the
same height as the heart. Take care, that the
cuff lies free. Remain so for 2 minutes sitting
quietly, before beginning with the measure-
ment.
d) Let legs uncrossed, feet flat on the floor,
back and arm supported.
Unit (mmHg/KPa)
"
"
"
"
"
"
flash on the
Air
Connector
Cuff
M-L
size
2 2 - 4 2 c m
Advertisement
Table of Contents

Summary of Contents for dynarex 7096
- Page 1 Reorder No. 7096 1. INTRODUCTION 3. OPERATION (Cont.) Digital Blood 3.2. SETTING DATE/TIME 1.1. FEATURES OF THE DIGITAL BLOOD PRESSURE MONITOR How to enter to the setting mode: The Digital Blood Pressure Monitor (with integrated time/date display) is a fully...
- Page 2 7. GUARENTEE the last 3 measurements and all of records. All of 120 measurements (MR1, output power of the communications equipment. Please contact Dynarex at MR3, ..., MR120) can be displayed (MR1: Values of the last measurement). QA.Support@Dynarex.com for more information and manufacturer technical specifications.
Need help?
Do you have a question about the 7096 and is the answer not in the manual?
Questions and answers