
Subscribe to Our Youtube Channel
Related Manuals for Rover 98117

Summary of Contents for Rover 98117
- Page 1 Owners Manual Chip ‘N’ Shred Model No: 98117 - Petrol 9862 - Petrol 9848 - Petrol 9885 - 240 Volt Electric...
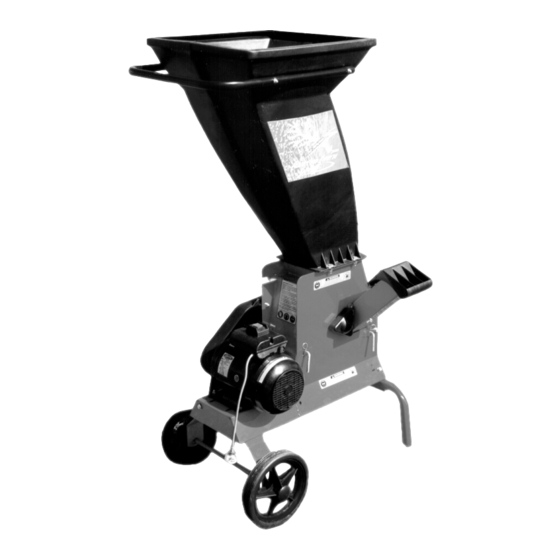
- Page 2 Baffle Right Hand Side Figure 1. Hopper Assembly Figure 3. Hopper handle to hopper Figure 5. Chipper tube to body assembly Handle Left Hand Side Figure 2. Hopper baffle fitting Figure 4. Hopper assembly to body Spreader tube Front leg support Figure 6.
- Page 3 Screen bar Figure 7. Clutch Lever - Petrol Models Figure 8. Screen fitting Figure 9. Drive belt adjustment - Petrol Models Figure 10. Drive belt Adjustment - Electric Models Figure 11. Chipper blade removal and fitting Figure 12. Rotor assembly...
-
Page 4: Table Of Contents
Please read and understand this Owners Manual, and the accompanying Engine manufacturers manual for petrol models. If any point is unclear, contact Rover Mowers Limited or any authorised Rover Mower service dealer. WARNING The safety of the user and others involved. -
Page 5: Safety Instructions
Rover Mowers Limited Training * Become familiar with the Owner’s Manual before attempting to operate this equipment. * Do not allow children to operate this equipment. * Do not operate this equipment in the vicinity of bystanders. * Carbon dioxide can be extremely dangerous in enclosed areas;... -
Page 6: Specifications
Rover Mowers Limited General Electrical Safety Rules 1. Avoid dangerous environments such as damp locations. 2. Do not abuse the power cord. Never pull a machine by the cord or pull the cord to disconnect it from the outlet socket. Keep the cord away from excessive heat, oil, and sharp edges. -
Page 7: Hopper Handle And Baffle Assembly
2. Slide the chipper tube assembly into the rectangular port on the right hand side of the Chip ‘N’ Shred that the holes in the flanges on the chipper tube align with the studs on the Chip ‘N’ Shred 3. Retain the chipper tube assembly with three 5/16”... -
Page 8: Fuel - Petrol Models
Rover service dealer. engine as per section 3.1.for WARNING , cut them first into lengths... -
Page 9: Screens
Rover Mowers Limited 3.8 Screens Two screens are supplied with the Chip ‘N’ Shred standard screen consisting of numerous holes in a curved plate and a bar screen consisting of widely spaced bars between two side plates. The size of the mulch produced by either shredding or chipping is dependent on the screen fitted to the Chip ‘N’... -
Page 10: Chipper Blade Removal And Fitting
3. Remove the hopper assembly fasteners and lift the hopper assembly off the Chip ‘N’ Shred 4. Rotate the rotor to expose the chipper blade in the chipper tube port. 5. Using a 1/2” AF ring spanner and a Allen key remove the chipper blade fasteners and remove the chipper blade. -
Page 11: Composting
* Dead plants and flowers Plant cuttings and prunes. * Green branches from small trees Sawdust and pulverised wood shavings. * Mulched material from the Rover Shred * Cow, horse and chicken manure. 5.7 Materials that should NEVER be composted. - Page 12 Product Model no: ... Product Serial no: ... Date of Purchase: ... Rover Mowers Limited reserves the right to make changes of and add improvements upon its product at any time without notice or obligation. The Company also reserves the right to discontinue manufacture of any product at its discretion at any time.
Need help?
Do you have a question about the 98117 and is the answer not in the manual?
Questions and answers