
Subscribe to Our Youtube Channel
Related Manuals for Zennio ZVIFDV2


Summary of Contents for Zennio ZVIFDV2
- Page 1 Flat Display v2 Capacitive switch with display and humidity sensor ZVIFDV2 Application Programme Version: [2.5] User Manual Version: [2.5]_a www.zennio.com...
-
Page 2: Table Of Contents
2.3.6 Fan ..........................44 2.3.7 Borders ........................45 Inputs ........................... 48 2.4.1 Binary Input ......................48 2.4.2 Temperature Probe ....................48 2.4.3 Motion Detector ...................... 48 Thermostat ........................49 Humidity ........................49 ANNEX I. Communication Objects....................50 https://www.zennio.com Technical Support: https://support.zennio.com... -
Page 3: Introduction
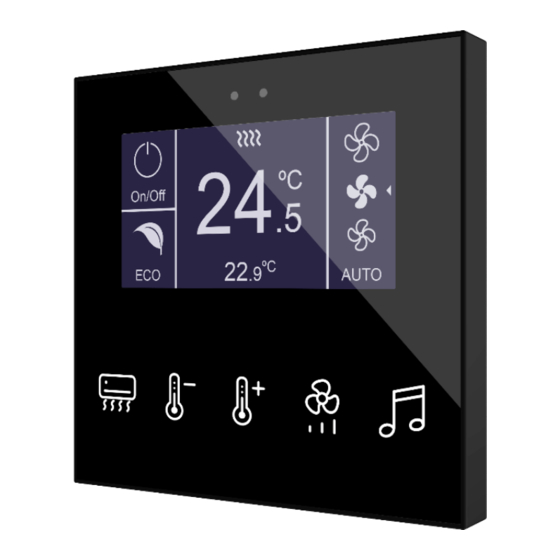
FLAT DISPLAY V2 Flat Display v2 is a KNX multifunction capacitive touch switch with an analogue display from Zennio with proximity sensor, humidity, luminosity sensor and backlighted buttons and display. It is offered at a reduced size and weight, with five capacitive touch buttons on the bottom, with LED backlight to confirm the press of the buttons or showing states, and a display on the top. - Page 4 Celsius and Fahrenheit temperature scales for the on-screen indicators, being possible to select them in parameters or through communication object. Ambient luminosity sensor for brightness automatic adjustment. Proximity sensor for quick start. Heartbeat or periodical “still-alive” notification. https://www.zennio.com Technical Support: https://support.zennio.com...
-
Page 5: Installation
LED will then blink in red. For detailed information about the technical features of Flat Display v2, as well as on security and installation procedures, please refer to the Datasheet, bundled within the device packaging of also available at www.zennio.com. https://www.zennio.com Technical Support:... -
Page 6: Start-Up And Power Loss
Button presses. For a correct calibration of the proximity and brightness sensors it is recommended not to approach less than 50 cm from the device during this time and to avoid that the light strikes directly. https://www.zennio.com Technical Support: https://support.zennio.com... -
Page 7: Configuration
(screensaver, sounds, lock procedure of the touch panel…) or to advanced features (cleaning function, welcome back object, welcome greeting…). 2.1.1 CONFIGURATION In the “Configuration" tab, the general settings are displayed. https://www.zennio.com Technical Support: https://support.zennio.com... - Page 8 Thermostat [disabled/enabled]: enables or disables the “Thermostat” tab in the tree on the left. See section 2.5 for details. The default values of each parameter will be highlighted in blue in this document, as follows: [default/rest of options]. https://www.zennio.com Technical Support: https://support.zennio.com...
- Page 9 There are four options available, some of them with a configurable delay: ➢ [Disabled]: no read request, therefore objects are not updated. ➢ [After Programming]: read requests are sent after a complete or partial download after the parameterised delay [1…10…65535] [s/min/h]. https://www.zennio.com Technical Support: https://support.zennio.com...
- Page 10 “waking up” the device display when detecting presence. Please refer to the specific manual “Proximity and Luminosity Sensor” (available in the Flat Display v2 product section at the Zennio homepage, www.zennio.com) for detailed information about the functionality and the configuration of the related parameters.
- Page 11 [General] Activity: 1-bit object to force activity or inactivity state in the device. See "Proximity and luminosity Sensor" and "Brightness" user manuals (available in the Flat Display v2 product section at the Zennio homepage, www.zennio.com) for more information. [General] Display - Brightness: 1-byte percentage object for changing the display brightness level.
- Page 12 ➢ Not case sensitive. ➢ Please refer to http://en.wikipedia.org/wiki/List_of_ISO_639-1_codes for a table with the language codes. On the other hand, Flat Display v2 allows the use of Latin, Greek and Cyrillic characters for the texts displayed on the screen. https://www.zennio.com Technical Support: https://support.zennio.com...
- Page 13 These objects work accordingly to the behaviour mentioned above. 2.1.1.2 BACKLIGHT Flat Display v2 allows managing the brightness of the display and the LED according to two operating modes: normal mode and night mode. Note: Contrast is not a configurable feature in this device. https://www.zennio.com Technical Support: https://support.zennio.com...
- Page 14 KNX bus and of triggering certain actions when the temperature reaches specific values. Please refer to the specific manual “Temperature Probe” (available in the Flat Display v2 product section at the Zennio homepage, www.zennio.com) for detailed information about the functionality and the configuration of the related parameters.
- Page 15 Note: this functionality is independent of the buttons lock performed when the alarm is triggered on thermostat page. (see section 2.3.1). ETS PARAMETERISATION After enabling Touch Locking from the "Configuration" tab (section 2.1.1), a new tab is added to the left tree: https://www.zennio.com Technical Support: https://support.zennio.com...
- Page 16 When the first one is selected, one textbox (Message) appears to enter the desired message. 2.1.1.6 AMBIENT LUMINOSITY SENSOR Flat Display v2 incorporates a luminosity sensor to receive and monitor ambient brightness measurement. https://www.zennio.com Technical Support: https://support.zennio.com...
- Page 17 Please refer to the specific manual “Luminosity and Proximity Sensor” (available in the Flat Display v2 product section at the Zennio homepage, www.zennio.com) for detailed information about the functionality and the configuration of the related parameters. 2.1.1.7 SOUNDS Flat Display v2 emits 3 types of sounds, depending on the action performed: Press Confirmation: short beep indicating that the user has pressed a button.
- Page 18 Object for Doorbell [disabled/enabled]: enables or disables the doorbell function. If enabled, a specific object (“[General] Sounds - Doorbell”) will be included into the project topology. https://www.zennio.com Technical Support: https://support.zennio.com...
-
Page 19: Advanced Configuration
Welcome Back Object [disabled/enabled]: enables or disables the “Welcome Back Object” tab. See section 2.1.2.3 for details. Object to Change the Temperature Scale [disabled/enabled]: enables the 1- bit object “[General] Temperature Scale”), which permits changing in runtime https://www.zennio.com Technical Support: https://support.zennio.com... - Page 20 (or both). ETS PARAMETERISATION After enabling Cleaning Function from “Advanced” screen (see section 2.1.2), a new tab will be incorporated into the tree on the left. https://www.zennio.com Technical Support: https://support.zennio.com...
- Page 21 The same will happen if any of the 14-byte objects that define the text lines receives a new value from the bus. It is also possible to make the button LEDs flash during the welcome state. https://www.zennio.com Technical Support: https://support.zennio.com...
- Page 22 14- byte object “[General] Welcome Greeting – Line X”. Up to four objects will appear, depending on how many lines have been assigned the “Received from text Object” option. https://www.zennio.com Technical Support: https://support.zennio.com...
- Page 23 Send Object Trigger [Press Button / Detect Presence]: sets whether the welcome back object is sending after a touch in the screen or when the proximity sensor detects presence. https://www.zennio.com Technical Support: https://support.zennio.com...
- Page 24 (through “[General] Scene: send”) when the welcome back function is triggered and the condition (if any) evaluates to true. The desired value should to be set in Scene Number [1…64]. https://www.zennio.com Technical Support: https://support.zennio.com...
-
Page 25: Buttons
BUTTONS For detailed information about the functionality and the configuration of the related parameters, please refer to the specific manual "Capacitive Touch Switches" available in the Flat Display v2 product section at the Zennio homepage, www.zennio.com. DISPLAY 2.3.1 CONFIGURATION Flat Display v2 features a 2.4’’ 128 x 64 pixel back-lit monochrome screen with black background and white icons and fonts. - Page 26 12 characters for big boxes and 6 characters for small boxes (if the text does not fit in the box, it will be truncated). If this label is left empty, then the indicator fills the box. https://www.zennio.com Technical Support: https://support.zennio.com...
- Page 27 While all the zones remain disabled, it will only contain a sub-tab named Configuration. This screen contains the following parameters: Page Style [Normal Page / Thermostat]: sets the layout and functionality of the display. Figure 15. Display – Configuration (Normal Page) https://www.zennio.com Technical Support: https://support.zennio.com...
- Page 28 “Box C”. See section 2.3.6. Note: Option only available for zone C of Thermostat Page. ➢ [Setpoint]: Selecting Thermostat Page, this option will always be activated in zone B. The “Box B” tab is displayed in the left tree. https://www.zennio.com Technical Support: https://support.zennio.com...
- Page 29 Enabling and disabling the alarm functionality at runtime is also possible through the object “[Disp] Enable Alarm”. Note: only available in “Thermostat” type pages. Figure 17. Display – Configuration (Thermostat Page) - Alarm Alarm Configuration: https://www.zennio.com Technical Support: https://support.zennio.com...
-
Page 30: Disabled
This function has no related parameters. 2.3.3 SINGLE Single boxes have a size of 64 x 32 pixels. The display can be divided into up to four single boxes. Single boxes can be assigned the following types of indicators: https://www.zennio.com Technical Support: https://support.zennio.com... - Page 31 When the value contains decimals, only the first one will be shown, and it will be represented in a smaller size. Also, if the decimal part does not fit, the number will be rounded to the nearest integer. https://www.zennio.com Technical Support: https://support.zennio.com...
- Page 32 “Display” in the tree on the left. Moreover, the textbox INFO allows changing the default name of the tab in the left menu, as shows the following figure, as happen with buttons (see section 2.2). https://www.zennio.com Technical Support: https://support.zennio.com...
- Page 33 Depending on the indicator, some more parameters are shown, as described next. Please note that in the next pages the general notation “[Disp][X]” is used for the name of the communication objects, as “x” depends on the display zone (a, b, etc.). Icon https://www.zennio.com Technical Support: https://support.zennio.com...
- Page 34 • # Enums [1…6]: sets the number of states of the enumerated list. ▪ Value [0…255]: sets the numerical value assigned to the state. ▪ Icon: sets the icon to be displayed for each value. Number https://www.zennio.com Technical Support: https://support.zennio.com...
- Page 35 “[Disp] [X] Text – 1-Bit”. When selecting this type, the following parameters need to be configured. • Text for value 0/1: sets the text to be displayed for each value. https://www.zennio.com Technical Support: https://support.zennio.com...
- Page 36 Time of day Figure 24. Display indicator – Time. The hour to be shown is received through the object “[General] Time”. Font size [Small / Big / Extra]: sets the font size of the time. https://www.zennio.com Technical Support: https://support.zennio.com...
- Page 37 Include Plus Sign before Positive Numbers [disabled/enabled]: sets whether showing or not the “+” sign before positive temperature values. Font size [Small / Big / Extra]: sets the font size of the temperature label. https://www.zennio.com Technical Support: https://support.zennio.com...
- Page 38 If “Text” is selected, the following parameters will appear: ➢ Font size [Small (12 Characters) / Big (8 Characters)]: sets the font size of the texts. ➢ Text for each value: sets the text to be displayed for each value. https://www.zennio.com Technical Support: https://support.zennio.com...
- Page 39 Figure 29. Display indicator – [Climate] Fan. The value should be updated through the “[Disp] [x] Fan” one-byte communication object. Off/Auto [0%] [enabled/disabled]: defines whether the Off/Auto level is required to be represented or not. If enabled, the following parameter shows https://www.zennio.com Technical Support: https://support.zennio.com...
- Page 40 If “[Disp] [x] (Climate) On/Off” = 1 and “[Disp] [x] (Climate) On/Off - Status” = 1, it means that the climate is on and running. The icon represented will depend on the mode selected through “[Disp] [x] (Climate) On/Off - Mode” https://www.zennio.com Technical Support: https://support.zennio.com...
- Page 41 “[Disp] [x] (Climate) Mode Special”. If “Text” is selected, the following parameters will appear: ➢ Font size [Small (12 Characters) / Big (8 Characters)]: sets the font size of the texts. Text for each value: sets the text to be displayed for each value. https://www.zennio.com Technical Support: https://support.zennio.com...
-
Page 42: Double
The textbox INFO also allows changing the default name of the tab in the left menu. Figure 32. Display – Box a1. The ETS parameterisation of each indicator is exactly the same as for Single boxes. See section 2.3.3 for details. https://www.zennio.com Technical Support: https://support.zennio.com... -
Page 43: Setpoint
Setpoint Temperature" and the real temperature through the object "[Disp][Setpoint] Real temperature". Include Plus Sign before Positive Numbers [disabled/enabled]: sets whether showing or not the “+” sign before positive temperature values. Object to show/hide indicator [enabled/disabled]. https://www.zennio.com Technical Support: https://support.zennio.com... -
Page 44: Fan
Value to Activate Auto Mode [Receive 0 to Set Auto Mode / Receive 1 to Set Auto Mode] and an arrow will be displayed next to the AUTO icon and next to the currently activated speed. https://www.zennio.com Technical Support: https://support.zennio.com... -
Page 45: Borders
Figure 36. Borders – Different configuration for each border. ETS PARAMETERISATION After selecting “Customize every border” in the Border lines parameter (see section 2.3.1), a new tab will be incorporated into the tree on the left. https://www.zennio.com Technical Support: https://support.zennio.com... - Page 46 Figure 37. Display – Borders (Normal Page) Figure 38. Display – Borders (Thermostat Page) Depending on the page style selected in the “Configuration” tab (see section 2.3.1), this screen will be divided into the following parts: https://www.zennio.com Technical Support: https://support.zennio.com...
- Page 47 ➢ Horizontal lines: configures the horizontal lines a1-a2 y c1-c2. ➢ Vertical lines: configures the vertical lines a1-b, a2-b, c1-b y c2-b. The options available for all the lines are: [Solid line / Invisible / Dotted line]. https://www.zennio.com Technical Support: https://support.zennio.com...
-
Page 48: Inputs
Display v2 product section, at the Zennio website (www.zennio.com). 2.4.3 MOTION DETECTOR It is possible to connect motion detectors from Zennio to the input ports of Flat Display v2. This brings the device with the possibility of monitoring motion and presence in the room. -
Page 49: Thermostat
THERMOSTAT Flat Display v2 implements one Zennio thermostat which can be enabled and fully customised. Please refer to the specific manual “Zennio Thermostat” (available in the Flat Display v2 product section at the Zennio website, www.zennio.com) for detailed information about the functionality and the configuration of the related parameters. -
Page 50: Annex I. Communication Objects
[General] Welcome Greeting 0 = Finish Welcome; 1 = Run Welcome 22, 23, 24, 25 C - W - - DPT_String_UTF-8 [General] Welcome Greeting - Line x Text to Show on the Display at Line x Bytes https://www.zennio.com Technical Support: https://support.zennio.com... - Page 51 C - W T - DPT_Switch [Btn][Ix] Fan Control - Auto Mode Switch Auto Mode on Long Press 45, 52, 59, 66, 73 1 Bit C - W T - DPT_Switch [Btn][Ix] LED On/Off 0 = Off; 1 = On https://www.zennio.com Technical Support: https://support.zennio.com...
- Page 52 1 Byte C - - T - DPT_Fan_Stage 0 - 255 0, 1, 2, 3, 4 Enumeration) [Btn][Ix] Fan Control (Type: 1 Byte C - - T - DPT_Fan_Stage 0 - 255 0, 1, 2, 3 Enumeration) https://www.zennio.com Technical Support: https://support.zennio.com...
- Page 53 C - - T - DPT_Switch [Btn][Px] Light - On/Off (Short press) Left = Off; Right = On (Short press) Left = Stop/Step down; Right = 1 Bit C - - T - DPT_Step [Btn][Px] Shutter - Stop/Step Stop/Step up https://www.zennio.com Technical Support: https://support.zennio.com...
- Page 54 0x1 (Dec. by 100%) 0x7 (Dec. by 1%) 4 Bit C - W T - DPT_Control_Dimming [Btn][Px] Light - Dimming (Long press) Left = Brighter; Right = Darker 0x8 (Stop) 0xD (Inc. by 100%) 0xF (Inc. by 1%) https://www.zennio.com Technical Support: https://support.zennio.com...
- Page 55 C - - T - DPT_Fan_Stage 0 - 255 0, 1, 2, 3, 4, 5 Enumeration) [Btn][Px] Fan Control (Type: 1 Byte C - - T - DPT_Fan_Stage 0 - 255 0, 1, 2, 3, 4 Enumeration) https://www.zennio.com Technical Support: https://support.zennio.com...
- Page 56 [Disp][a] Show/Hide Box 0 = Hide Box; 1 = Show Box 92, 100, 108, 116, 1 Bit C - W - - DPT_Switch [Disp][ax] Show/Hide Box 0 = Hide Box; 1 = Show Box 124, 132, 140, 148 https://www.zennio.com Technical Support: https://support.zennio.com...
- Page 57 DPT_Scaling 0% - 100% [Disp][a] Fan - 100%) Off/Auto + 2 levels: Off/Auto = 0%; Min. 1 Byte C - W T U DPT_Scaling 0% - 100% [Disp][a] Fan (1% - 50%); Max. (51% - 100%) https://www.zennio.com Technical Support: https://support.zennio.com...
- Page 58 C - W T U DPT_Value_2_Count -32768 - 32767 Object numeric value is shown signed) -671088.64 - 2 Bytes C - W T U 9.xxx [Disp][a] Number - Float (2-Byte) Object numeric value is shown 670433.28 https://www.zennio.com Technical Support: https://support.zennio.com...
- Page 59 0 = Disable; 1 = Enable 1 Bit C - W - - DPT_Enable [Disp] Alarm Enable 0 = Enable; 1 = Disable 1 Bit C - W T U DPT_Alarm [Disp] Alarm 0 = No Alarm; 1 = Alarm https://www.zennio.com Technical Support: https://support.zennio.com...
- Page 60 0xD (Inc. by 100%) 0xF (Inc. by 1%) 0x0 (Stop) 0x1 (Dec. by 100%) 4 Bit C - - T - DPT_Control_Dimming [Ix] [Short Press] Darker Decrease Brightness 0x7 (Dec. by 1%) 0x8 (Stop) 0xD (Inc. by 100%) https://www.zennio.com Technical Support: https://support.zennio.com...
- Page 61 [Ix] [Long Press] Stop/Step Down 1 Bit C - - T - DPT_Step Sending of 1 (Stop/Step Down) Shutter [Ix] [Long Press] Stop/Step Shutter 1 Bit C - - T - DPT_Step Switching of 0/1 (Stop/Step Up/Down) (Switched) https://www.zennio.com Technical Support: https://support.zennio.com...
- Page 62 [Ix] [Long Press] Constant Value 1 Byte C - - T - DPT_Scaling 0% - 100% 0% - 100% (Percentage) [Ix] [Long Press] Constant Value 1 Byte C - - T - DPT_Value_1_Ucount 0 - 255 0 - 255 (Integer) https://www.zennio.com Technical Support: https://support.zennio.com...
- Page 63 1 Bit C - W - - DPT_Switch [Ix] [ax] Force State 0 = No Detection; 1 = Detection 233, 238 1 Byte C - W - - DPT_SceneControl 0-63; 128-191 [Thermostat] Scene Input Scene Value https://www.zennio.com Technical Support: https://support.zennio.com...
- Page 64 [Tx] Setpoint Reset Reset Setpoint to Default 1 Bit C - W - - DPT_Reset [Tx] Offset Reset Reset Offset 1 Bit C - W - - DPT_Heat_Cool [Tx] Mode 0 = Cool; 1 = Heat https://www.zennio.com Technical Support: https://support.zennio.com...
- Page 65 0 = No Alarm; 1 = Alarm 1 Bit C R - T - DPT_Alarm [Hum] Low Humidity 0 = No Alarm; 1 = Alarm 1 Bit C R - T - DPT_Alarm [Hum] Condensation 0 = No Alarm; 1 = Alarm https://www.zennio.com Technical Support: https://support.zennio.com...
- Page 66 Join and send us your inquiries about Zennio devices: https://support.zennio.com Zennio Avance y Tecnología S.L. C/ Río Jarama, 132. Nave P-8.11 45007 Toledo, Spain. Tel. +34 925 232 002 www.zennio.com info@zennio.com...
Need help?
Do you have a question about the ZVIFDV2 and is the answer not in the manual?
Questions and answers