Table of Contents
Advertisement
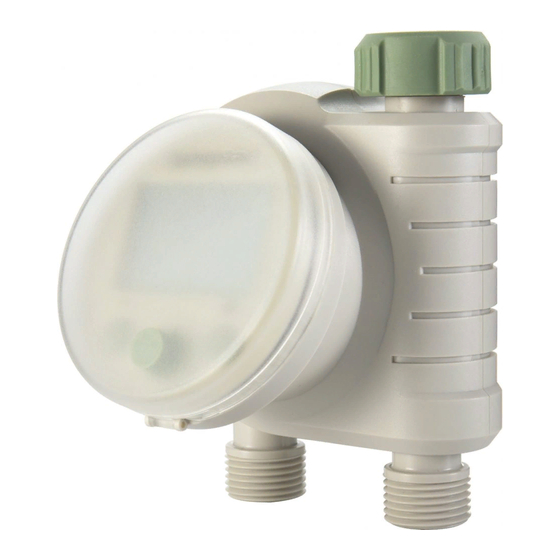
Edge 2 Plus
Electronic Hose Faucet Timer
Setup Manual
Ideal for:
✓ Lawns
✓ Gardens
✓ Shrubs
✓ Allotments
✓ Patios
✓ Pots
✓ Holiday watering
Note: Actual product colour may vary by region.
To be used outdoors, with cold water only. Horizontal or inverted installation is prohibited.
Note: Avoid exposing the product to frost as damage will occur.
1
Advertisement
Table of Contents

Related Manuals for AppyGarden Edge 2 Plus

Summary of Contents for AppyGarden Edge 2 Plus
- Page 1 Edge 2 Plus Electronic Hose Faucet Timer Setup Manual Ideal for: ✓ Lawns ✓ Gardens ✓ Shrubs ✓ Allotments ✓ Patios ✓ Pots ✓ Holiday watering Note: Actual product colour may vary by region. To be used outdoors, with cold water only. Horizontal or inverted installation is prohibited.
-
Page 2: How To Modify The Programs Of Stations 1 And
INTRODUCTION Thank you for selecting the Edge 2 Plus Electronic Hose Faucet Timer. The Edge 2 Plus combines the simplicity of mechanical switches with the accuracy of digital electronics to give you a versatile and easy to program product. This Manual provides guidelines and precautions for use of this Product. -
Page 3: Table Of Contents
CONTENTS PAGE Features Additional Features Components Installation Instructions How to set the current time How to modify the programs of Stations 1 and 2 How to manually turn off the Product during a watering cycle How to set and change manual watering mode How to set, change or turn off the rain delay timer Product precautions Troubleshooting... -
Page 4: Features
FEATURES We have packed many useful and beneficial features in an attractive and easy to program LCD layout. • Two outlet ports for additional watering options. • 2 independent programs per outlet for more watering flexibility. • Detachable electronic fascia to enable you to program inside at your convenience. -
Page 5: Components
Components Hose Tap Connection: ” Internal thread and built-in metal filter. Display Screen: Large LCD display Operation Buttons: Turn/OK dial +/− buttons Water Outlets: ” External thread... -
Page 6: Installation Instructions
INSTALLATION INSTRUCTIONS Connect the product using Connect the first hose to the Connect the second hose to the hose tap connection to leftmost water outlet, this will the rightmost water outlet, the corresponding faucet. become Station 1. Use an this will become Station 2. adapter PTFE tape... -
Page 7: How To Set The Current Time
For ease of programming the face of the product can be removed from the body. How to set the current time: Note: the time on the Edge 2 Plus does not automatically change during the summer daylight saving time and may therefore require manual changing. - Page 8 How to modify the programs for Station 1 and Station 2: From the main menu, turn Press the middle dial to begin Turn the middle dial to select the middle dial until the customizing the program. ON or OFF, depending on required program whether the program is...
- Page 9 Ensure that the minutes are Press the middle dial to Turn the middle dial to select flashing and modify by confirm and to move onto the duration of the irrigation turning the middle dial, until the duration of the watering cycle.
-
Page 10: How To Manually Turn Off The Product During A Watering Cycle
How to manually turn off the Product during a watering cycle: During a watering cycle the current time will appear in the top left corner, and the station and program will appear in the top right corner. A faucet symbol will appear under the corresponding station, alongside the corresponding program, which will be flashing. -
Page 11: How To Set And Change Manual Watering Mode
How to set and change manual watering mode Note: Manual watering can also be turned on during a watering cycle, simply follow the same instructions. To turn on manual watering Press the middle dial to begin If you would like to change mode for Station 1, from the modifying the time. - Page 12 If you would like to change If both manual watering time To turn off the manual the duration, turn the middle modes are on, you can watering mode, press the (−) dial to modify the time (with alternate the display to show until ON begins to flash, turn a limit of 6 hours), and press the time remaining on either...
-
Page 13: How To Set, Change Or Turn Off The Rain Delay Timer
How to set, change or turn off the rain delay timer From the main menu, Press The ON should be flashing. Press the middle dial to the button to the right of the Turn the middle dial to select confirm the rain delay time. middle dial, displaying the the amount of delay, 24h or 2 (+) symbol. -
Page 14: Product Precautions
PRODUCT PRECAUTIONS 1. This product is for outdoor use only, horizontal, or inverted installation is prohibited. 2. Do not soak the product in water and please prevent it from contact with high amounts of dust. 3. Do not store it with high concentrations of salt or sulphur in the air. 4. -
Page 15: Troubleshooting
TROUBLESHOOTING The LCD screen does not display anything when the batteries are installed. Check if: • The two batteries loaded are new AA 1.5V alkaline batteries. • The batteries are properly placed as per the marks of +/−. Water Does not come out at the pre-set time. Check if: •... -
Page 16: Maintenance
MAINTENANCE The replacement and maintenance of the batteries: • Please replace the batteries in time when the empty battery icon appears on the LCD screen. • When not using the product for a long time, remove the batteries to prevent them from leaking and damaging the life-span of the product. -
Page 17: Warranty Card
WARRANTY CARD Thank you for purchasing our products. Users who purchased our products are automatically provided with a conditional warranty. You may contact local distributors or special repair stations with the product invoice and warranty card if your device fails due to quality problems.
Need help?
Do you have a question about the Edge 2 Plus and is the answer not in the manual?
Questions and answers