
Summary of Contents for Top Chef HGM408
- Page 1 Multifunctional Food Processor Model: HGM408 Welcome Important Safeguards Product Overview How to Use 220-240V~ 50/60Hz 820-1100W Getting Started Guide...
- Page 2 Contents English 01~14 Deutsch 15~29 30~44 Français 45~59 Español Italiano 60~74...
- Page 3 Welcome to the world of TopChef cooking.
-
Page 4: Important Safeguards
Important Safeguards Read this user manual carefully before you use the appliance and keep it for future reference. Danger - Never immerse the motor unit in water or any other liquid, nor rinse it under the tap. Warning - Check if the voltage indicated on the appliance corresponds to the local mains voltage before you connect the appliance. - Never connect this appliance to a timer switch in order to avoid a hazardous situation. -
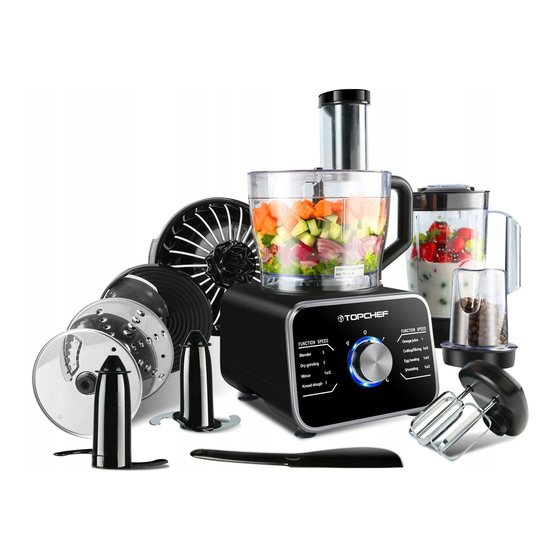
Page 5: Product Overview
- Always unplug the appliance before you reach into the blender jar with your ngers or an object (e.g. aspatula). - Wait until moving parts stop running before you remove the lid of the bowl or jar. - Never use any accessories or parts from other manufacturers or that Supplier does not speci cally recommend. If you use such accessories or parts, your guarantee becomes invalid. -
Page 6: How To Use
HOW TO USE - Please wash thoroughly those components which may contact the food before using the product. - This product has a dual safety system. It will work only after all parts are properly installed. Chopping Meat Place the Bowl on the Main Body, the angle between the handle and the main body safety switch is about 55 degrees (before placing, make sure that the Main Body is on a at desktop and it is not shaking) - Page 7 Hold the handle of the Bowl and turn it clockwise into the Main Body. When the "▼" on the Bowl is opposite to the Main Body “ ” or a "click" is heard, it indicates that the Bowl has been rotated in the right position.The product does not work if the Bowl is not in the right position.
-
Page 8: Kneading Dough
CAUTION 1)Make sure that the Chopping Blade is placed rst when putting the ingredients in the Bowl, so as to avoid the di culty to assemble Chopping Blade. 2)The Bowl Lid should be in the right postion to avoid not working. 3)Do not process hard food materials, such as co ee beans, ice cubes, etc. - Page 9 Put the Drive Shaft into the Bow Put the our into the Bowl. The our should not exceed 500g ① Cover the Blow with the Bowl Lid. ② Rotate the Bowl Lid clockwise into the Bowl. When the "click" is heard, it means that the Bowl Lid has been rotated in the right position, The product does not work if the Bowl Lid is not in the right position ①...
-
Page 10: Slicing & Shredding
5)Please put in the appropriate proportion of our rst, then start the machine to ensure that the Dough Hook works rst, then evenly and slowly pour into the appropriate proportion of water, do not pour water too fast, so that water can not form paste with the our Slicing &... - Page 11 ① Cover the Blow with the Bowl Lid. ② Rotate the Bowl Lid clockwise into the Bowl. When the "click" is heard, it means that the Bowl Lid has been rotated in the right position, The product does not work if the Bowl Lid is not in the right position Insert the power cord into the power supply, and rotate the switch to 1 or 2 shift and start working.
- Page 12 Whisk Place the Bowl on the Main Body, the angle between the handle and the main body safety switch is about 55 degrees (before placing, make sure that the Main Body is on a at desktop and it is not shaking) Hold the handle of the Bowl and turn it clockwise into the Main Body.
- Page 13 Insert the power cord into the power supply, and rotate the switch to 1 or 2 shift and start working. Each working time should be less than 30 seconds. CAUTION 1)When processing egg white, please make sure that the inside of the Bowl is dry and there is no water or oil inside of the Bowl.
- Page 14 Put the Drive Shaft into the Bowl. ① Put the Citrus Juicer Filter on the Drive Shaft. ② Rotate the Citrus Juicer Filter clockwise into the Bowl. When the "click" is heard, it means that the Citrus Juicer Filter has been rotated in the right position, The product does not work if the it is not in the right position.
- Page 15 Blender ① Check whether the sealing ring is installed in the Blender Jar Base. ② Rotate the Blender Jar Base clockwise into the Blender Jar. It needs to be tightened. Untightened will lead to leakage. Pour the food materials and some water into the Blender Jar. ①Put the Blender Jar Lid on the Blender Jar.
- Page 16 Insert the power cord into the power supply, and rotate the switch to 1 shift and start working. Each working time should be less than 1 minute. CAUTION 1)Do not put food above 80℃ into the Blender Jar. 2)Ingredient should not exceed the maximum calibration line of the Bowl, otherwise the crushing e ect and life of the product will be a ected.
- Page 17 ① Place the Grinder on the Main Body. (before placing, make sure that the Main Body is on a at desktop and it is not shaking) ② Rotate the Grinder clockwise into the Main Body. When the "click" is heard, it means that the Blender Jar has been rotated in the right position, The product does not work if the it is not in the right position.
- Page 18 Lesen Sie bitte vor Inbetriebnahme die Bedienungslei tung aufmerksam durch. Bewahren Sie die Bedienung sanleitung für zukünftige Referenz. Achtung - Tauchen Sie die Motoreinheit niemals ins Wasser oder andere Flüssigkeiten und spülen Sie sie nicht unter ießendem Wasser Warnung - Prüfen Sie, ob die auf dem Gerät angegebene Span nung mit der örtlichen Netzspannung übereinstimmt, bevor Sie das Gerät anschließen.
- Page 19 - Ziehen Sie das Gerät sofort nach jedem Gebrauch ab. - Immer den Netzstecker ausziehen, bevor Sie mit den Fingern oder einem Gegenstand (z. B. einem Spatel) in den Mixaufsatz gelangen. - Ö nen Sie die Schüssel oder den Mixeraufsatz erst, wenn der Motor vollends zum Stillstand gekommen ist. - Verwenden Sie niemals Zubehöre oder Teile von anderen Herstellern, oder die der Lieferant nicht be sonders emp ehlt.
- Page 20 13. Hackklinge 14. Knethaken 15. Spatel 16. Mahlwerk 17. Mahlwerkdeckel 18. Messbecher 19. Mixbecher Deckel 20. Mixerbecher 21. Mixerbecher-Basis 22. Schneebesen Körper 23. Schneebesen Stock...
- Page 21 BENUTZUNG - Vor der Verwendung des Produkts, bitte Komponenten sorgfältig waschen, die mit dem Lebensmittel in Berührung kommen können. - Dieses Produkt verfügt über ein duales Sicherheitssys-tem. Es funktioniert nur, wenn alle Teile ordnungsgemäß installiert sind. Fleisch hacken Schüssel auf dem Hauptgehäuse platzieren. Der Winkel zwischen dem Gri und dem Sicherheitsschalter des Hauptgehäuses beträgt etwa 55 Grad (vor dem Platzie-ren, sicherstellen, dass sich das Hauptgehäuse auf einem achen Desktop be ndet und nicht wackelt)
- Page 22 Fleisch in die Schüssel legen. Lebensmittel, die verarbeitet werden müssen, sollten 500 g nicht überschreiten. ① Schüssel mit dem Schüsseldeckel abdecken. ② Schüsseldeckel im Uhrzeigersinn in die Schüssel drehen,. Wenn das „Klicken “zu hören ist, bedeutet dies, dass der Schüsseldeckel in die richtige Position gedreht wurde.
-
Page 23: Teig Kneten
Teig kneten Schüssel auf dem Hauptgehäuse platzieren. Der Winkel zwischen dem Gri und dem Sicherheitsschalter des Hauptgehäuses beträgt etwa 55 Grad (vor dem Platzieren, sicherstellen, dass sich das Hauptgehäuse auf einem achen Desktop be ndet und nicht wackelt). Gri der Schüssel halten und im Uhrzeigersinn in den Hauptkörper drehen. Wenn das „▼“... - Page 24 ① Schüssel mit dem Schüsseldeckel abdecken. ② Schüsseldeckel im Uhrzeigersinn in die Schüssel drehen,. Wenn das „Klicken “zu hören ist, bedeutet dies, dass der Schüsseldeckel in die richtige Position gedreht wurde. Das Produkt funktioniert nicht, wenn der Schüsseldeckel nicht in der richtigen Position ist.
- Page 25 Schneiden & Zerkleinern Schüssel auf dem Hauptgehäuse platzieren. Der Winkel zwischen dem Gri und dem Sicherheitsschalter des Hauptgehäuses beträgt etwa 55 Grad (vor dem Platzieren, sicherstellen, dass sich das Hauptgehäuse auf einem achen Desktop be ndet und nicht wackelt). Gri der Schüssel halten und im Uhrzeigersinn in den Hauptkörper drehen. Wenn das „▼“...
- Page 26 Netzkabel in die Stromversorgung stecken, Schalter auf 1 oder 2 Schicht drehen und mit der Arbeit beginnen. Jede Arbeitszeit sollte weniger als 30 Sekunden betragen. ① Nahrungsmittelmaterial durch die Rutsche auf dem Schüsseldeckel in die Schüssel langsam setzen. ② Doppelschieber vorsichtig verwenden, um die Zutaten durch die Rutsche zu schieben.
- Page 27 Schneebesen Schüssel auf dem Hauptgehäuse platzieren. Der Winkel zwischen dem Gri und dem Sicherheitsschalter des Hauptgehäuses beträgt etwa 55 Grad (vor dem Platzieren, sicherstellen, dass sich das Hauptgehäuse auf einem achen Desktop be ndet und nicht wackelt). Gri der Schüssel halten und im Uhrzeigersinn in den Hauptkörper drehen. Wenn das „▼“...
- Page 28 Netzkabel in die Stromversorgung stecken, Schalter auf 1 oder 2 Schicht drehen und mit der Arbeit beginnen. Jede Arbeitszeit sollte weniger als 3 Minuten betragen. Vorsicht 1)Bei der Verarbeitung von Eiweiß, bitte sicherstellen, dass das Innere der Schüssel trocken ist und es kein Wasser oder Öl in der Schüssel gibt.
- Page 29 Antriebswelle in die Schüssel setzen. ① Zitruspresse-Filter auf die Antriebswelle setzen. ② Zitruspresse-Filter im Uhrzeigersinn in die Schüssel drehen,. Wenn das „Klicken “zu hören ist, bedeutet dies, dass der Zitruspresse-Filter in die richtige Position gedreht wurde. Das Produkt funktioniert nicht, wenn der Zitruspresse-Filter nicht in der richtigen Position ist.
- Page 30 Mixer ① Überprüfen, ob der Dichtungsring in der Mixbecher Basis installiert ist. ② Mixbecher Basis im Uhrzeigersinn in den Mixbecher drehen. Es muss festgezogen werden. Ungespannt führt zu Undichtigkeiten. Nahrungsmittelmaterialien und etwas Wasser in den Mixbecher gießen. ① Mixbecherdeckel auf den Mixbecher setzen . ②...
- Page 31 Netzkabel in die Stromversorgung stecken, Schalter auf 3 Schicht drehen und mit der Arbeit beginnen. Jede Arbeitszeit sollte weniger als 1 Minute betragen. Vorsicht 1)Lebensmittel über 80 ℃ in den Mixbecher nicht legen. 2)Die Zutat sollte die maximale Kalibrierungslinie der Schüssel nicht überschreiten, da sonst die Quetschwirkung und die Lebensdau- er des Produkts beeinträchtigt werden.
- Page 32 ① Schleifer auf dem Hauptgehäuse platzieren. (vor dem Platzieren, sicherstellen, dass sich das Hauptgehäuse auf einem achen Desktop be ndet und nicht wackelt). ② Schleifer im Uhrzeigersinn in die Schüssel drehen, Wenn das „Klicken “zu hören ist, bedeutet dies, dass der Mixbecher in die richtige Position gedreht wurde. Das Produkt funktioniert nicht, wenn der Mixbecher nicht in der richtigen Position ist.
- Page 33 Lisez ce manuel de l’utilisateur attentivement avant que vous utilisez cet appareil et conservez le pour la référence future. Danger - Ne jamais plonger l’unit de moteur dans l’eau ou tout autre liquide, ni rincer le sous le robinet. Avertissement - Véri er si la tension indiquée sur l’appareil correspond à...
- Page 34 - Toujours débrancher l’appareil avant que vous tou chez la jarre du mixeur avec vos doigts ou un objet(ex. Un spatule). - Attendez jusqu’à ce que les pièces en mouvement arrêtez le fonctionnement avant que vous enleviez le couvercle du bol ou de la jarre.
- Page 35 13. Lame de hachage 14. Crochet de pâte 15. Spatule 16. Broyeur 19. Couvercle de pot de mixeur 17. Couvercle de broyeur 18. Coupe de mesure 20. Pot de mixeur 23. Bâton de fouet 21. Base de pot de mixeur 22.
- Page 36 COMMENT EST-CE QUE VOUS L’UTILISEZ - Veuillez soigneusement laver les composants susceptibles d'entrer en contact avec les aliments avant l’utilisa- tion de produit. - Ce produit possède un double système de sécurité. Il fait le fonctionnement uniquement lorsque toutes les pièces seront correctement installées.
- Page 37 Mettez la viande dans le bol. Les aliments à transformer ne doivent pas dépasser 500g. ① Couvrez le bol avec le couvercle de bol. ② Tournez le couvercle de bol dans le sens inverse. Lorsque vous entendez le "clic", cela signi e que le couvercle de bol a été tourné dans la bonne position.
- Page 38 Pétrissage de pâte Placez le bol sur le corps principal, l’angle entre la poignée et l’interrupteur de sécurité de corps principal est d’environ 55 degrés (avant qu’il est placé, assurez que le corps principal est mis sur une surface plate de table et elle ne tremble pas).
- Page 39 ① Couvrez le coup avec le couvercle de bol. ② Tournez le couvercle de bol dans le sens inverse. Lorsque vous entendez le "clic", cela signi e que le couvercle de bol a été tourné dans la bonne position. Si le couvercle de bol n'est pas mis dans la bonne position, le produit ne fait pas le fonctionnement.
- Page 40 Tranchage et déchiquetage Placez le bol sur le corps principal, l’angle entre la poignée et l’interrupteur de sécurité de corps principal est d’environ 55 degrés (avant qu’il est placé, assurez que le corps principal est mis sur une surface plate de table et elle ne tremble pas).
- Page 41 Insérez le l d’alimentation dans l’alimentation, tournez l’interrupteur à 1 ou 2 et commencez le fonctionnement. Le temps de fonctionnement doit durer moins de 30 secondes. ① Mettez lentement les aliments dans le bol à travers la goulotte située sur le couvercle de bol. ②...
- Page 42 Slicing & Shredding Placez le bol sur le corps principal, l’angle entre la poignée et l’interrupteur de sécurité de corps principal est d’environ 55 degrés (avant qu’il est placé, assurez que le corps principal est mis sur une surface plate de table et elle ne tremble pas).
- Page 43 Insérez le l d’alimentation dans l’alimentation, tournez l’interrupteur à 1 ou 2 et commencez le fonctionnement. Le temps de fonctionnement doit durer moins de 3 minutes. Attention 1)Lors du traitement du blanc d'œuf, veuillez assurer que l'intérieur de bol est sec et il n'y a pas l'eau ou l'huile dans le bol. 2)N’utilisez pas le corps de fouettement pour pétrir la pâte.
- Page 44 Placez l'arbre d’entraînement dans le bol. ① Placez le ltre de presse-agrumes sur l'arbre d’entraînement. ② Tournez le ltre de presse-agrumes dans le bol dans le sens horaire. Lorsque vous entendez un "clic", cela signi e que le ltre de presse-agrumes a été tourné dans la bonne position.
- Page 45 Mixeur ① Véri ez si la bague d'étanchéité est installée dans la base de pot de mixeur. ② Tournez la base de pot de mixeur dans le pot de mixeur dans le sens horaire. Il faut faire le serrage. Le desserrage peut entraîner la fuite. Versez les produits alimentaires et l’eau dans le pot de mixeur.
- Page 46 Insérez le l d’alimentation dans l’alimentation, tournez l’interrupteur au niveau 3 et commencez le fonctionnement. Le temps de fonctionnement doit être inférieur à une minute. Attention 1)Il est interdit d'installer la base de broyeur lorsque le broyeur n’est pas installé sur le corps principal; 2)L'ingrédient ne doit pas dépasser la ligne d'étalonnage maximale de bol, sinon l'e et de broyage et la durée de vie de produit sont a ectées.
- Page 47 ① Placez le broyeur sur le corps principal. (avant qu’il est placé, assurez que le corps principal est mis sur une surface plate de table et elle ne tremble pas.) ② Tournez le broyeur dans le corps principal dans le sens horaire. Lorsque vous entendez le "clic", cela signi e que le pot de mixeur a été...
- Page 48 Lea cuidadosamente este manual de usuario antes de usar el aparato y guárdelo para futuras referencias. Peligro - Nunca sumerja la unidad de motor en agua o cual quier otro líquido, ni lo enjuague bajo el grifo. Advertencia -Compruebe si el voltaje indicado en el aparato se corresponde con el voltaje de red local antes de conectar el aparato. - Nunca conecte este aparato a un interruptor de temporizador a n de evitar una situación peligrosa.
- Page 49 - Nunca utilice cualquier accesorio o pieza de otros fabricantes o que el Proveedor no lo recomiende especí camente. Si utilice tales accesorios o partes, su garantía se convierte en inválido. - No supere el contenido máximo indicado en el recipi ente del procesador de alimentos o la jarra de la bati dora. - No utilice el exprimidor si el tamiz está...
- Page 50 13. Cuchilla para Picar 14. Gancho de Masa 15. Espátula 16. Triturador 19. Licuadora 17. Tapa de Triturador 18. Taza de Medición 20. Jarra de Licuadora 23. Varillo de Batidora 22. Cuerpo de Batidora Base de Jarra de Licuadora...
-
Page 51: Cómo Utilizar
CÓMO UTILIZAR - Lave minuciosamente los componentes que puedan entrar en contacto con los alimentos antes de usar el producto. - Este producto tiene un sistema de seguridad doble. Funcionará solamente después de que todas las piezas se hayan instalado correctamente. - Page 52 Ponga la carne en el Tazón. Los alimentos que necesitan procesarse no deben exceder de 500g. ① Cubra el golpe con la cubierta de tazón. ② Gire la Cubierta de Tazón en el sentido horario en el Tazón. Cuando se oye un "clic", signi ca que la Cubierta de Tazón ha girado en la posición correcta.
- Page 53 Amasar la Masa Coloque el Tazón en el Cuerpo Principal, el ángulo entre el mango y el interruptor de seguridad del cuerpo principal es de aproximadamente 55 grados (antes de colocarlo, asegúrese de que el Cuerpo Principal esté sobre un escritorio plano y no esté agitando). Sostenga el mango del Tazón y gírelo en sentido horario en el Cuerpo Principal.
- Page 54 ① Cubra el Tazón con la Cubierta de Tazón ② Gire la Cubierta de Tazón en sentido horario en el Tazón. Cuando se oye un "clic", signi ca que la Cubierta de Tazón se ha girado en la posición correcta. El producto no funciona si la Cubierta de Tazón no está...
- Page 55 Rebanada & Trituración Ponga el Tazón en el Cuerpo Principal, el ángulo entre el mango y el interruptor de seguridad del cuerpo principal es de aproximadamente 55 grados (antes de colocarlo, asegúrese de que el Cuerpo Principal esté sobre un escritorio plano y no esté agitando). Sostenga el mango del Tazón y gírelo en sentido horario en el Cuerpo Principal.
- Page 56 Inserte el cable de alimentación en la fuente de alimentación, gire el interruptor a la marcha 1 o 2 y empieza a trabajar. Cada tiempo de trabajo debe ser inferior a 30 segundos. ① Ponga lentamente el material de alimento en el Tazón a través de la rampa en la Cubierta de Tazón.
- Page 57 Batición Ponga el Tazón en el Cuerpo Principal, el ángulo entre el mango y el interruptor de seguridad del cuerpo principal es de aproximadamente 55 grados (antes de colocarlo, asegúrese de que el Cuerpo Principal esté sobre un escritorio plano y no esté agitando) Sostenga el mango del Tazón y gírelo en sentido horario en el Cuerpo Principal.
- Page 58 Inserte el cable de alimentación en la fuente de alimentación, gire el interruptor a la marcha 1 o 2 y empieza a trabajar. Cada tiempo de trabajo debe ser inferior a 3 minutos. Precaución 1)Al procesar la clara de huevo, asegúrese de que el interior del Tazón esté seco y que no haya agua ni aceite dentro del Tazón 2)No utilice el Cuerpo de Batidora para amasar la masa.
- Page 59 Ponga el Eje de Accionamiento en el Tazón. ①Ponga el Filtro de Exprimidor de Cítricos en el Eje de Accionamiento. ②Gire el Filtro de Exprimidor de Cítricos en el sentido horario en el Tazón. Cuando se oye un "clic", signi ca que el Filtro de Exprimidor de Cítricos se ha girado en la posición correcta.
- Page 60 Licuadora ① Compruebe si el anillo de sellado está instalado en la Base de Jarra de Licuadora. ② Gire la Base de Jarra de Licuadora en sentido horario en la Jarra de Licuadora. Debe ser apretada. Si no se aprieta, se producirán fugas. Vierta los materiales de alimentos y un poco de agua en la Jarra de Licuadora.
- Page 61 Inserte el cable de alimentación en la fuente de alimentación, gire el interruptor a la marcha 3 y empieza a trabajar. Cada tiempo de trabajo debe ser inferior a 1 minuto. Precaución 1)No ponga los alimentos más de 80 ℃ en la Jarra de Licuadora. 2)El ingrediente no debe exceder la línea de calibración máxima del Tazón, en caso contrario, se verán afectados el efecto de trituración y la vida útil del producto.
- Page 62 ① Ponga la Trituradora en el Cuerpo Principal (antes de colocarla, asegúrese de que el Cuerpo Principal esté en un escritorio plano y no esté agitando) ② Gire la Trituradora en sentido horario en el Cuerpo Principal. Cuando se oye un "clic", signi ca que la Jarra de Licuadora se ha girado en la posición correcta.
- Page 63 Leggere questo manuale utente con attenzione e conservarlo per futuri riferimenti. Pericolo -Mai immergere l'unità motore in acqua o in altri liquidi, nè sciacquarla sotto il rubinetto. Avvertenze -Controllare se la tensione indicata sull'apparecchio corrisponde alla tensione delle prese locali prima di attaccare l'apparec- chio.
- Page 64 - Spegnere l'apparecchio prima di staccare gli acces sori. - Staccare la corrente dall'apparecchio immediata mente dopo ciascun utilizzo. - Staccare sempre la corrente dall'apparecchio prima di toccare l'interno della ciotola del frullatore con le dita o con altri oggetti (per esempio una spatola). - Aspettare no che i componenti in movimento si fermino di muoversi prima di rimuovere il coperchio della ciotola o del barattolo.
- Page 65 5. Albero di Trasmissione 6. Coperchio della Ciotola 7. Doppio Spingitore Spremiagrumi Disco per Triturazione Disco per Affettare Regolabile 12. Disco per Friggitrice Francese Filtro dello Spremiagrumi Spessa/Grossolana 13. Lama di Triturazione 14. Gancio per la Pasta 15. Spatola 16. Frullatore 18.
-
Page 66: Come Usare
COME USARE - Si prega di lavare accuratamente quei componenti che potrebbero entrare in contatto con il cibo prima di usare il prodotto. - Questo prodotto ha un doppio sistema di sicurezza. Funzionerà solo dopo aver installato tutte le parti correttamente. Chopping Meat Posizionare la Ciotola sul Corpo Principale, l'angolo tra la maniglia e l'interruttore di sicurezza del corpo principale è... - Page 67 Mettere la carne nella Ciotola. Il cibo che deve essere lavorato non deve superare i 500 g. ① Coprire la Ciotola con il Coperchio della Ciotola. ② Ruotare il Coperchio della Ciotola in senso orario nella Ciotola. Quando si sente il "clic", signi ca che il Coperchio della Ciotola è stato ruotato nella posizione corretta.
- Page 68 Impastare la pasta Posizionare la Ciotola sul Corpo Principale, l'angolo tra la maniglia e l'interruttore di sicurezza del corpo principale è di circa 55 gradi (prima di posizionarla, assicurarsi che il Corpo Principale si trovi su una scrivania piana e non si agiti). Tenere la maniglia della Ciotola e girarla in senso orario nel Corpo Principale.
- Page 69 ① Coprire la Ciotola con il Coperchio della Ciotola. ② Ruotare il Coperchio della Ciotola in senso orario nella Ciotola. Quando si sente il "clic", signi ca che il Coperchio della Ciotola è stato ruotato nella posizione corretta. Il prodotto non funziona se il Coperchio della Ciotola non è nella posizione corretta.
- Page 70 A ettare E Triturare Posizionare la Ciotola sul Corpo Principale, l'angolo tra la maniglia e l'interruttore di sicurezza del corpo principale è di circa 55 gradi (prima di posizionarla, assicurarsi che il Corpo Principale si trovi su una scrivania piana e non si agiti). Sostenga el mango del Tazón y gírelo en sentido horario en el Cuerpo Principal.
- Page 71 Inserire il cavo di alimentazione nell'alimentatore e ruotare l'interruttore sullo spostamento 1 o 2 e iniziare a lavorare. Ogni orario di lavoro deve essere inferiore a 30 secondi. ① Mettere lentamente il cibo nella ciotola attraverso lo scivolo sul coper- chio della ciotola.
- Page 72 Sbattere Posizionare la Ciotola sul Corpo Principale, l'angolo tra la maniglia e l'interruttore di sicurezza del corpo principale è di circa 55 gradi (prima di posizionarla, assicurarsi che il Corpo Principale si trovi su una scrivania piana e non si agiti). Tenere la maniglia della Ciotola e girarla in senso orario nel Corpo Principale.
- Page 73 Inserire il cavo di alimentazione nell'alimentatore e ruotare l'interruttore sullo spostamento 1 o 2 e iniziare a lavorare. Ogni orario di lavoro deve essere inferiore a 3 minuti. Attenzione 1)Quando si lavora il bianco d'uovo, si prega di assicurarsi che l'interno della Ciotola sia asciutto e che non ci sia acqua o olio all'interno della Ciotola.
- Page 74 Mettere l'Albero di Trasmissione nella Ciotola. ① Coprire la Ciotola con il Coperchio della Ciotola. ② Ruotare il Coperchio della Ciotola in senso orario nella Ciotola. Quando si sente il "clic", signi ca che il Filtro dello Spremiagrumi è stato ruotato nella posizione corretta.
- Page 75 Frullatore ① Controllare se l'anello di tenuta è installato nella base del Vaso del Frullatore. ② Ruotare la base del Vaso del Frullatore in senso orario nel del Vaso del Frullatore. Ha bisogno di essere serrata. Lo svitamento porterà a perdite. Versare i materiali alimentari e un po' d'acqua nel Vaso del Frullatore.
- Page 76 Inserire il cavo di alimentazione nell'alimentatore e ruotare l'interruttore sullo spostamento 3 e iniziare a lavorare. Ogni orario di lavoro deve essere inferiore a 1 minuto. Attenzione 1)Non mettere il cibo sopra 80 ℃ nel Vaso del Frullatore. 2)L'ingrediente non deve superare la linea di calibrazione massima della Ciotola, altrimenti l'e etto di schiacciamento e la vita del prodotto saranno in uenzati.
- Page 77 ① Posizionare la Smerigliatrice sul Corpo Principale. (prima di posizionarla, assicurarsi che il Corpo Principale sia su una scrivania piatta e non si agiti) ② Ruotare la Smerigliatrice in senso orario nel Corpo Principale. Quando si sente il "clic", signi ca che il Vaso del Frullatore è stato ruotato nella posizione corretta. Il prodotto non funziona se non è...
- Page 78 Hong Kong TopChef Appliance Limited Room P, 4/f, Lladro Centre, 72 Hoi Yuen Road Kwun Tong Kowloon website: www.topchef.cc E-mail: support.topchef.cc Made In China...
Need help?
Do you have a question about the HGM408 and is the answer not in the manual?
Questions and answers
where do you get spare parts for the processor
Spare parts for the Top Chef HGM408 processor can be obtained from the eBay seller "Cchri_842061," who offers items such as the French Fries Cutting Disc Blade for this model.
This answer is automatically generated
Pleade can you advise if uou have a replacement for Topchef HGM 408 multifunctional food processor- Item 21 jug base unit. Current one has began leaking from lower jug and can not be used. Thank you