Advertisement
Table of Contents
- 1 Installing / Removing Track Roller on Pantograph
- 2 Mounting / Unmounting Studio Light on Pantograph
- 3 Increasing / Decreasing Pantograph Spring Tension
- 4 Handling Pantograph Tension Wire Breakage / Displacement
- 5 Rewinding Entire Tension Wire Around Spring Case
- 6 Pantograph Usage and Handling Good Practices
- Download this manual
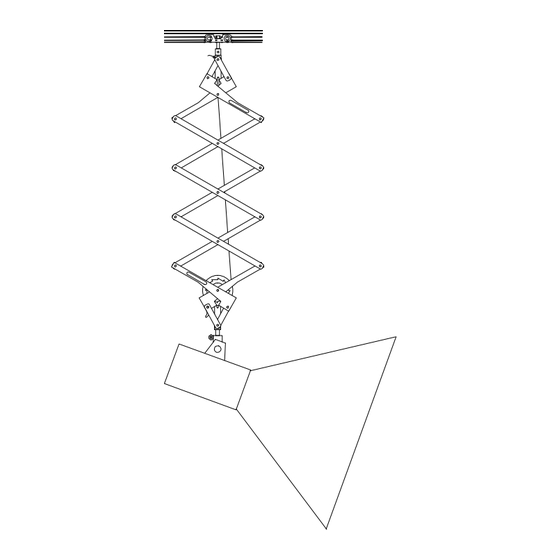
Adjoining diagram shows
a brief sketch of all the
components of Modern
Pantograph
1. Track
2. Track roller
3. Track roller socket
4. Track roller socket bolt
5. Tension wire
lock
6. Tension wire
stud
7. Tension wire
8. Body cage
9. Body stud
10. Body spacer
11. Light wire hook
12. Spring case
13. Locking gear
14. Locking lever
15. Light stud
Modern Pantograph
Operation and Maintenance Manual
1
Advertisement
Table of Contents

Summary of Contents for Modern Pantograph
- Page 1 Modern Pantograph Operation and Maintenance Manual Adjoining diagram shows a brief sketch of all the components of Modern Pantograph 1. Track 2. Track roller 3. Track roller socket 4. Track roller socket bolt 5. Tension wire lock 6. Tension wire stud 7.
- Page 2 8 feet sliding track 3 or 4 track wire hooks can be used. - Take Modern Pantograph and slide it at other end of the sliding track. - Take light wire and start installing it from the lower end of the pantograph as shown here.
- Page 3 - Once the light is mounted on the pantograph, the orientation of light with respect to pantograph body cage is very important for smooth functioning of the pantograph. - As shown in the above diagram, rotate the light along the light stud on pantograph to have the desired orientation.
- Page 4 - Open the lower track end stop of the sliding track and unmount the pantograph in shortened form as shown in the adjoining diagram - Place the pantograph firmly on ground in a way that the light stud touched the ground and pantograph stays in upright position as shown here.
- Page 5 -Once the tension in the tension wire is set, take the end of the wire and pass it thorough the tension wire stud at upper part of pantograph as shown in the adjoining diagram. - Make sure that the spring case is held firmly...
- Page 6 - Open the lower track end stop of the sliding track and unmount the pantograph. - Place the pantograph firmly on ground in a way that the light stud touched the ground and pantograph stays in upright position as shown in the adjoining diagram.
- Page 7 - After the tension in the tension wire is set, take the end of the wire and pass it thorough the tension wire stud at upper part of pantograph as shown in the adjoining diagram. - Make sure that the spring case is held firmly...
- Page 8 If more load is applied without pressing locking lever, it may deform pantograph structure and hamper its functionality. - See that while sliding the pantograph its body cage should not bend on side-ways. This again might deform the pantograph structure and hamper its functionality.
Need help?
Do you have a question about the Pantograph and is the answer not in the manual?
Questions and answers