Advertisement
Quick Links
Advertisement

Summary of Contents for Sarka SSGI
- Page 1 Safety Precautions Assembly Operation Accessories Troubleshooting 25 Year Warranty...
- Page 2 The last grill you will ever need to buy. Welcome to the proud Family of owners of Sarka Grills. We know that you will receive years of enjoyable grilling pleasure from our grill. For your convenience, we have taken the time to prepare this manual. Please take the time to read it carefully and fully understand your new grill.
- Page 3 Important Safety Precautions ! WARNING ! IMPORTANT If You Smell Gas: Shut off gas to the appliance. Read all warning and safety Extinguish any open flame. instructions carefully prior to assembly Open lid. and / or operating your new Sarka If odor continues, immediately call your gas Grill. We also advise supplier or your fire dept. you to keep this manual for future reference. ! WARNING Never Alter This Grill In Any Manner. It INSTALLER: Please leave this manual Will Void The Warranty And May in the possession of the grill owner. Cause Bodily Harm and/or Personal Property Damage.
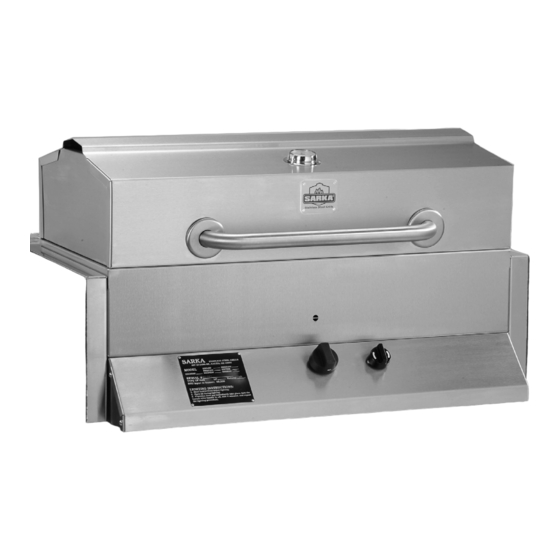
- Page 4 Assembly Procedures Each SARKA grill is packaged in durable shipping cartons. If, during assembly, you find that a component is damaged in any way, please consult your local dealer. ! CAUTION Parts may have sharp edges. It is • recommended that you wear gloves during the assembly process. • Remove protective plastic film from all stainless steel parts before assembly. STEP 1 - Island Requirements Island opening should measure 18.5”...
- Page 5 STEP 3 - Grill Top & Burner Assembly COMPONENTS REQUIRED: (1) Top - (4) 1/4 - 20 bolts. lock washers and acorn nuts (1) Burner (1) Handle - (4) 1/4 - 20 bolt, lock washer and nut (1) Thermometer and Thermometer ring - (3) #6 x 1/2 self tapping screws Assembly Tips: 1. Thermometer is inserted through the gill top first. The ring is placed in position over the thermometer and fastened in place using the screws. 2. Insert bolts, lock washers and acorn nuts through the top holes of the hinges. 3.Venturi of burner should be inserted through the opening in the bottom of the grill first. The Venturi slides over the orifice cap on the valve. The burner peg should be inserted into the hole in the igniter bracket. It is important that the burner be aligned properly. See illustration for proper gap between burner and electrode (1/4”). STEP 5 - Gas Connection The hose end is equipped with a 3/8” flare fitting. This will match to the fitting on the grill valve. (Ensure that hose is not in contact with bottom of grill) Tighten and test for leaks immediately after assembly of the hose is complete. To tighten the hose assembly to the valve, you will need (1) 5/8” wrench and (1) 3/4” wrench. NATURAL GAS CONNECTIONS All natural gas models come shipped with a valve and a #43 orifice. It is the sole responsibility of the owner of the grill to contact their local gas service technician for hook-up to the supply. Remind the service...
- Page 6 For more information on cleaning your SARKA grill, please read the The temperature range on all 400 & 500 series SARKA grills is 400 degrees section “Cleaning your SARKA grill” on the following page.
- Page 7 A. Drain excess grease from catch pan and operate on high Temperature for 15-20 minutes. The grill should be attended during this procedure. B. Grill at 475-500 degrees C. Postheat grill for 15 minutes after use. Cut and Mail Warranty Registration Card To Reorder Grill Parts Contact: Please Print Clearly Sarka Bros. 607 Ottawa Street First Name Initial Last Name P.O. Box 316 Kalida, OH 45853 Street Ph: 419-532-2393...
- Page 8 25 Year Warranty Sarka Grills (hereinafter Factory), warrants all grills to be free from defects in material and workmanship under normal use for a period of twenty-five (25) years (see exclusions below). This warranty covers North America for parts only. This warranty covers the original consumer and is not transferable. The installation of any Natural gas model is considered to be a consumer responsibility.
Need help?
Do you have a question about the SSGI and is the answer not in the manual?
Questions and answers