Table of Contents
Advertisement
Quick Links
Advertisement
Table of Contents

Summary of Contents for Fusion Gator Series
- Page 1 Gator Automatic Butt Fusion Range Operating Manual www.fusiongroup.com...
-
Page 2: Table Of Contents
1.1 Precautions when lifting 1.2 Risk of fire or explosion 1.3 Risk of electrical shock 1.4 Risk of burning. 1.5 Precautions specific to Automatic Butt Fusion Machines 1.5.1 Trimmer module 1.5.2 Heater module 1.5.3 Guidance when using hydraulic fluids 2 Getting to know your Gator 2.1 Controller... - Page 3 Gator Automatic Butt Fusion Range Operating Manual 11.4.5 Automatic Fusion and cooling stage 11.5.6 Accepting the joint 12 Error messages 13 User menus 13.1 Adjust LCD contrast (Menu option 00) 13.2 Set language (Menu option 01) 13.3 Output joint record(s) (Menu option 02) 13.3.1 Send to...
-
Page 4: Safety Instructions
1.4 Risk of burning. The process of Butt Fusion Welding uses a heater plate that typically runs at temperatures in excess of 200ºC. The use of heat resistant gloves is strongly recommended, as is use of suitable eye protection. -
Page 5: Trimmer Module
Gator Automatic Butt Fusion Range Operating Manual 1.5.1 Trimmer module The trimming cycle is automatically controlled from the control unit. Operators must ensure that all personnel are clear of the equipment and should exercise due care and attention, when operating the equipment. -
Page 6: Getting To Know Your Gator
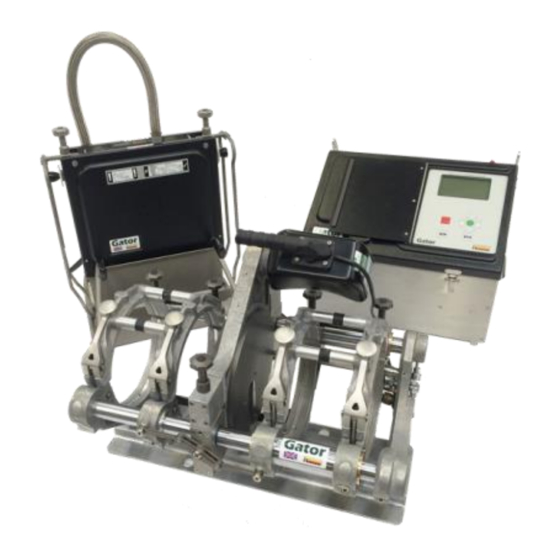
Gator Automatic Butt Fusion Range Operating Manual 2 Getting to know your Gator The four main components of the Automatic Butt Fusion Machine: Automatic Trimmer Control Unit Heater Chassis 2.1 Controller The controller keypad is located under the protective cover of the control unit lid. -
Page 7: Inside The Control Unit
Gator Automatic Butt Fusion Range Operating Manual Heater Chassis Trimmer socket Socket socket socket Emergency stop button Temperature sensor Hydraulic hose connectors Input cable Socket Scanner Printer protective socket Protective socket covers covers 2.1.1 Inside the control unit Two clips secure the protective cover to the main body of the control unit enclosure. -
Page 8: Heater
Gator Automatic Butt Fusion Range Operating Manual Circuit breaker RESET buttons Hydraulic pump power supply Electronics power supply There are sensitive electronic components located within the electronic control enclosure. Do not attempt to open this enclosure – there are no user serviceable parts inside. -
Page 9: Trimmer
Gator Automatic Butt Fusion Range Operating Manual Temperature Indicator 2.3 Trimmer Securing fixture Trimmer blade 2.4 Chassis Clamp adjusters Fast clamps EDOI6922 Page 9 of 44 Issue 02... -
Page 10: Scope Of Operation
Do not attempt to open the enclosures - there are no user serviceable parts inside. 4.1.1 Oil check Check the oil level prior to powering up. Approved hydraulic Oils If the hydraulic oil level is low, use only Fusion approved hydraulic oils with Gator machines: Castrol Hy-Spin AWS22 Total... -
Page 11: Storage Guidance
To ensure safe operation and performance are maintained, this product should be checked at intervals of no longer than 6 months, either by the manufacturer or an authorised service agent. For technical information contact the manufacturer; Fusion Group Limited, via telephone on +44(0) 1246 268666. EDOI6922... -
Page 12: Good Practice For Automatic Butt Fusion
Gator Automatic Butt Fusion Range Operating Manual 5 Good practice for Automatic Butt Fusion 5.1 Good practice during Butt Fusion In cold temperatures the chassis should be opened and closed manually approx. 10 times in quick succession following the automatic warm up routine. -
Page 13: Preparation
Gator Automatic Butt Fusion Range Operating Manual 6 Preparation 6.1 Familiarisation with Equipment Before applying power to the machine, operators should be familiar with all aspects of machine control and have read and understood this Operating Manual. Before commencing a jointing cycle, operators should ensure that the generator used has sufficient fuel to complete operations. -
Page 14: Manual Data Entry
Gator Automatic Butt Fusion Range Operating Manual 7 Manual data entry Manual data entry is required at various points in the operation of the unit. 7.1 Data entry There are two modes for character entry - Select mode and Edit mode. On activating Manual Data Entry the box is in Select mode. -
Page 15: Status Bar
Gator Automatic Butt Fusion Range Operating Manual 8 Status bar The status bar is shown at the bottom of most of the screens showing information on the service period and input supply. Each bar on the memory status indicates approximately 80 joint records. -
Page 16: Sending Data To Pc
Gator Automatic Butt Fusion Range Operating Manual 8.4 Sending data to PC This status bar is shown when sending data to PC (in review joint record(s), print joint record(s) and fast data transfer modes). 1000 Memory status Number of joints to next service... -
Page 17: Machine Operation
Gator Automatic Butt Fusion Range Operating Manual 9.0 Machine operation 9.1 Power-up sequence Once the equipment is connected as described in Section 6.3, connect the machine to a suitable power supply and switch on. When the system is switched on, the LCD (Liquid Crystal Display) indicates the following message for approximately 4 seconds and a short audible tone will sound. -
Page 18: Information Entry
Gator Automatic Butt Fusion Range Operating Manual ! Service Lock Out ! ! Service Required! Contact Fusion Group +44 (0)1246 268666 +44 (0)1246 268052 ! Service Lock Out ! 10 Information entry The unit will prompt for entry of operator, location, optional data 1, optional data 2,... -
Page 19: Jointing Process
Gator Automatic Butt Fusion Range Operating Manual Up to 5 previously entered items of data are maintained for re-use. This ‘History’ data can be accessed by pressing the left or right scroll buttons. When all the relevant information has been entered scroll down to ‘... -
Page 20: Automated Trim Cycle
Gator Automatic Butt Fusion Range Operating Manual Heater temperature 233°C Approx. weld time 20m 21s (DP) Press ● to continue 11.2 Automated trim Cycle In accordance with safety regulations, a warning light and audible alarm are operated before and during all automatic cycle movements. -
Page 21: Fit Trimmer
Gator Automatic Butt Fusion Range Operating Manual 11.2.3 Fit Trimmer Remove the trimmer from the heater/trimmer stand and position onto the locator block between the two centre clamps. Location pegs will allow the trimmer to sit flush onto the blocks. -
Page 22: Trim Cycle
Gator Automatic Butt Fusion Range Operating Manual the two pipes are aligned and placed to the top of the machine. To secure the pipe, place the clamp over the pipe and raise the edge to ensure that the clamp adjusters are hooked under, onto the clamp. The clamp should... - Page 23 Gator Automatic Butt Fusion Range Operating Manual [ /233C] Joint:97 Auto trim cycle Trimming PE63 250 SDR11 Please wait The system will then gradually increase the system pressure to move the pipes onto the trimmer in a controlled manner. When a small amount of pipe has been trimmed from the pipe ends, the display will indicate: [ ...
-
Page 24: Automated Check Cycle
Gator Automatic Butt Fusion Range Operating Manual 11.3 Automated Check Cycle After trimmer is removed, the LCD will indicate: [ /233C] Joint:97 Check Ready for check PE63 250 SDR11 Press ● to continue 11.3.1 Pipe slippage check When the green button is pressed the machine will close until the pipe ends make contact. -
Page 25: Automated Join Cycle
Operating Manual 11.4 Automated Join Cycle The machine automatically controls all aspects of the Butt Fusion Welding cycle. At the start of the join cycle, the system will wait until the correct heater temperature is achieved. Whilst the temperature is out of the specified limits (in this example the heater temperature is at 225ºC with a target of 233ºC), the... -
Page 26: Automatic Bead-Up Stage
Gator Automatic Butt Fusion Range Operating Manual Press the green button to continue the jointing process. The machine will display the following and will gradually build up the pressure in order to move the pipe. When the machine starts to move, the line pressure is measured and both the peak and dynamic drag pressure values are stored for calculating subsequent welding pressure. -
Page 27: Automatic Pressure Build-Up
11.4.5 Automatic Fusion and cooling stage The automatic fusion and cooling stages allow the joint to form and become solid before the clamps can be removed. During these stages, the display shows: [ /233C]... -
Page 28: Error Messages
Gator Automatic Butt Fusion Range Operating Manual 12 Error messages During the welding cycle, the controller monitors the system for problems which could potentially result in poor joints. In the event of such a problem, or if an unexpected event occurs, a message is issued indicating its nature. The following shows the failure modes, likely causes and remedies. - Page 29 Gator Automatic Butt Fusion Range Operating Manual Mode Message Reason Possible cause Remedy Cool time short The machine has detected Clamps were loosened Press red button and abort the joint. unexpected clamp prematurely movement during welding cycle Abort before joining...
- Page 30 Gator Automatic Butt Fusion Range Operating Manual Mode Message Reason Possible cause Remedy Heater UP/DOWN status The machine has detected Faulty heater plate detection Contact dealer that the heater is not up. switch. Abort during dwell Dwell phase aborted Emergency stop button pressed Power failed Ensure generator has enough fuel.
-
Page 31: User Menus
Gator Automatic Butt Fusion Range Operating Manual 13 User menus The User Menu allows the user to view and download joint data and System Variables, change contrast and erase the history data. To enter the User Menu, press the red button when in the information entry screen. Use the up and down buttons to highlight the required menu option then press the green button to select. -
Page 32: Output Joint Record(S) (Menu Option 02)
Gator Automatic Butt Fusion Range Operating Manual 13.3 Output joint record(s) (Menu option 02) Selecting this option allows the operator to view joint data on the screen or ® download joint data to memory stick. View downloaded joint data in Microsoft Notepad from output joint records option. - Page 33 Gator Automatic Butt Fusion Range Operating Manual 13.3.6.3 Joint range Allows a range of joints to be selected by scrolling down to ‘From’ or ‘To’ then using the left and right buttons on the keypad to select the joint range. See section 13.3.6.7 sending data view/download.
-
Page 34: Jointmanager (Menu Option 03)
Gator Automatic Butt Fusion Range Operating Manual If the database is empty the following screen is displayed. Review Joint(s) No records! ■ to Proceed 13.4 JointManager (Menu option 03) Selecting this option allows the operator to download joint data to USB drive, Minitran or PC and view joint data on JointManager. -
Page 35: System Variables (Menu Option 04)
Press the green button to tab across to see the information that runs off the side of the screen. Press the red button on the keypad to exit system variables. This information may be asked for when contacting Fusion Group. EDOI6922... -
Page 36: Remove User History (Menu Option 05)
Gator Automatic Butt Fusion Range Operating Manual View On Screen Send to: Screen System Variables ● to Proceed Refer to section 13.3.1 for how to select other Send to: destinations for the System Variables data. The first screen of information is shown below. -
Page 37: User Diagnostics Menu
Gator Automatic Butt Fusion Range Operating Manual 14 User diagnostics menu To enter the user diagnostic menu turn on the unit, when the logo screen is displayed press the red button then press the red button again. 14.1 Test / Calibration (01) The options in test / Calibration allow the operator to test relevant parts of the Gator machine. -
Page 38: Specification
Gator Automatic Butt Fusion Range Operating Manual 15 Specification Supply Gator 180, 250 & 315 Minimum Typical Maximum Input voltage 110V 110v 150v 220V 195v 230v 265v Input frequency 40Hz 50Hz 60Hz Power requirements Trimmer 750 watt 750 watt 750 watt... - Page 39 Gator Automatic Butt Fusion Range Operating Manual Communication ports Gator 180, 250 & 315 Bluetooth Printer/PC Printer port transmission Gator 180, 250 & 315 Protocol RS232 Speed 1200 Baud Parity None Data bits Stop bits Unit weights...
-
Page 40: Rights
Gator Automatic Butt Fusion Range Operating Manual 16 Rights Due to Fusion's policy of continued development and improvement, we reserve the right to modify products without prior notice. 17 Accessories Below is a list of accessories and Fusion order numbers: Order No. -
Page 41: Appendix A Gator Manual Entry Character Set
Gator Automatic Butt Fusion Range Operating Manual Appendix A Gator Manual entry character set The Gator character sets are shown below: A.1 Number character set. ⌴ (⌴ - represents a SPACE). 0 1 2 3 4 5 6 7 8 9 . - + , A.2 ABC font set... -
Page 42: Russian
Gator Automatic Butt Fusion Range Operating Manual A.3 Russian A.3.1 Upper case characters Э A Б B Г Д E Ж З И Й K Л M H O П P C T У Ф X Ц Ч Ш Щ Ъ... -
Page 43: Declaration Of Conformity
Gator Automatic Butt Fusion Range Operating Manual Declaration of Conformity Declaration of Conformity In accordance with EN ISO 17050-1:2004 Fusion Group Limited Fusion House Chesterfield Trading Estate Chesterfield Derbyshire S41 9PZ England In accordance with the following Directives(s) 2004/108/EC The Electromagnetic Compatibility Directive... - Page 44 Gator Automatic Butt Fusion Range Operating Manual Fusion Group Limited Smeckley Wood Close Chesterfield Trading Estate Chesterfield Derbyshire S41 9PZ Tel: + 44 (0) 1246 268666 Fax: + 44 (0) 1246 268052 Email: sales@fusiongroup.com Web: www.fusiongroup.com EDOI6922 Page 44 of 44...
Need help?
Do you have a question about the Gator Series and is the answer not in the manual?
Questions and answers