Advertisement
Quick Links
Advertisement

Summary of Contents for BioMedix Configured Olympus CX43
- Page 1 Quick Set-up Guide for the Biomedx Configured Olympus CX43 Page 1 v3.01.22...
- Page 2 Your microscope is supplied with an Olympus CX43 Manual, please refer to that for more complete information on microscope operation. This guide is meant to give you a quick overview of the system setup and the camera operation with pertinent specimen viewing tips. >>>...
- Page 3 Assembly Steps Setting up Your System Mounting the Trinocular Port Putting on the Camera Assembly Parfocal Monitor/Eyepiece Adjustment Putting on the View Head and Eyepieces Plugging in the Camera WiFi Power Video Only Setup Operation Notes Modes of the Condenser Specimen Stage, X-Y Control, Phase Adjusters Focus Knobs, Tension Adjustment, Stage Stopper HD Camera...
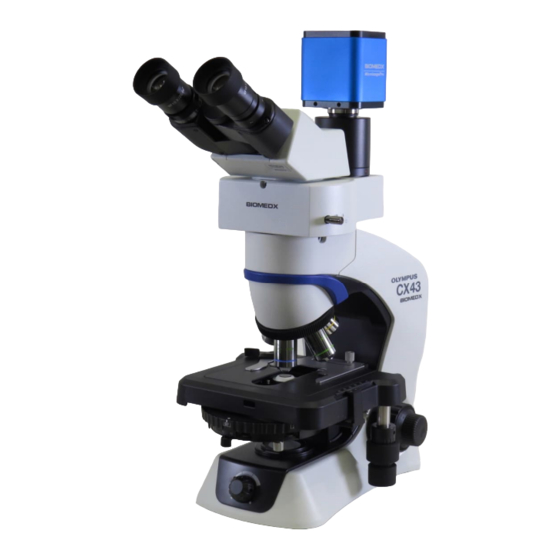
- Page 4 Setting up Your System - Begin by laying everything out on your workspace. When you do, you will see something like the picture below differing only in the items that were selected in your particular configuration. Biomedx pre-assembles, pre-checks and pre-adjusts everything prior to shipping so the objectives will already be mounted in place.
- Page 5 Mount the Trinocular Camera Port Assembly Use the Allen wrench to loosen the set screw a bit then mount the assembly and tighten. Note: There is a slider bar on this assembly. This slider moves an internal prism back and forth. When the slider is pushed in, 100% of the light is directed to the eyepieces.
- Page 6 The set screw to hold the camera assembly in place points to the back on the port itself. Mount the Camera The video camera is pre-mounted on a microscope optical coupling lens. You will note two set screws, marked FOCUS and LOCK. This is for parfocal adjustment.
- Page 7 (See page 10 for video only setup using no binocular vew head or eyepeices.) Mount the Binocular Eyepiece Head The set screw to hold the head in place is directly in front and below the head. Note that the oculars just slide right Remove the lens down into the hole.
- Page 8 Plug in the AC adapter for the camera to DC12V. Plug the mouse into the USB port. Plug one end of the HDMI cable into the camera slot marked HDMI and the other end into your HDTV HDMI input. Example of a HDTV input. The HDMI cable will have ends as shown here.
- Page 9 As a last step to set up, plug the AC power adapter into the back of your microscope. You will note a Velcro strap on the power cord, you can use this and other Velcro straps to tidy up the cords behind the microscope and from the camera.
- Page 10 NOTE FOR VIDEO ONLY SCOPE If you purchased a “Video Only” microscope, this page should be reviewed in lieu of page 7 of this quick set-up guide which shows you the trinocular video port set up for a video only scope. The steps shown here may have already been done prior to the scopes shipment to you.
- Page 11 OPERATION NOTES Your microscope has a factory built-in multi-mode universal turret condenser. By simply rotating the condenser turret left or right, you can change the condenser mode from brightfield to darkfield to phase contrast and even to a 3D image perspective. Condenser Modes Darkfield DF—...
- Page 12 The top condenser lens can be oiled IF you were using an oil objective. The lens can be pulled forward an inch to drop on the oil and for cleaning. Microscope Stage X-Y slide control Phase Contrast adjusting knobs are found on both sides of the scope.*** *** IMPORTANT NOTE These knobs are essentially screw drivers on a spring.
- Page 13 On/Off Switch Light intensity dial: Typically turned down for brighfield lighting, about 12 o’clock to 3 o’clock range Focus knob: Raises for phase, 1 o’clock to all the way and lowers the stage. up for darkfield. The settings are Large outer knob is specimen and objective course focus, inner dependent, for video viewing the...
- Page 14 VIDEO CAMERA The Biomedx MicroImagePro is a select high definition video camera with internal operating software. The camera engineers specifically adjusted the software to the Biomedx specifications required for our live cell imaging market. Inside there is a Sony high pixel size chipset with very high dark signal sensitivity.
- Page 15 Your selected HDTV will have its own menu system to adjust color, brightness, contrast, backlight, gamma, etc. The default settings of the camera itself (values which may differ a bit from those shown here) are a good place to leave the camera settings and from there you can tweak your TV settings.
- Page 16 Moving the mouse arrow to the bottom edge of the video screen brings up this menu: Mouse clicks Mouse clicks on WDR (Wide Internal software here gives you a the left box will Dynamic version info. flip the video digital zoom and Range) not unzoom feature.
- Page 17 Remember that all HDTVs have their own menu se ngs. It is impossible to go through all the possibili es. Below are reasonable se ngs for a Vizio 24” 1080p HDTV as shown here: This model, the Vizio D24F-F1 used on some of the scopes in our classroom works great. The new Vizio model that replaced it is D24F-G1.
- Page 18 HDTVs generally have their own built in stands. If it is not of a size you will be moun ng on a wall, then some mes it is nice to add a bit of height to the TV when it is on a desktop.
- Page 19 Condenser Mode Viewing Tips The variable mode condenser provides a lot of versatilty, particularly when using non-oil optics. BIGHTFIELD (BF) condenser mode: This will be used for all brighfield applications, such as when viewing dried blood clot retraction patterns as shown in the top image here on the left. In BF mode when viewing on a monitor through a camera, the field of view using a 2x optic will be on full display (you must remove the darkfield donut or...
- Page 20 USING OIL OBJECTIVES Having to use oil objectives is not necessary for most specimen viewing applications for day to day clinic and education use. However, if you are capturing photos or video for publication purposes and require a refinement in resolution that oil can offer, than using oil objectives may be something you might be doing.
- Page 21 Make sure your darkfield donut is in place over the light port shown here. Note that the 50x oil objective has an iris built into it which rotates in either direction. When your 50x oil objective is in place over your sample and your condenser is properly set to DF mode with the light intensity turned UP, you will need to adjust this objective iris to obtain the...
- Page 22 Using 100x oil phase objective after using the 50x oil darkfield. Using 100x oil phase objective after using the 50x oil darkfield. Here you would simply rotate the 50x out of position and rotate the 100x oil phase objective into place (moving it back and forth about a millimeter either way to well set the lens into the oil.) It is conceivable that you might need another drop of oil on your slide cover depending on how much you may have moved the slide around using the 50x.
- Page 23 Get supplies and re-supply at — https://store.biomedx.com Get the latest training info at — https://biomedx.com/training Get support, current manual and videos at — https://biomedx.com/support Support Phone: 1-206-577-0037 Page 23 v3.01.22...
Need help?
Do you have a question about the Configured Olympus CX43 and is the answer not in the manual?
Questions and answers