
Related Manuals for Horizon Fitness 8 Series


Summary of Contents for Horizon Fitness 8 Series
- Page 1 8 series User Manual 55HQ8590U/B Manual de utilizare Felhasználói útmutató Εγχειριδιο χρηση Nutzerhandbuch 55” 139cm www.horizon-europe.com...
- Page 2 Thank you for choos ng th s product! Vă mulțum m pentru alegerea acestu produs! Köszönkük, hogy ezt a terméket választotta! Благодарим ви, че избрахте този продукт! Хвала што сте одабрали овај производ! Σας ευχαριστούμε που επιλέξατε αυτό το προϊόν! V elen Dank, dass S e s ch für d eses Produkt entsch eden haben! Please read the nstruct ons carefully and keep the manual for further nformat on.
-
Page 3: Table Of Contents
Cuprins Introducere ............4 Accesorii incluse ........... 4 ..5 Pornire/Oprire televizor ......... 7 ...... 7 ............8 ......9 Ecranul de pornire ..........12 ..12 Canale ............12 ........12 Înregistrare ............14 ..........14 Canal ...............15 ........17 ............17 .........18 AVERTISMENT ............21 .... - Page 4 laser de clasa 1 care este AVERTISMENT pe perete. pentru copiilor. Intrare USB trase sau apucate. integrat suport adecvat. televizorul. - 3 - - 4 -...
- Page 5 min. (mm) max. (mm) televizorul. spate a televizorului. spate a televizorului. Satelit pe perete. - 5 - - 6 -...
- Page 6 de pe ecran. de curent. Televizorul va porni. Televizorul nu de control. terii AAA pentru a selecta cu televizorul. de pe pentru a reveni la de pe tele- . Tv-ul se accesoriilor.. - 7 - - 8 -...
-
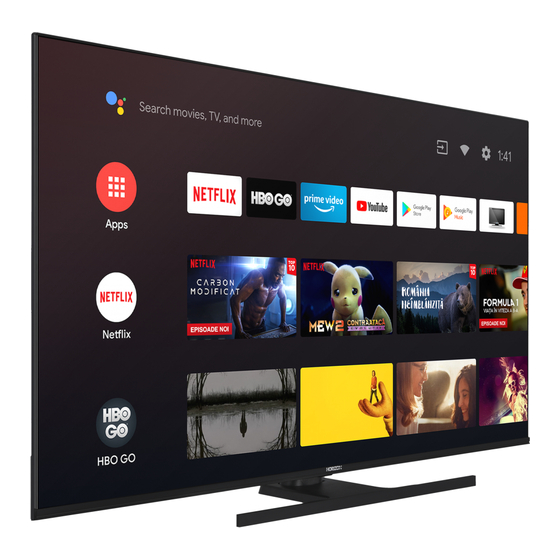
Page 7: Ecranul De Pornire
pentru de pe ecranul de pornire. pentru a continua. de pe ecranul (Canale) pentru a continua. sunt de pe ecranul de pornire. pentru a continua. consecutiv pentru a continua. pentru a continua. setarea. cont nou. pentru pentru a continua. - 9 - - 10 -... - Page 8 pentru a continuaa. pentru pentru a naviga pentru a continua. prin dispozitivele USB conectate sau server-urile Satelit este . Pentru a pentru a continua. pentru a preferat) Ecranul Meniul principal este punctul central al televizorului pentru ca pentru a continua. din linia pe ecranul de pornire.
- Page 9 pentru a pentru a utiliza din Ecranul de pornire sau pentru dezactivare. pentru pentru a anula. pentru dezactivare. etc. Mute pentru este setat ca pentru a-l selecta. Canalul pentru a derula pagina este setat ca nu este - 13 - - 14 -...
-
Page 10: Canal
pentru a revoca acest pentru a le selecta/deselecta. pentru pentru a le selecta/de- pentru anulare. de instalare a canalelor de salvare. digitale. pentru a Canalele pentru a le selecta/deselecta. este setat la pentru a le selecta/de- pentru a revoca acest satelit. - Page 11 PIN-ul pentru a salva pentru dezactivare. canalul selectat. categorii. pentru a salva pentru anulare. acesteia. pentru nu este 1234 pentru dezactivare. pentru a pentru a sincroniza pentru selecta sau a deselecta. Pentru a PIN-ul pentru pentru dezactivare. pentru a selecta/deselecta. - 17 - - 18 -...
- Page 12 pentru a activa Controlul Adaptive prefe- Controlul Adaptive lorilor pentru a activa/dezactiva pentru dezactivare. Controlul con- nile ecranului. pentru a porni sau detaliilor. nului. tru Controlul contrastului local ca sau dezac- ale ecranului. nului. pentru a continua. . În valori este setat ca open source.
- Page 13 selectarea sursei de intrare din ecranul de pornire. Pentru 1234 pentru a trece de Aceste liste includ doar canalele alese de pentru . Apoi pentru a-l viziona. pentru pentru a vedea la televizor. audio. . Rezultatele nile Main pentru a accesa din Ecranul de pornire sau titlul pentru a...
- Page 14 videoclipurilor. Întrerupe/Reia redarea. pentru a-l pornire. de derulare. dreapta sus ale selectat. . În Întrerupe/Reia redarea. pentru a activa pentru a redarea se va opri. titlul - 23 - - 24 -...
- Page 15 doar pentru pentru a de diapozitive. din ecranul de pentru doar de diapozitive. pentru a opri ecranul. A activa din nou ecranul. - 25 - - 26 -...
-
Page 16: Cec
pentru de la dispozitivul audio conectat Butoanele pentru datele. pentru a viziona. pentru a opri redarea. pentru activare sau dezactivare. pentru a din ecranul de pornire. Contorul va dispozitivului conectat. pentru a relua pentru a continua. - 27 - - 28 -... - Page 17 480i 480p 720p 1080i 1080p pentru a actualiza versiunea - 29 - - 30 -...
- Page 18 1080P@ 60fps 1080P la 60fps la nivel 5 1080P la 60fps 1080P la 60fps 1080P@60fps EAC3 nivel ridicat la nivel 5.1 1080P la 30fps 1080P la 60fps 1080P la 60fps nivel 6.0.1.08.60 1080P la 60fps .WMA 1080P la 60fps WMA 10 Pro M0 1080P la 30fps 1080P la 60fps WMA 10 Pro M1...
- Page 19 XSUB .srt .ssa/ .ass SAMI Progresiv Progresiv - 33 - - 34 -...
- Page 20 12 200 drepturile rezervate. Bulgaria Italia 140W < 2 Norvegia Israel 55" de la Microsoft. colectare pentru reciclare. gratuit. Produse Baterie - 35 - - 36 -...
- Page 21 Do not expose the TV to direct sunlight or do not Table of Contents Safety Information or near the TV. Introduction ............4 Do not place any heat sources such as electric CAUTION Accessories Included ..........4 heaters, radiators, etc. near the TV set. Stand Installation &...
-
Page 22: Introduction
High Dynamic Range (HDR) / Hybrid Log- Introduction WARNING Gamma (HLG) WALL MOUNTING WARNINGS Do not ingest the battery, Chemical Burn Hazard Thank you for choosing our product. You’ll soon be Using this feature the TV can reproduce greater This product or the accessories supplied with the Read the instructions before mounting your TV enjoying your new TV. -
Page 23: Stand Installation & Wall Mounting
Stand Installation & Antenna Connection Other Connections Wall Mounting Connect the aerial or cable TV plug to the AERIAL Assembling / Removing the pedestal INPUT (ANT) socket located on the left side of the TV any connection. After the connection is done, you can turn on the units and use them. or satellite plug to the SATELLITE INPUT (LNB) socket Preparations located on the rear side of the TV. -
Page 24: Turning On/Off The Tv
Turning On/Off the TV TV Control & Operation Remote Control Standby: Quick Standby / Standby / On Connect power Numeric buttons: Switches the channel in Live TV IMPORTANT: The TV set is designed to operate on mode, enters a number or a letter in the text box on 220-240V AC, 50 Hz socket. - Page 25 network and press OK if you want to use wireless No and proceed by are available. Highlight the option that corresponds to Initial Setup Wizard connection instead of wired connection. pressing the OK button. You can change this setting your environment and press OK or Right directional later using the Settings>Device Preferences>Loca- button to proceed.
-
Page 26: Live Tv Mode Menu Content
corresponds to your satelite system and press OK or OK or Right directional button to stop the search. The using the Date & time menu options from the Speakers: To hear the TV audio from the connected the Right directional button to proceed to the next step. channels that have already been found will be stored Settings>Device Preferences menu. -
Page 27: Record
Persistent Storage: Turn the Persistent Storage System Information: Display detailed system is password protected. Additionally you can add new Favourite Network Select: Select your favourite On cookies will be information on the current channel such as Signal networks by using the related options. network. -
Page 28: Accounts & Sign In
Single RF Scan: Enter the Frequency value. Signal Channel Installation Mode - Preferred/General Note: Some options may not be available and appear as Open Source Licenses Level and Signal Quality of the selected Frequency Satellite/Satellite grayed out depending on the operator selection and operator Display Open Source Software license information. - Page 29 Netflix ESN: Display your ESN number. ESN Sport, Movie and Game. You can use User mode and brighter white perception. Set your Adaptive Sound to create customised settings. Luma Control preference as Low, Medium, System Sounds: System sound is the sound especially to identify your TV.
-
Page 30: Channel List
formation on the usage details highlight and press OK. Headphone: Turn this option on if you want to in Live TV mode. You can switch to Live TV mode by are currently listed in the channel list using the There will also be options for ejecting and formatting route the sound of the audio commentary to the +/- buttons on the remote. - Page 31 protocol in order to avoid any possible problems while Press OK watching videos. Info: Display the info bar. Press twice to display the You must change your modem’s SSID when there are any other modems around with the same SSID. You Play/pause: Pause and resume the playback.
-
Page 32: Usb Recording
When you press the OK button slide show will start Photo Frame Image: Set the currently displayed From a Mobile Device via DMR Instant Recording image as photo frame image. This image will be device, depends on the viewing style, will be displayed displayed if the One Photo mode is selected instead Make sure that your mobile device is connected to the Press Record button to start recording an event... -
Page 33: Schedule List
might not work with all devices. If you connect a device HbbTV requires AV streaming capability for the plat- Tap on ‘Device Connectivity’ Schedule List with HDMI CEC support to your TV, the related HDMI form. There are numerous applications providing VOD Tap on the ‘Easy projection’... -
Page 34: Audio
HDMI Signal Compatibility Supported File Formats for USB Mode Video Source Supported Signals 480i 60Hz Video Codec Resolution Bit Rate Container 480p 60Hz 576i, 576p 50Hz MPEG program stream (.DAT, .VOB, .MPG, .MPEG), MPEG transport stream 720p 50Hz,60Hz MPEG 1/2 1080P@ 60fps 80Mbps MP@HL... -
Page 35: Picture
Audio Codec Sample rate Channel Bit Rate Container Note Audio Codec Sample rate Channel Bit Rate Container Note Movie: AVI (.avi), Matroska (.mkv), Movie: AVI (.avi), ASF (.asf), 3GPP (.3gpp, .3gp), MP4 (.mp4, Matroska (.mkv), MPEG transport 8Kbps ~ 64Kbps ~ .mov), MPEG transport stream (.ts, MPEG1/2 Layer2 16KHz ~ 48KHz... -
Page 36: Subtitle
Subtitle Max Output Frequency Ranges Internal Power PAL BG/I/DK TV Broadcasting SECAM BG/DK 2400 - 2483,5 MHz (CH1-CH13) < 100 mW File Extension Container Subtitle Codec VHF (BAND I/III) - UHF 5150 - 5250 MHz (CH36 - CH48) < 200 mW Receiving Channels (BAND U) - HYPERBAND 5250 - 5350 MHz (CH52 - CH64) -
Page 37: Disposal Information
Disposal Information Tartalomjegyzék Licences [European Union] Bevezetés ............. 4 These symbols indicate that the electrical and Mellékelt tartozékok ..........4 Interface, and the HDMI Logo are trademarks or regis- electronic equipment and the battery with this symbol Állvány összeszerelése és fali rögzítése....5 tered trademarks of HDMI Licensing Administrator, Inc. - Page 38 Biztonsági információ távirányítók. csatlakozásra. FIGYELEM a fentiekkel azonos szempontokat kell alkalmazni. A jelzett terminál(ok) – – – – – – – – – – – – ÁRAMÜTÉS VESZÉLYE NE NYISSA KI készülékre vagy a TV-készülék fölé (pl. a készülék aktív(ak). KONNEKTORON vagy más készüléken keresztül a FIGYELEM: AZ ÁRAMÜTÉS VESZÉLYÉNEK ELKERÜLÉSE ÉRDEKÉBEN NE TÁVOLÍTSA EL A FEDELET (VAGY...
-
Page 39: Bevezetés
Bevezetés Állvány összeszerelése VESA FALRA SZERELÉS MÉRETEK Lyuk nagyság méretek (mm) Csavar méretek min. (mm) Hossz (X) max. (mm) Mellékelt tartozékok Menet (Y) és stabil asztalt. Az antenna csatlakoztatása pompázó napfényt. A HDR/HLG tartalmakat saját Használati utasítás Csatlakoztassa az antenna vagy kábel TV-csatlakozót töri el a TV-készüléket. -
Page 40: A Tv Be-/Kikapcsolása
Egyéb csatlakozások Csatlakoztatás a hálózatra készülékeket. Csatlakoztatás Kábelek Eszközök csatlakoztatása Ezután a TV automatikusan bekapcsol. SPDIF SPDIF (Optikai funkcióinak beállítását. kimenet) csatlakoztatása Megjegyzés: Nyomja meg a távirányító Készenléti gombját. A TV kikapcsolása (Gyors készenlét): Nyomja Ó Fejhallgató készüléken. csatlakozása Ezután a TV-készülék bekapcsol. A TV kikapcsolása (Készenlét): Ha a A TV bekapcsolása... - Page 41 Készenlét: Gyors készenlét / Készenlét / Be Megjegyzés: Számgombok: Nyelv: opciót Mikrofon: és nyomja meg az OK és nyomja le az OK V i s s z a / V i s s z a t é r é s : tások menü...
- Page 42 Felhasználási feltételek Szkennelési a DiSEqC ezt a funkciót a Ki opció kiválasztásával. Jelölje ki a sebesség (Ksym/s) . A teljes az OK gombot vagy a Jobb iránygombot. opcióra. A kiválasztott szolgáltatótól és/vagy nyomja meg a Jobb OK gombot. Ha az opció...
-
Page 43: Csatornák
OK gombot a korábban nem TV Forrás gombot és állítsa be Ez az opció csak az Egyesült Királyságban és Kihagyás opciót és nyomja meg az OK válassza a opciót. Állítsa be HBBTV funkciót. a TV hangszórói Követés letiltása: meg az Kilépés Live TV Áramellátás opcióban a... -
Page 44: Felvétel
A szkennelést az Csatorna szerkesztése: Csatornák szerkesztése Frekvencia A szkennelés Polarizáció és a CW Vissza gombot. A már megtalált csatornák rögzítésre kerülnek a csa- neve Frekvencia és opciót tornalistán. TV opciók menüjében és nyomja meg az OK Frissítéseket keres. A korábban kék gombot opcióban a nan megtalált csatornák felkerülnek a csatornalistára. -
Page 45: Fiókok És Bejelentkezés
A hang nyelve OK elemet csatorna telepítési és nyomja meg az OK Általános ki a Mégse OK gombot folyamat során kiválasztott országtól. vagy Megjegyzés: távirányító gombjaival. Jelölje ki a kívánt csatorná(ka)t a listán és nyomja meg az OK gombot Állítsa be ezt az opciót Antenna Kábel A két kiválasztott csatornát vagy értékre. - Page 46 A Dolby Vision tartalom saját magától kikapcsoljon. Állítsa ezt az opciót Be vagy Egyszer bizonyos funkcióit. Ki pozícióra a kontrasztbeállítást ezekre a régiókra. Ez az algo- Az alkalmazások az Egyszer világítás preferenciáit. Ki Alacsony Közepes és Eco ezeken a kategóriákon belül. ki a sötét és a fényes területeket.
-
Page 47: Csatornalista
meg az OK kiválasztása Intelligens Film Zene és Keresés. és Látássérül opció nem és nyomja meg az OK to speech Kiválasztás tása gyári alapbeállításokra. átirata opciót és nyomja meg az OK gombot. A A Fel Kategóriák Digitális használó Élénk Sport Film Zene Tárterület: Analóg és... - Page 48 Fel és Le iránygombokkal mozgassa gombot. Jelölje ki a csatornát a listában és nyomja igényel a munkakörnyezetben. Ebben az esetben a meg az OK Ha szeretné a nemrégiben megtekintett csatornát Nyomja meg a Felvétel nyomja meg az OK gombot. Ezután jelölje ki a Ütemezés a Menü...
- Page 49 Vissza/Visszatérés: Ha az Sárga gombot is. Ez az opció nem Ismétlés opció Nincs kijelölt és a listában az utolsó fájl közötti elemek Zenei fájlok és szín az Ön igényei szerint. Nyomja meg az OK FAT32 USB tárolóeszközt csatlakoztat. Ezen felül Infó: Megjeleníti az infosávot.
-
Page 50: Usb Feljátszás
Ha a csatlakoztatott USB tárolóeszköz írási sebessége KILÉPÉS gombot. Lemez formattálása zenei fájlokat. Csatlakoztassa az USB eszközt a TV formattálni az eszközt a Formattálás a Felvétel>Eszközinformáció a funkció a HDMI CEC-t (Consumer Electronics az Eszközinformáció az OK meg az OK kommunikáljon. -
Page 51: Google Cast
opciót a Az okostelefonon vagy a tableten nyissa meg elemre kell állítani. Ezt az opciót a TV opciók vagy funkciót keresés Forrás Támogatott jelek Koppintson a Google Cast ikonra 480i 60Hz 480p 60Hz 50Hz Megjegyzések: van. 720p Ha az 1080i van a Megjegyzés: 1080p... - Page 52 Csatorna Bit arány Tároló Megjegyzés Film: 8Kbps ~ MPEG1/2 Layer2 16KHz ~ 48KHz Akár 2 Felbontás Bit arány Tároló 384Kbps Zene: Film: MPEG 1/2 1080P@ 60fps 80Mbps MP@HL ASF (.asf) 8Kbps ~ MPEG1/2 Layer3 16KHz ~ 48KHz Akár 2 320Kbps MPEG4 1080P@60fps 40Mbps...
-
Page 53: Kép
Felirat Csatorna Bit arány Tároló Megjegyzés Film: Fájlkiterjesztés Tároló 48KHz-ig Akár 5.1 < 1.5Mbps (.mkv) DVD felirat DVB felirat Film: DVD felirat 64Kbps ~ LPCM 8KHz ~ 48KHz Akár 5.1 1.5Mbps Zene: VobSub DVD Subtitle Film: IMA-ADPCM 8KHz ~ 48KHz Akár 2 384Kbps MS-ADPCM... - Page 54 Tájékoztatás az Licenszek Frekvenciatartomány kimeneti PAL BG/I/DK/ SECAM BG/DK Ezek a jelölések elektromos és elektronikus 100 mW készülékeket jelöl és az ezzel a jelöléssel ellátott VHF (I/III SÁV) - UHF (U Vett csatornák SÁV) - SZÉLESSÁV 5150 - 5250 MHz (CH36 - CH48) 200 mW 5250 - 5350 MHz (CH52 - CH64) 200 mW...
- Page 55 .............. 4 ......4 ..5 ..... 7 ............. 8 ......... 9 ............12 ... 13 ............13 ............13 ............14 ..........15 ..............15 .....18 ............18 ........19 ........... 22 ........23 ..........28 ..........28 ..........28 ......28 ........29 ........29 CEC..............29 Google Cast ............30 ..........
- Page 56 Menu Google Cast - 3 - - 4 -...
- Page 57 Menu - 5 - - 6 -...
- Page 58 - 7 - - 8 -...
- Page 59 - 9 - - 10 -...
- Page 60 - 11 - - 12 -...
- Page 61 Menu - 13 - - 14 -...
- Page 62 - 15 - - 16 -...
- Page 63 1234 - 17 - - 18 -...
- Page 64 - 19 - - 20 -...
- Page 65 1234 - 21 - - 22 -...
- Page 66 Menu - 23 - - 24 -...
- Page 67 - 25 - - 26 -...
- Page 68 - 27 - - 28 -...
- Page 69 - 29 - - 30 -...
- Page 70 - 31 - - 32 -...
- Page 71 - 33 - - 34 -...
- Page 72 - 35 - - 36 -...
- Page 73 12 200 < 2 - 37 - - 38 -...
- Page 74 - 39 - - 40 -...
- Page 75 / den Stecker mit nassen Händen, da dies einen Inhaltsverzeichnis Sicherheitsinformationen Kurzschluss oder elektrischen Schlag verursachen kann. Machen Sie niemals Knoten in das Netzkabel, Einleitung .............. 4 und binden Sie es nie mit anderen Kabeln zusammen. Zubehör im Lieferumfang ........4 Wenn es beschädigt ist, muss das Kabel ersetzt VORSICHT Standinstallation &...
-
Page 76: Einleitung
Klären Sie IMMER Ihre Kinder darüber auf, dass es Over-the-Top-Dienste (OTT), USB-Anschlüsse sowie Kennzeichnungen auf dem Gerät Einleitung gefährlich ist, auf hohe Möbelstücke zu klettern, um über DVB-T2- und DVB-S2-Sender unterstützt. Die folgenden Symbole werden auf dem Gerät das TV-Gerät oder die Fernbedienung zu erreichen. Vielen Dank, dass Sie sich für unser Gerät entschieden High Dynamic Range (HDR) / Hybrid Log- als Kennzeichnungen für Einschränkungen und... -
Page 77: Standinstallation & Wandmontage
Einstellung für den Bildmodus zu ändern, drücken Sie Andere Verbindungen die Menü-Taste, während Sie den Dolby Vision-Inhalt ansehen, und gehen Sie zum Menü Bild. Während Sie Dolby Vision Inhalte über eine Anwendung ansehen, Wenn Sie ein externes Gerät an das TV-Gerät anschließen wollen, vergewissern Sie sich, dass sowohl der Fernseher als auch das externe Gerät ausgeschaltet sind. -
Page 78: Tv-Steuerung & Betrieb
TV-Steuerung & Betrieb Fernbedienung Ein- / Ausschalten des TV-Geräts Schnell-Standby / Standby / Ein Standby: Nummerntasten: Schaltet den Kanal im Live-TV-Modus Stromanschluss um und gibt eine Zahl oder einen Buchstaben in das WICHTIG: Das Gerät ist nur für den Betrieb mit Textfeld auf dem Bildschirm ein Sprache: Schaltet zwischen den Tonmodi um (analoges 220-240V Wechselspannung bei einer Frequenz... - Page 79 diesem Schritt vorgenommenen Einstellungen können Wenn Sie sich zu diesem Zeitpunkt nicht in Ihrem Menüs, Inhalte oder gesperrte Kanäle, Quellen usw. Richtungstasten und die OK-Taste auf der Fernbedienung, um auszuwählen, einzustellen, zu bestätigen und fortzufahren. einige Schritte übersprungen werden. Google-Konto anmelden möchten, können Sie zuzugreifen.
- Page 80 Direkt, Einzelkabel, DiSEqC 1.0 und DiSEqC 1.1 sicher, dass Sie den richtigen Transponder unter anzuzeigen. Über das Home-Menü können Sie eine Hinweis: Wenn das ausgewählte Land keine analogen Sendungen hat, ist die analoge Suchoption möglicherweise sind verfügbar. Markieren Sie den Antennentyp, der der Option Referenztransponder im zweiten der beliebige Anwendung starten, zu einem Fernsehkanal nicht verfügbar.
-
Page 81: Menüinhalt Des Live-Tv-Modus
Sie, dass Sie den Bildschirm nicht über die Tasten Einwerden Cookies mit einem Ablaufdatum im allgemeiner Satellit oder Satellit. Die verfügbaren Menüinhalt des Live-TV-Modus Volume +/-, Mute und Standby einschalten können. dauerhaften Speicher des TV-Geräts gespeichert. Optionen unterscheiden sich je nach ausgewähltem Diese Tasten funktionieren normal. -
Page 82: Netzwerk & Internet
wird, wird die Position dieses Kanals durch die Position Scanvorgang zu starten. Die gefundenen Sender Kanal Einstellungen des ersten ausgewählten Kanals ersetzt. Sie sollten werden in der Senderliste gespeichert. die LCN-Option auf Aus oder Standard setzen, um Kanälen LCN: Legen Sie Ihre Präferenz für LCN fest. LCN das diese Funktion zu aktivieren. -
Page 83: Konten & Anmelden
Element ist möglicherweise nicht sichtbar, je nachdem, Sie zur Auswahl OK. Machen Sie dasselbe für einen heben. Um zu einer gesperrten Eingabequelle zu ob der zuletzt gesehene Kanal analog war oder nicht. zweiten Kanal. Wenn der zweite Kanal ausgewählt wechseln, muss zuerst ein PIN eingegeben werden. Sie können kürzlich geöffnete Apps anzeigen. - Page 84 Timer Bild Anzeigemodus: Stellen Sie das Seitenverhältnis Schritt zu halten. Schalten Sie den Spielemodus ein oder aus. Einschaltzeit Typ: Stellen Sie Ihr TV-Gerät so ein, Picture Mode: Stellen Sie den Bildmodus nach nierten Optionen nach Ihren Wünschen. Ihren Wünschen oder Anforderungen ein. Der HDMI RGB-Bereich: Diese Einstellung sollte dass es sich von selbst einschaltet.
-
Page 85: Kanalliste
Sie als TV-Lautsprecher ein, um die Lautsprecher ändern Sie deren Reihenfolge oder holen Sie sich Bewegungen für Menschen mit Sehbehinderungen anzuzeigen. Die verfügbaren Optionen können Ihres TV-Geräts für die Tonausgabe zu verwenden. mehr davon. beschreiben. abhängig vom Bedienerauswahl variieren. Ladenmodus: Markieren Sie Ladenmodus und Um die Kanäle zu sortieren, markieren Sie Sortieren Digitalausgang: Stellen Sie die Voreinstellung für Lautsprecher: Aktivieren Sie diese Option, wenn... -
Page 86: Programmführer
Favoritenliste hinzugefügt. Nur der aktuell angesehene Drücken Sie die Aufnahmetaste, um einen Timer Einige Netzwerke verfügen möglicherweise über ein Kanal kann zu einer Favoritenliste hinzugefügt werden. für das markierte Ereignis im Programmführer Gerät möglicherweise an eine Netzwerksteckdose Berechtigungssystem, das eine zweite Anmeldung als Um einen Kanal aus einer Favoritenliste zu entfernen, hinzuzufügen. - Page 87 Wählen Sie den Medientyp auf dem Hauptbildschirm Wiedergabe / Pause: Pause und Fortsetzen der Wiedergabe / Pause: Halten Sie die Diashow an und die Einstellung zu ändern. Sie können zum Einstellen des Media Players. Auf dem nächsten Bildschirm Wiedergabe. setzen Sie sie fort. auch die grüne Taste drücken.
-
Page 88: Usb-Aufzeichnung
Suchen: Springe zu einer bestimmten Zeit der Mobilgerät die Datei, die Sie freigeben möchten, Sie können im Aufnahme-Modus die Sendung nicht In den meisten Fällen können so Laufwerksfehler und tippen Sie auf das Freigabesymbol oder auf wechseln. repariert werden, aber nach der Formatierung sind Richtungstasten, um die Uhrzeit einzugeben, und die entsprechende Option im Optionsmenü... -
Page 89: Google Cast
Einstellungen> Geräteein- Wählen Sie den Fernseher aus, zu dem Sie eine Hinweis: ARC wird nur über den HDMI2-Eingang unterstützt. Schnelle Standby-Modus stellungen> Eingänge auf dem Startbildschirm oder Übertragung durchführen möchten Google Cast die TV-Optionen> Einstellungen> Geräteeinstel- Die von Ihnen ausgewählte App sollte im TV-Gerät lungen>... -
Page 90: Hdmi-Signalkompatibilität
HDMI-Signalkompatibilität Beim USB Modus unterstützte Dateiformate Video Quelle Unterstützte Signale 480i 60Hz Video-Codec Bitrate Behälter 480p 60Hz 576i, 576p 50Hz MPEG Programmstream (.DAT, .VOB, .MPG, .MPEG), MPEG Transportstream 720p 50Hz, 60Hz MPEG 1/2 1080P@ 60fps «80Mbps MP@HL (.ts, .trp, .tp), MP4 (.mp4, .mov), 3GPP 1080i 50Hz, 60Hz (.3gpp, .3gp), AVI (.avi), MKV (.mkv),... -
Page 91: Audio
Audio Audio-Codec Sample-Rate Kanal Bitrate Behälter Hinweis Film: ASF (WMV, ASF), AVI (AVI), Audio-Codec Sample-Rate Kanal Bitrate Behälter Hinweis Matroska (MKV) WMA 10 Pro M1 48KHz Bis zu 5,1 384kbps Film: AVI (.avi), ASF (.asf), Musik: ASF (.wma) Matroska (.mkv), MPEG- Transportstrom (.ts, .trp, .tp), 32Kbps ~ MPEG1/2 Layer1... -
Page 92: Bild
Bild Untertitel Intern Bild Foto Baseline 15360x8640 (1920x8 x 1080x8) Dateinamenserweiterung Behälter Untertitel-Codec JPEG Progressiv «1024x768 non-interlace «9600x6400 dat, mpg, mpeg, vob MPG, MPEG DVD-Untertitel Interlace «1200x800 ts, trp, tp DVB-Untertitel «9600x6400 DVD-Untertitel Baseline 15360x8640 (1920x8 x 1080x8) «mp4 «MP4 UTF-8 Klartext Progressiv «1024x768... -
Page 93: Unterstützte Dvi-Auflösungen
Unterstützte DVI-Auflösungen Technische Daten Transmitters (WLAN) Wenn Sie Zusatzgeräte über das DVI-Adapterkabel (DVI zu HDMI, nicht im Lieferumfang enthalten) an die PAL BG/I/DK TV-Übertragung Frequenzbereiche SECAM BG/DK Ausgangsleistung 56Hz 60Hz 66Hz 70Hz 72Hz 75Hz VHF (BAND I/III) - UHF 2400–2483,5 MHz (CH1-CH13) <... -
Page 94: Informationen Zur Entsorgung
Licensing Corporation. Hergestellt unter der Lizenz der Sammelstelle für die Wiederverwertung von ....27 elektrischen und elektronischen Geräten zur richtigen ............27 Material. Copyright ©1992-2020 Dolby Laboratories. Behandlung, Wiedergewinnung und Wiederverwertung ......2 ............28 Alle Rechte vorbehalten. in Übereinstimmung mit den gesetzlichen Regelungen ...28 und den EU-Richtlinien 2012/19/EU und 2013/56/EU Google, Android, Android TV, Chromecast, Google... - Page 95 - 2 - - 3 -...
- Page 96 Google Cast - 4 - - 5 -...
- Page 97 - 6 - - 7 -...
- Page 98 - 8 - - 9 -...
- Page 99 - 10 - - 11 -...
- Page 100 - 12 - - 13 -...
- Page 101 - 14 - - 15 -...
- Page 102 - 16 - - 17 -...
- Page 103 - 18 - - 19 -...
- Page 104 - 20 - - 21 -...
- Page 105 ”. - 22 - - 23 -...
- Page 106 - 24 - - 25 -...
- Page 107 - 26 - - 27 -...
- Page 108 - 28 - - 29 -...
- Page 109 - 30 - - 31 -...
- Page 110 H.263 H.264 - 32 - - 33 -...
- Page 111 - 34 - - 35 -...
- Page 112 12 200 140W < 2 - 36 - - 37 -...
- Page 113 - 38 - - 39 -...
- Page 116 50617034...
Need help?
Do you have a question about the 8 Series and is the answer not in the manual?
Questions and answers