Table of Contents
Advertisement
Quick Links
Advertisement
Table of Contents

Related Manuals for HCFA Q Series

Summary of Contents for HCFA Q Series
- Page 1 ATCMQH01-V1.20...
-
Page 2: Applicable Readers
Store this manual in a safe place so that it can be taken out and read whenever necessary. Applicable readers For the users of HCFA Q series PLC, refer to this manual to perform the wiring, installation, diagnosis and maintenance and requires the users to have the certain knowledge of electrical and automation. -
Page 3: Introduction
Safety Precautions Before use Before use, read this manual fully to acquire proficiency in the mounting, wiring, operation, maintenance and troubleshooting of the product. And, store this manual in a safe place so that it can be taken out and read whenever necessary. - Page 4 Other symbols are explained as follows: Tips A warning that an error is likely to occur. “Indicates the reference page” Depending on circumstances, procedures indicated by WARNING may also be linked to serious results. In any case, it is important to follow the directions for usage as they are very important for personal safety. Failure to do so may cause damage to the equipment, or death or severe injury or significant property damage.
- Page 5 Do not drop the PLC or add excessive vibration or shock to the device. Doing so may cause failure or malfunctions. For installation WARNING For the installation, wiring, maintenance and inspection of this product, only professional technical personnel who have received relevant training on electrical equipment are qualifed .
- Page 6 The cable terminals should be well insulated to ensure that the insulation distance between the cables will not decrease after the cables are installed on the terminal block, otherwise it will cause electric shock, equipment failure, and damage Appropriate protection devices should be installed on the input cables, such as the circuit breaker or external fuse with fusing and detection characteristics.
-
Page 7: Terminology
Failure to do so may cause failures in the PLC Terminology Terminology Description Programmable Logic Controller Integrated Development Environment Program Organization Unit Input/Output CPU unit Q series Programmable Logic Controller Extension module Extension I/O module, special module EtherCAT Slave Controller... -
Page 8: Table Of Contents
Main contents ........................... 1 Safety Precautions ..........................1 Before use ............................1 Symbol description ......................... 1 Terminology ............................. 5 Chapter 1 System Configuration ....................8 Q series PLC introduction ..................8 1-1-1 System configuration ..................8 1-1-2 Module overview ....................9 1-1-3 System startup procedures ................ - Page 9 Chapter 4 Installation and wiring ....................61 4-1 Module connection ......................61 4-1-1 Installing moduels ....................61 4-1-2 Precautions for module correction ............... 62 4-2 Module wiring ........................62 4-2-1 Precautions on wiring .................... 62 4-2-2 Precautions on module grounding ............... 63 4-2-3 Connector installation and wiring ................
-
Page 10: Chapter 1 System Configuration
Chapter 1 System Configuration 1-1 Q series PLC introduction Q-series PLC is a safe, reliable and easy-to- maintain standard PLC with modular structure design. Q-series PLC contains the functions of the traditional PLC, supporting multiple remote I/O modules extensions, and will support local extension in the near future. Various functions of motion control can be realized through SoftMotion provided by PLC. -
Page 11: Module Overview
Besides connecting the extension module directly on the right side of CPU unit, users can also conduct EtherCAT slave station extension through the EC coupler module provided by HCFA. A single EC coupler can connect up to 10 extension modules. If exceeding this number, some modules may not work due to insufficient power(excluding some special extension modules). -
Page 12: System Startup Procedures
1-1-3 System startup procedures Start Ready for work “Safety precautions” Connect power supply, CPU, I/O, extension Module installation “4-1 Connecting module” “4-3 Mounting module” module Use terminal block to make “4-2 Wiring” Wiring correct wiring Connect PC with programming Connection “Software manual”... -
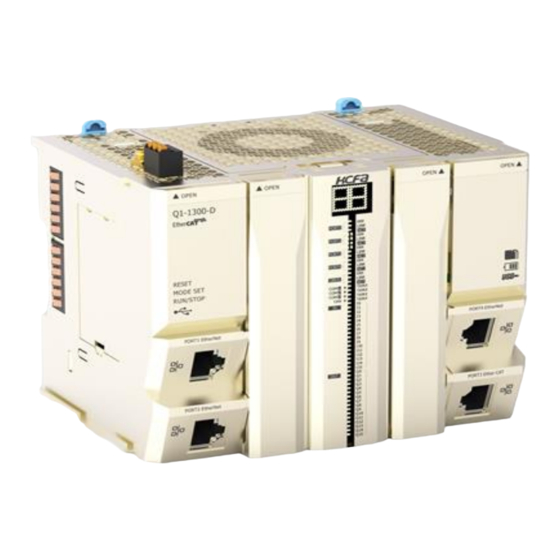
Page 13: Chapter 2 Part Names And Functions
2-1 CPU unit This section describes the model name, part names and functions for the CPU units. 2-1-1 Model name for CPU unit Packaging After purchasing HCFA Q-series PLC, check if there’s the following device and accessories before unpacking. Terminal block ①... - Page 14 DC power terminal block Please check whether the packaging is damaged or anything missing. Anything wrong, contact HCFA distributor. When first power on Check whether the button cell is installed correctly Model name description for CPU unit Nameplae descriptionas follows:...
-
Page 15: Part Names
② Rated input voltage, power and output voltage , power ③ Software version number, updated with IDE version in CPU unit ④ CE certificate and QR code for the device Model name Type Description Applicable modules HCQ1-1300-D CPU unit 16MB user storage space (including program and data storage Q-series CPU units space);... - Page 16 Mounting hook 24VDC terminal block Function keys Dial switch RUN-STOP MINI USB PORT1 EtherNet, Support Modbus TCP PORT2 EtherNet, , Support Modbus TCP Table 0-3 Part names and function -2 Item Name Functions Mounting hook Install controller onto the DIN rail mounting hook (10) 24VDC terminal block 24V DC power supply interface for CPU unit...
- Page 17 COM port CPU unit indicator description Table 0-5 Part names and function -3 Items Port Color Function Current status Panel display “HCFA” Upon power-on Operation status Rotating rectangular strip (21) White Stop status Static rectangular strip “00” No program inside PLC “0E”...
- Page 18 “0F” CPU downtime “OK” Firmware update completion RJ45 Ethernet interface ERR indicator, red indicates communication error or failure to communicate normally RJ45 Ethernet interface LINK indicator, green indicates communication (22) PORT1 Green has been established. RJ45 Ethernet interface ACT indicator, Orange flashing indicates data Orange exchange on the network port.
- Page 19 Port DI0 detects signal input Port DI1 detects signal input Port DI2 detects signal input Port DI3 detects signal input Port DI4 detects signal input Port DI5 detects signal input Port DI6 detects signal input Port DI7 detects signal input High-speed (31) Port DI8 detects signal input...
-
Page 20: Ac Power Module(To Be Supported
CPU unit top view CPU unit top view Mounting hook Fan cover, do not block 24VDC terminal block Items Name Function (33) Extension modules connection Connect the CPU unit and extension modules (34) Fan cover Removable, easy to attach or detach the fan Tips ... -
Page 21: Ec Coupler Model Name And Part Names
AC power IO power extension Company information ground terminal HCFA extension ② Rated input voltage and power &output voltage and power ③ Software version number, updsated with IDE version within the CPU unit ④ CE certificate and QR code... - Page 22 EC coupler part names and functions HCQX-EC-D coupler top view HCQX-EC-D coupler bottom view Mounting hook Cable tie Connector mounting hook Indicator Sheetmetal Port3 Port1 QBUS EtherCAT IN Port2 EtherCAT OUT Terminal block EC coupler channel description Table 0-6 Indicator description Symbol Color Description...
- Page 23 EtherCAT slave output port,Data passed from port this port in EtherCAT topology Tips EC coupler needs specified network cable or adapter, which is sent for free by HCFA. “EtherCAT introduction” “Appendix 2 Specified network cable for EC coupler” HCQX-EC-D viewed from the right...
-
Page 24: Ethercat Introduction
HCQX-EC-D front view 2-3-2 EtherCAT introduction EtherCAT is chosen as the main bus communication protocol of the master for HCFA Q-series controllers. EtherCAT is a real-time industrial Ethernet technology proposed by Beckhoff Automation in 2003. It is also an Ethernet-based real-time industrial fieldbus communication protocol and international standard. It has the characteristics of openness, high compatibility, and fast transmission speed, and supports multiple device connection topologies. - Page 25 topology according to their own requirements. Different transmission methods can be used for signal transmission, and different transmission methods have different requirements for the max. transmission distance between slave stations. See the table below for details: Table 0-10 Max. transmission distance for transmission methods Transmission method Max.
-
Page 26: Ethercat Slave Controller (Esc)
Take the HCFA module as an example, the EC coupler module uses three ESC data ports, and the extension IO module uses two ESC data ports. -
Page 27: Digital I/O Modules(Id/Od
Series name Input channel QX slave 16-ch input Function module Power type Company information Digital input DC power HCFA OD/OC Digital output AC power Digital I/O Analog input Analog output Analgo I/O ② Working voltage and input/output current for normal operation ③... - Page 28 Part names for digital input module HCQX-ID16-D module front view Mounting hook Input channel arrangements Connector mounting hook Indicators Sheetmetal Terminal block Common “Connector installation and wiring” terminal Table 0-11 Digital inut module indicators description Symbol Color Description Green The indicator show the current power supply status of the module. ID module running state.
- Page 29 No indicator S/S input common terminal No indicator S/S input common terminal HCQX-ID16-D viewed from the right side Mounting hook Sheetmetal Connector Mounting hook mounting hook Cable tie Table 0-12 Digital input module structure description Item Name Description ① Sheetmetal Transmits QBUS signal and control circuit current.
-
Page 30: Digital Output Module Model Name And Part Names
Series name Output channel QX slave 16-ch output Function module Power type Company information Digital input DC power HCFA OD/OC Digital output AC power Digital I/O Analog input Analog output Analog I/O ② Working voltage and input/output current for normal operation ③... - Page 31 HCQX-OD16-D Front view Output channel arrangements Mounting hook Connector connection Indicator Sheetmetal Common terminal “Connector installation and wiring” “Remove the connector” Terminal block Common terminal Table 0-13 Digital output module indicator description Symbol Color Description Green The indicator show the current power supply status of the module. OD module running state.
- Page 32 No indicator Output common terminal HCQX-OD16-D viewed from right side Mounting hook Sheetmetal Connector Mounting hook connection Cable tie Table 0-14 Digital output module structure description Item Name Description ① Sheetmetal Transmits QBUS signal ② Connector Provide wiring device for easy wiring and module replacement connection ③...
-
Page 33: Digital I/O Module Model Name And Part Names
Series name Input channel QX slave 16-ch input Function module Power type Company information Digital input DC power HCFA OD/OC Digital output AC power Digital I/O Analog input Analog output Analog I/O ② Working voltage and input/output current for normal operation ③... - Page 34 Part names for digital I/O module Channel arrangement Mounting hook Connector mounting hook Indicator Sheetmetal I-COM Q-COM Common Common terminal terminal Terminal block Common * COM for input and output should be independent terminal from each other. Do not connect together internally. Table 0-15 Digital I/O module indicator description Symbol Color...
-
Page 35: Analog I/O(Ad/Da)Module
I-COM No indicator I-COM input common terminal Q-COM No indicator Q-COM output common terminal HCQX-MD16-D viewed from right side Mounting hook Sheetmetal Connector Mounting hook connection Cable tie Table 0-16 Digital I/O module structure description Items Name Desccription ④ Sheetmetal Transmits QBUS signal ⑤... - Page 36 Input channel QX slave customization Number analog Not defined input channel Function module Company information Digital input HCFA Power type OD/OC Digital output DC power Digital I/O AC power Analog input Analog output Analog I/O ② Working voltage and input/output current for normal operation ③...
- Page 37 Analog input module terminal arrangements Table 0-15 Terminal arrangements Terminal Description Name Terminal Name name Voltage input (negative) of channel 1 Voltage input (positive) of channel 1 Voltage input (negative) of channel 2 Voltage input (positive) of channel 2 Voltage input (negative) of channel 3 Voltage input (positive) of channel 3 Voltage input (negative) of channel 4...
- Page 38 HCQX-AD04-D viewed from right side Mounting hook Sheetmetal Connector Mounting connection hook Cable tie Items Name Description ② Sheetmetal Transmits QBUS signal ③ Connector Provide wiring device for easy wiring and module replacement connection ④ Cable tie Pass the cables through and fix them to make the wiring more neat and convenient for future maintenance.
-
Page 39: Analog Output Module Model Name And Part Names
Number analog Not defined output channel Function module Company information Power type Digital input HCFA DC power OD/OC Digital output AC power Digital I/O Analog input Analog output Analog I/O ② Working voltage and input/output current for normal operation ③... - Page 40 HCQX-DA04-D Front view Mounting hook Note that the indicators here are not Connector defined. mounting hook Indicator Sheetmetal Terminal block Analog output module terminal arrangements Table 0-17 Terminal arrangements Name Terminal Name Terminal Description name Channel 1 voltage output Channel 1 current output Channel 2 voltage output Channel 2 current output...
- Page 41 LED indicators arrangements for analog output module “2-3-3 EtherCAT slave controller” Table 0-18 LED indicator description Symbol Color Description Green The indicator shows the current power supply status of the module. Analog module running state. Lit means the module is in normal running state Whether ESC channel 1 of analog output module can respond normally.
-
Page 42: Terminal Module(Not Updated
connection ④ Cable tie Pass the cables through and fix them to make the wiring more neat and convenient for future maintenance. Analog output module signal transmission direction The direction of EtherCAT data frame transmission in the digital output module depends on the ESC (EtherCAT Slave Controller). -
Page 43: Chapter 3 Specifications
Chapter 3 Specifications 3-1 General specifications This section mainly describes the electrical specifications and application environment specifications. 3-1-1 Electrical specifications Items Technical specifications Dielectric withstand AC1000V for 1 min voltage Between power terminal and I/O terminal, between external terminal and shell 1500Vp-p or more,Noise width 1μs,50ns(based on noise simulator), comply with Noise resistance (IEC61000-4-2/3/4/6)... -
Page 44: Performance Specifications
3-2 Performance specifications This section will mainly describe the specifications and dimension for CPU unit and extension modules. 3-2-1 CPU unit specifications CPU unit performance specifications Items Technical specifications Programming method IEC61131-3 programming language(IL、LD、FBD、ST、CFC、SFC) Program execution method Compile execution I/O control method Bus refresh mode Max. -
Page 45: Ac Power Module Specifications(Not Updated
Control circuit voltage DC5V~24V Rated load current 250mA Max. voltage drop at power-ON 0.05V Leakage current at power-OFF <0.1mA Output frequency 100KHZ(Version 2.XX.XX)200KHz(Version 3.XX.XXor more) Common method Evey 8 points share a common terminal. CPU unit dimensions Figure 0-1 CPU unit dimension diagram 3-2-2 AC power module specifications(not updated)... -
Page 46: Digital Input Module Specifications
Working /storage temperature 0°C~+55°C/-25°C~+75°C Relative humidity 95%,no condensation Protection level/Installation IP20/ Not specified Certificate EC coupler module dimensions Figure 0-2 EC coupler module dimensions 3-2-4 Digital input module specifications Digital input module basic specifications Items Technical specifications Number of input channels Input type Source/sink input Isolation method... -
Page 47: Digital Output Module Specifications
Storage temperature -25 °C ... + 85 °C Relative humidity 95%, no condensation Dimensions About 15 mm x 100 mm x 70 mm ( Width alignment : 12 mm) Installation method On 35 mm DIN rail Comply with EN 50022 Vibration/shock resistance Comply with EN 60068-2-6/EN 60068-2-27/29 Anti-electromagnetic... -
Page 48: Digital I/O Module Specifications
Switching time(cycle) Max. output current(per 250mA channel) 1.4W ( Typ ) QBUS power consumption Electrical isolation 500 V ( Backboard/input interface)) Weight About 90g Working temperature 0 °C ... + 55 °C Storage temperature -25 °C ... + 85 °C Relative humidity 95%, no condensation Dimensions... - Page 49 Item HCQX-MD16-D technical specifications Number of channels 8 input channels+8 output channels Input type Source/sink input Output type Sink output Isolation method Photocoupler isolation Load type Resistive, inductive, lighting load Input/output voltage DC24 V (-15% / +20%) Input "0" signal voltage -3 V ...
-
Page 50: Analog (Voltage) Input Module Specifications
Figure 0-5 Digital I/O module dimensions 3-2-7 Analog (voltage) input module specifications This module is a 16-bit analog input module based on the EtherCAT, which can perform peak value monitoring, limit value monitoring, disconnection detection, user scale adjustment, auto tuning and input filtering setting. - Page 51 Relative humidity 95%, no condensation Dimension About 15 mm x 100 mm x 70 mm (Width alignment: 12 mm) Installation On 35 mm DIN rail Comply with EN 50022 Vibration/shock resistance Comply with EN 60068-2-6/EN 60068-2-27/29 Anti-electromagnetic Comply with EN 61000-6-2/EN 61000-6-4 interference Protection level IP 20...
- Page 52 1A05 Channel 2 Data (bipolar effective) 1A0D Channel 4 Data (bipolar effective) Channel 2 Max. value(bipolar Channel 4 Max. value(bipolar 1A06 1A0E effective) effective) Channel 2 Mini. value(bipolar Channel 4 Mini. value(bipolar 1A07 1A0F effective) effective) Status bit description 8..13 Within Over range...
- Page 53 Sub-index 9 UINT 1A08 Sub-index 10 UINT 1A09 Sub-index 11 UINT 1A0A Sub-index 12 UINT 1A0B Sub-index 13 UINT 1A0C Sub-index 14 UINT 1A0D Sub-index 15 UINT 1A0E Sub-index 16 UINT 1A0F 1C33 SM input parameter Sync. mode UINT SM communication cycle Cycle time UDINT 7122000(DEC)...
- Page 54 6060 Max. value 6070 Mini. value 6080 Channel 3 status Within range BOOL FALSE Over range BOOL FALSE Limit 1 BOOL FALSE Limit 2 BOOL FALSE Error BOOL FALSE 6090 Digital value 60A0 Max. value 60B0 Mini. value 60C0 Channel 4 status Within range BOOL FALSE...
- Page 55 Mode 1:Disabled user scale mode: 0、Enabled user scale mode: 0~User Scale Gain-1000; Mode 2:0; Mode 3:0; Mode 4:1000; Mode 5:Disabled user scale mode : 0、Enabled user scale mode : 0~User Scale Gain-3000; Mode 6:4000; Setting value: Mode 0:5000; Mode 1:Disabled user scale mode:: 5000、...
- Page 56 Limit1+1~16383; Mode 3: Limit1+1~16383; Mode 4: Limit1+1~16383; Mode 5: Limit1+1~32767; Mode 6: Limit1+1~32767; Setting value: Filtering setting 0001 0~4096; 0x80n0:0A\0x80n0:1\0x80n0:11 User scale adjustment description 0x80n0:0A user scale adjustment enabled 0x80n0:11 user scale offset 0x80n0:12 user scale gain Example1: 【0x80n0:01:1】 【0x80n0:11:1000】 【0x80n0:12:5000】 【0x80n0:0A:TRUE】 In AD mode, the user's actual measurement range is (0x80n0:11/1000) 1~5V (0x80n0:12/1000).
-
Page 57: Analog (Voltasge) Output Module Specifications
I/O signal Value HCQX-AD04-D HCQX-DA04-D Decimal Hexadecimal 20mA 20mA 32000 0x7D00 16000 0x3E80 0x0001 0x0000 0x0001 -16000 0xC180 -10V -10V -32000 0x8300 The graph shown as below: Conversion value DEC(HEX) 32767(7FFF) 32000(7D00) 16383(3FFF) 16000(3E80) 0000(0000) -16000 ( C180) -16383 ( C001) Resolution:32000 -32000 (8300)... - Page 58 Setting No need to set the address, can be configured through CODESYS Weight About 90 g Working temperature 0 °C ... + 55 °C Storage temperature -25 °C ... + 85 °C Relative humidity 95%, no condensation Dimensions About 15 mm x 100 mm x 70 mm (Width alignment: 12 mm) Installation On 35 mm DIN rail Comply with EN 50022 Vibration/shock resistance...
- Page 59 Parameter setting Index Sub-index Description Type Default (HEX) Notes (HEX) (HEX) 1000 Device type UDINT 5001 1001 Error register USINT Reserved 1008 Device name STRING(20) HCQX-DA-04 1009 Hardware version STRING(5) 100A Software version STRING(5) Restore default 1011 BOOL FALSE settings Sub-index 1 BOOL...
- Page 60 SM event loss UINT counting Cycle time UINT Sync error BOOL FALSE 1600 Channel 1 parameter Sub-index 1 UDINT 70100110 Output data mapping 1601 Channel 2 parameter Sub-index 1 UDINT 70100210 Output data mapping 1602 Channel 3 parameter Sub-index 1 UDINT 70100310 Output data mapping...
- Page 61 mode Relationship between the value in 0x7010 and the output voltage 0x7010:0n(N=1、2、3、4) :Setting value of corresponding output channel After selecting the required working mode for DA modules in channel [0x80n0:01:=TRUE], the setting value can be converted to �� ������������ ����������...
-
Page 62: Terminal Module Specifications(Not Updated
Figure as shown below: Analog output signal 10.24V 10V/20mA 5.12V 0V/1V 4mA/0mA -5.12V -10V -10.24V -32000 0000 32000 -16000 16000 Setting value(DEC) -32768 -16383 16383 32767 3-2-9 Terminal module specifications(not updated)... -
Page 63: Chapter 4 Installation And Wiring
Chapter 4 Installation and wiring 4-1 Module connection This section describes how to install the modules and DIN raio mounting. 4-1-1 Installing moduels Take the installation of EC coupler and I/O module as the example: Left view of I/O module Right view of EC coupler module Tips ... -
Page 64: Precautions For Module Correction
After connecting the modules together according to the above steps, please CAUTION check the contact between the modules. Bad contact may cause failure, electric shock amd module damage. 4-1-2 Precautions for module correction Observe the following precautions when connecting unit or modules: ... -
Page 65: Precautions On Module Grounding
Precautions for I/O module wiring Input and output cables should be separated. If the power cable is close to the I/O cable, error may occur due to the high voltage and current. Please keep the I/O cable from the power cable at a distance of more than 100mm. ... -
Page 66: Connector Installation And Wiring
About the contact protection When using clutches, motors, electromagnetic coils or other inductive load, surge current will occur at power-on, and inverter voltage will occur at power-off. Surge current and inverter voltage drop significantly shorten the life of short contacts. To suppress this, please set the contact protection circuit. Contact protection circuit examples ... - Page 67 About connectors For HCFA Q-series PLC, you can add the connector to the modules /units, which is easy for customers to make wiring and mainternance. In case of module damage, users only need to replace the module and install the connector to the new module, and then it can operate normally. This section will mainly describe the wiring, installation and removal of the connector.
- Page 68 After completing the wiring of the connector, use a cable tie to fix the cables through the hole at the bottom of the connectors and cut off the excess cable tie. Use a cable tie to fix the cables through the hole at the bottom of the connectors To remove the cable from the connector, insert the small screwdriver into the outside square socket as Step 1, and then remove the cable from the corresponding square socket.
- Page 69 After inserting the connector successfully, press it in the “C” direction until you hear the “click”, then connector installation has been completed. Remove the connector Insert the screwdriver into the upper side of the connector in the “A” direction, and gently push it downward in the “B”...
-
Page 70: Module Wiring
16-ch high-speed output The I/O provided by the Q series CPU unit can be used either as high-speed input and output or as general input and output. When the I/O is used as general input and output, it has both 16-point input and 16-point output. - Page 71 Internal/external circuit diagram of general inputs Internal circuit R0~R15 Wiring diagram HSInput HSInput HSInput HSInput HSInput HSInput HSInput HSInput Common DC24V DC24V terminal *S/S is intermal short-circuit, other channels are not connected, such the example of I8-I15. Internal/external circuit diagram of high-speed inputs ...
- Page 72 hsi_cnt1 hsi_cnt5 hsi_cnt2 hsi_cnt6 hsi_cnt3 hsi_cnt7 terminal terminal The encoder Z-phase can be connected to any ports except AB high-speed input channels, which requires corresponding setting in the software. The total extension distance of high-speed IO extension cables should be within CAUTION ...
-
Page 73: Ec Coupler Wiring
4-3-2 EC coupler wiring As a remote extension coupler of Q series PLC, EC module provides 24V power supply for other extension modules through its side metal sheet. Unlike other remote extension I/O modules, it’s not necessary for EC module to use all the ports. The wiring diagram is shown as below:... -
Page 74: Digital Output Module Wiring
Sink output,low level is effective PNP wiring diagram Source output,high level is effective Wiring diagram Tips The digital output module(PNP) needs to be Load customized. If necessary, pls contact HCFA Load distributor. Common DC24V terminal *COM is short-circuited internally, and other channels are not connected. -
Page 75: Analog Input Module Wiring
4-3-6 Analog input module wiring The analog input module, as the remote extension module of the Q series CPU unit, cannot work alone and needs to be connected to the EC coupler or the right side of the CPU unit. It supports both current and voltage input. -
Page 76: Analog Output Module Wiring
4-3-7 Analog output module wiring The analog output module, as the remote extension module of the Q series CPU unit, cannot work alone and needs to be connected to the EC coupler or the right side of the CPU unit. It supports both current and voltage output. -
Page 77: Module Installation
4-4 Module installation 4-4-1 Installation environment When installing CPU units and modules, users need to consider operability and maintainability. Do not install the module in the following environment: The ambient temperature exceeds the range of -5~55℃; The humidity exceeds 5%~95%RH; ... - Page 78 interface or panel facing forward, as shown below: Installation space When installing modules or equipment, the distance between the equipment the the wall or other equipment must be more than 50mm to facilitate the ventilation and replacement of the modules and equipment.
-
Page 79: Installation Procedures
4-4-3 Installation procedures For the initial installation, the user can refer to the following process to complete the module installation。 Ready to install Fix the DIN rail to the platform in the control ccabinet Connect the power supply module, CPU, extension I/O modules Install the connected module on the rail... - Page 80 After connecting the CPU units and modules, unlock the mounting hook of the CPU unit and pull it upward in the direction A as shown below. Locked Open Insert the DIN rail mounting hook into the DIN rail in the direction B as shown below. Push down the DIN rail mounting hook of the CPU unit in the direction C.
-
Page 81: Removal From Din Rail
This installation method will damage the mounting hook and cause problems such as unstable installation. Q series CPU units and its extension modules are equipped with front and rear connecting ports. In order to avoid direct exposure of the connecting ports, terminal modules should be installed at the beginning or end units for protection. - Page 82 Install the new modules as describes above.
-
Page 83: Chapter 5 Maintenance And Operation
Add the fan or ari-conditioner to reduce the ambient LED display 0E,overtemperature temperature CPU unit error LED display 0F,CPU down Series CPU error and cannot be solved. Contact HCFA distributor. LED display 00,No program downloaded in CPU Re-download the user program... - Page 84 CPU hardwre error Contact HCFA distributor replace equipment Port definition No power, supply 24VDC to the module Not operate, the ports are not connected. Not operate, only A2 is connected to the module Not operate, only A3 is connected to the module Not operate,...
-
Page 85: Periodic Inspections
In order to deliver the best performance for Q-series PLCs, please take the daily or periodic inspection. 5-3-1 Periodic inspections The Q series has almost no parts with limited lifespan, but due to environmental conditions and irregular operations, component aging may occur, so regular inspections are required. It is recommended at least once every 6 months to a year. -
Page 86: Requirements For Replacing Units
contact these gases Whether the vibration or Within the specified Install cushioning shock shock occur range absorbing equipment if necessary Check for noise sources No significant noise Far away from the noise sources or sources take anti-interference measures Check for accumulation of No accumulation Clean and protect the unit dirt, dust, salt, or metal... - Page 87 Due to the relationship between the holding variables state at power-failure and CAUTION program, the accidents may occur. Please confirm the relative data or program before power-ON.
-
Page 88: Appendices
Appendix 1 Screwdriver specifications description Users need the suitable screwdriver to make the wiring for Q-series PLC. The screwdrive will be attached with the package by HCFA. And the users can also choose the screwdrive according to the specifications for wiring.
Need help?
Do you have a question about the Q Series and is the answer not in the manual?
Questions and answers