Chapters
Table of Contents

Summary of Contents for NORDFOREST 46-217
- Page 1 DE Wippkreissäge Nr. 46-217 und Nr. 46-218 – Bedienungsanleitung EN Rocker circular saw no. 46-217 and no. 46-218 – operating manual SK Výkyná okružná píla 46-217 a 46-218 – Návod na obsluhu...
- Page 2 Die Originalbetriebsanleitung wurde in deutscher Sprache erstellt The original operating manual is in German Originálny návod na obsluhu sa vypracoval v nemeckom jazyku...
-
Page 3: Table Of Contents
Sicherheitshinweise nach dem Betrieb Sicherheitshinweise zu Betriebsmitteln Verhalten im Notfall Sicherheitseinrichtungen Motorschutzschalter Persönliche Schutzausrüstung Aufbau und Funktion Übersicht über die Wippkreissäge Funktion Verschleißteile Symbole an der Wippkreissäge Lieferumfang Lieferumfang auf Vollständigkeit prüfen Transportschäden prüfen Montage Wippkreissäge aufstellen | 11.2019 Wippkreissäge 46-217 und 46-218... - Page 4 Inbetriebnahme und Bedienung Tätigkeiten vor Gebrauch Wippkreissäge ein- und ausschalten Werkstücke schneiden Transport Reinigung und Wartung Wippkreissäge reinigen Sägeblatt austauschen Rückfeder austauschen Außerbetriebnahme und Entsorgung Lagerung Störungen Technische Daten Allgemeine Daten Spezifischer Schallpegel Zubehör und Ersatzteile Händler-Service EG-Konformitätserklärung Gewährleistung Garantie Index Wippkreissäge 46-217 und 46-218 | 11.2019...
-
Page 5: Über Diese Anleitung
Über diese Anleitung Gültigkeit Diese Anleitung gilt für die Wippkreissäge in den folgenden Varianten: Maschine Nordforest Wippkreissäge 46-217 230 V Nordforest Wippkreissäge 46-218 400 V Sie richtet sich an Brennholzselbstwerber. Die Anleitung enthält wichtige Informationen, um die Wippkreissäge sicher und sachgerecht zu transportieren, zu montieren und instal- lieren, in Betrieb zu nehmen, zu bedienen, zu verwenden, zu warten und einfache Störungen selbst zu beseitigen. -
Page 6: Symbole In Dieser Anleitung
Warnhinweise vor Handlungsanweisungen in dieser Anleitung nicht beachten. › Lesen Sie diese Anleitung gründlich und vollständig, bevor Sie mit der Wippkreissäge arbeiten. › Bewahren Sie die Anleitung so auf, dass sie in einem leserlichen Zustand ist. Wippkreissäge 46-217 und 46-218 | 11.2019... -
Page 7: Bestimmungsgemäße Verwendung
• die entgegengesetzte Drehrichtung des Sägeblatts einstellen, • die Wippkreissäge anders verwenden, als es im Kapitel „Bestim- mungsgemäße Verwendung“ beschrieben ist, • die Wippkreissäge unter Betriebsbedingungen verwenden, die von den in dieser Anleitung beschriebenen abweichen. | 11.2019 Wippkreissäge 46-217 und 46-218... -
Page 8: Qualifikation Des Personals
Achten Sie auf eine korrekte Drehrichtung der Säge. › Betreiben Sie die Wippkreissäge ausschließlich mit den vom Hersteller angebrachten bzw. vorgesehenen Schutzeinrichtungen. › Bedienen Sie die Wippkreissäge mit beiden Händen. › Verwenden Sie die Wippkreissäge ausschließlich im Freien. Wippkreissäge 46-217 und 46-218 | 11.2019... -
Page 9: Sicherheitshinweise Zum Arbeitsplatz
› Nehmen Sie eine korrekte Arbeitshaltung ein. Stellen Sie sich frontal zur Säge und arbeiten Sie am Griff stets mit beiden Händen. › Tragen Sie die persönliche Schutzausrüstung (siehe „Persönliche Schutzausrüstung“ auf Seite 13). | 11.2019 Wippkreissäge 46-217 und 46-218... -
Page 10: Sicherheitshinweise Zum Arbeiten An Der Elektrik
Entfernen Sie vor dem Schneiden alle Nägel und Metallgegenstände von dem zu schneidenen Holzstück. › Achten Sie darauf, dass Holzstücke keine Kabel, Seile etc. enthalten. › Beginnen Sie erst mit den Schneiden, wenn das Sägeblatt die volle Drehzahl erreicht hat. Wippkreissäge 46-217 und 46-218 | 11.2019... -
Page 11: Sicherheitshinweise Während Des Betriebs
Betriebsmittel und Ersatzteile. Verhalten im Notfall Wenn z. B. durch Fehlfunktionen oder gefährliche Situationen unmit- telbare Verletzungsgefahr für Personen besteht oder die Wippkreissäge beschädigt werden kann: › Setzen Sie die Wippkreissäge über den NOT-AUS-Taster sofort außer Betrieb. | 11.2019 Wippkreissäge 46-217 und 46-218... -
Page 12: Sicherheitseinrichtungen
Sicherheitshinweise Abb. 1: NOT-AUS-Taster an den Varianten 46-217 (links) und 46-218 (rechts) › Trennen Sie die Wippkreissäge von der Spannungsversorgung. › Lassen Sie die Fehlfunktionen durch den Fachhändler beseitigen. Bei einem Brand an der elektrischen Anlage der Wippkreissäge: › Verwenden Sie ausschließlich Löschmittel, die hierfür zugelassen sind (z. B. -
Page 13: Persönliche Schutzausrüstung
Sicherheitshinweise Persönliche Schutzausrüstung › Tragen beim Bedienen stets folgende persönliche Schutzausrüstung: • Sicherheitsschuhe • Schutzhaube für lange Haare • eng anliegende Kleidung • Schutzhandschuhe • Augenschutz • Gehörschutz • Schutzmaske | 11.2019 Wippkreissäge 46-217 und 46-218... -
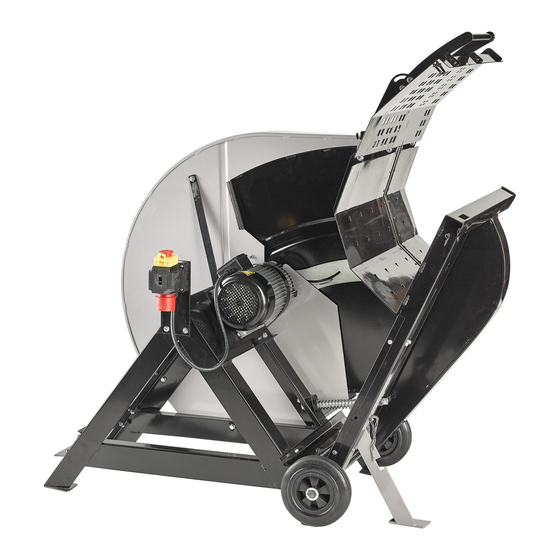
Page 14: Aufbau Und Funktion
Aufbau und Funktion Aufbau und Funktion Übersicht über die Wippkreissäge 12 13 Abb. 2: Übersicht über die Wippkreissäge Anschlusskasten inkl. Holz-Einlegefläche NOT-AUS-Taster Schutzhaube Rückfeder Lüftung für den Motor Rahmen Motor Mitnahmebolzen Sperrblech Griff Kette mit Arretierungsbolzen Wippe Stütze mit Sicherungshaken Wippkreissäge 46-217 und 46-218 | 11.2019... - Page 15 Aufbau und Funktion Abb. 3: Detailansicht Sägeblatt 15 Sägeblatt Unterlegscheibe 16 Öffnung für Arretierungsbolzen 19 Schraube 17 Flansch Abb. 4: Detailansicht Stütze 20 Öffnung für Arretierungsbolzen 23 Sicherungshaken 21 Kette Stütze 22 Arretierungsbolzen | 11.2019 Wippkreissäge 46-217 und 46-218...
-
Page 16: Funktion
Schnitt längere Zeit am Sägeblatt verharrt. Sie können das geschnittene Stück Holz nach Rückkehr der Wippe aus der Einlagefläche entnehmen. Verschleißteile Verschleißteile Sägeblätter sind Garantieanspruch aus geschlossen. › Sie können diese bei Bedarf bei Ihrem Händler nachbestellen. Wippkreissäge 46-217 und 46-218 | 11.2019... -
Page 17: Symbole An Der Wippkreissäge
Aufbau und Funktion Symbole an der Wippkreissäge Symbol Beschreibung Vor Inbetriebnahme Bedienungsanleitung und Sicherheits- hinweise lesen und beachten! Sicherheitsschuhe tragen! Schutzhandschuhe tragen! Gehörschutz tragen! Augenschutz tragen! Schutzkleidung tragen! Mundschutz tragen! | 11.2019 Wippkreissäge 46-217 und 46-218... -
Page 18: Lieferumfang
Hützeler Damm 38 – D-29646 Bispingen www.grube.de Drehrichtung des Sägeblatts Achtung! Verbrennungsgefahr. Dieser Aufkleber warnt vor heißen Oberflächen an Motorteilen. Lieferumfang Lieferumfang auf Vollständigkeit prüfen Zum Lieferumfang der Kreissäge gehören: • eine Wippkreissäge • zwei Räder • ein Anschlusskasten • eine Bedienungsanleitung Wippkreissäge 46-217 und 46-218 | 11.2019... -
Page 19: Transportschäden Prüfen
Halten Sie den Arbeitsbereich frei von Holzresten, Hindernissen und Stolperstellen. › Sorgen Sie am Arbeitsplatz für ausreichende Beleuchtung. › Ebnen Sie die Abstellfläche nicht mit Sägemehl oder Holzasche, da ansonsten Rutschgefahr besteht. Verwenden Sie bei Rutschgefahr eine Antirutschmatte. | 11.2019 Wippkreissäge 46-217 und 46-218... - Page 20 Befestigen Sie den Anschlusskasten mit jeweils 2 Unterlegschei- beiben und Schrauben an der dafür vorgesehenen Halterung. Variante 46-218/400 V › Befestigen Sie den Anschlusskasten mit jeweils 2 Unterlegschei- beiben und Schrauben an der dafür vorgesehenen Halterung. Abb. 9: Anschlusskasten montieren Wippkreissäge 46-217 und 46-218 | 11.2019...
- Page 21 Schließen Sie den CEE-Stecker an die entsprechende Steckdose an. Achten Sie auf eine korrekte Positierung des Phasenwenders und passen Sie diese ggf. mit einem Schraubendreher an. Sollte das Kreissägeblatt nicht in Richtung des Anwenders laufen, muss der Phasenwender gedreht werden. Abb. 10: Elektrischer Anschluss | 11.2019 Wippkreissäge 46-217 und 46-218...
- Page 22 Wippkreissäge ein- und ausschalten WARNUNG Verletzungsgefahr durch herausgeschleuderte Holzreste! Wenn die Schutzhaube nicht korrekt eingestellt ist, können Holz- reste aus der Wippkreissäge herausgeschleudert werden. › Achten Sie darauf, dass sich Sie Schutzhaube beim Schneiden in der geschlossenen Schutzposition befindet. Wippkreissäge 46-217 und 46-218 | 11.2019...
- Page 23 Überprüfen Sie vor jedem Schneidvorgang die Funktion der Motorbremse. › Um die Wippkreissäge einzuschalten: • Drehen Sie den Regler (Variante 46-217/230 V), sodass er ON anzeigt oder • betätigen Sie den grünen Knopf (Variante 46-218/400 V) des Schalters. Abb. 11: Einschalten der Varianten 46-217 (links) und 46-218 (rechts) Die Wippkreissäge startet.
- Page 24 Inbetriebnahme und Bedienung › Um die Wippkreissäge auszuschalten: • Drehen Sie den Regler (Variante 46-217/230 V), sodass er OFF anzeigt oder • betätigen Sie den roten Knopf (Variante 46-218/400 V) des Schalters. Das Sägeblatt kommt innerhalb von 10 Sekunden zum Stillstand. Werkstücke schneiden WARNUNG Gehörschäden durch Lärm!
- Page 25 Tragen Sie die persönliche Schutzausrüstung. Gefahr durch unerlaubte Bedienung! Personen, die die Wippkreissäge unerlaubt bedienen, können sich verletzen. › Schalten Sie immer die Wippkreissäge aus, wenn Sie sich von ihr entfernen. › Lassen Sie die Wippkreissäge niemals unbeaufsichtigt. | 11.2019 Wippkreissäge 46-217 und 46-218...
- Page 26 Legen Sie ein oder mehrere Holzstücke auf der linken Seite der Holz- Einlegefläche der Wippe ein. Holzstücke dürfen maximal einen Durchmesser von 190 mm (Variante 46-217/230 V) bzw. 240 mm (Variante 46-218/400 V) haben (siehe „Technische Daten“ auf Seite 39). ›...
- Page 27 Belasten Sie die Achse mit einem Fuß und kippen Sie die Wipp- kreissäge leicht nach vorne. Die Wippkreissäge kann jetzt gerollt werden. › Zum Abstellen belasten Sie die Achse erneut mit einem Fuß und stellen die Säge vorsichtig ab. | 11.2019 Wippkreissäge 46-217 und 46-218...
- Page 28 Betriebsmitel und Ersatzteile. Gefahr durch Einatmen von Sägemehl und Staub! Beim Sägen von Holzstücken gelangt Sägemehl und Staub in den Arbeitsbereich, was Atembeschwerden zur Folge hat. › Tragen Sie bei Reinigungsarbeiten die persönliche Schutzaus- rüstung, insbesondere den Mundschutz. Wippkreissäge 46-217 und 46-218 | 11.2019...
- Page 29 • Sprühen Sie alle beweglichen Teile mit Multifunktionsspray ein. Verwenden Sie z. B. WD-40 Multifunktionsspray. • Beseitigen Sie Harzreste von der Oberfläche des Sägeblatts und der Wippe. Harzreste können mit herkömmlichen Mitteln für Instand- haltung und Pflege beseitigt werden. | 11.2019 Wippkreissäge 46-217 und 46-218...
- Page 30 Verwenden Sie ausschließlich hochwertige Sägeblätter, z. B. aus Chrom-Vanadium-Stahl. › Verwenden Sie ausschließlich scharfe und intakte Sägeblätter. › Verwenden Sie ausschließlich Sägeblätter, die für die Nutzung der Wippkreissäge geeignet sind. Beachten Sie dazu die Angaben auf dem Typenschild. Wippkreissäge 46-217 und 46-218 | 11.2019...
- Page 31 6. Halten Sie die Wippe fest und lösen Sie den Sicherungshaken der Transportposition. Abb. 15: Mitnahmebol- zen lösen 7. Kippen Sie die Wippe vorsichtig zum Boden und legen Sie vorsichtig Abb. 16: Abgelegte Wippe 8. Schieben Sie den Arretierungsbolzen in die vorgesehene Öffnung zur Sicherung des Sägeblatts. Abb. 17: Sägeblatt arretieren | 11.2019 Wippkreissäge 46-217 und 46-218...
- Page 32 Eine verschlissene oder gerissene Rückfeder muss sofort ausgetauscht werden. Hilfestellung durch eine zweite Person ist empfohlen. Um die Rückfeder auszutauschen: 1. Ziehen Sie den Anschlusstecker. 2. Bringen Sie die Wippkreissäge in die Transportposition (siehe „Transport“ auf Seite 27). Wippkreissäge 46-217 und 46-218 | 11.2019...
- Page 33 12. Ziehen Sie die Nuss mit einem Drehmoment von 43,5 Nm fest. Achten Sie darauf, dass die Schraube fest angezogen ist und sich nicht lösen kann. Abb. 23: Ausgetauschte Rückfeder 13. Schrauben Sie das Sperrblech mit einer Innensechstkantschraube auf der Schutzhaube des Sägeblatts fest. | 11.2019 Wippkreissäge 46-217 und 46-218...
- Page 34 Lagern Sie die Wippkreissäge ausschließlich in geschlossenen Räumen. › Stellen Sie sicher, dass der Lagerraum gut belüftet und trocken ist. Bevor Sie die Wippkreissäge für einen längeren Zeitraum lagern, reinigen Sie sie gründlich (siehe „Wippkreissäge reinigen“ auf Seite 29). Wippkreissäge 46-217 und 46-218 | 11.2019...
- Page 35 Typenschild. Diese Angaben werden bei der Problembe- hebung bzw. Ersatzteilbestellung benötigt. In der folgenden Tabelle sind mögliche Fehler, Ursachen und ihre Besei- tigung aufgelistet. Halten Sie bei allen Einstell-, Reinigungs-, Wartungs- und Reparaturar- beiten die Sicherheitsvorschriften ein. | 11.2019 Wippkreissäge 46-217 und 46-218...
- Page 36 Lösen Sie den Sicherheits- mehr. ist nicht gelöst. haken (siehe „Transport- sicherung aufstellen“ auf Seite 20). › Die Rückfeder ist Tauschen Sie die Rück- defekt. feder aus (siehe „Rück- feder austauschen“ auf Seite 32). Wippkreissäge 46-217 und 46-218 | 11.2019...
- Page 37 Seite 30). › Es befinden sich Brand- Das Sägeblatt ist Tauschen Sie das Säge- stellen im Schnittbereich. stumpf. blatt aus oder lassen Sie es schärfen (siehe „Säge- blatt austauschen“ auf Seite 30). | 11.2019 Wippkreissäge 46-217 und 46-218...
- Page 38 Sie sie gegen ein originales Ersatzteil austauschen. › Das Sägeblatt läuft Der Motor wird nach Der Phasenwender im verkehrt herum. kurzer Zeit heiß. An der Stecker muss gedreht Schnittstelle bilden sich werden. Schmauchstellen. Wippkreissäge 46-217 und 46-218 | 11.2019...
- Page 39 Anleitung für die Messung des Lärms von technischen Arbeitsmitteln für die Land- und Forstwirtschaft mit folgenden Parametern: Einheit 46-218/400 V 46-217/230 V Schalleistungspegel Arbeit (LWA) Schalldruckpegel Arbeitsplatz (LPA) Faktor der Messunsicherheit: 4 dB. | 11.2019 Wippkreissäge 46-217 und 46-218...
- Page 40 Menge 46-260/30 Variante 46-217/230 V: Kreissägeblatt, Ø 600 mm 46-270/30 Variante 46-218/400 V: Kreissägeblatt, Ø 700 mm Weitere Ersatzteile sind auf Anfrage bei Ihrem Fachhändler erhältlich. Händler-Service Der Händler-Service steht Ihnen bei Rückfragen zur Wippkreissäge gern zur Verfügung. Wippkreissäge 46-217 und 46-218 | 11.2019...
- Page 41 D-29646 Bispingen · Tel. (0 51 94) 900-0 · Fax 900-270 E-Mail: info@grube.de · www.grube.de Geschäftsführer: Dr. Gunther Grube Amtsgericht Lüneburg HRA-Nr. 100717 · USt-ID DE 1163 80 250 Bispingen, den 13.11.2019 Datum Dr. Gunther Grube (Geschäftsführung) Amtssprache des Verwenderlandes: deutsch (Kopie des Kunden) | 11.2019 Wippkreissäge 46-217 und 46-218...
- Page 42 Käuferadresse und Maschinentyp müssen bei beruflicher bzw. gewerblicher Nutzung eindeutig erkennbar sein. Auftretende Mängel innerhalb der Garantiezeit durch Material- oder Herstellungsfehler sind, sofern sie trotz sachgemäßer Bedienung und Pflege der Maschine entstanden sind, durch Ausbesserung zu beseitigen. Wippkreissäge 46-217 und 46-218 | 11.2019...
- Page 43 Elektrik 10 Gültigkeit der Anleitung 5 nach dem Betrieb 11 vor dem Betrieb 10 Inbetriebnahme 22 während des Betriebs 11 zu Betriebsmitteln 11 Konformitätserklärung 41 zum Arbeitsplatz 9 Störungen 35 Symbole Lagerung 34 an der Maschine 17 Lieferumfang 18 in der Anleitung 6 Montage 19 Technische Daten 38 Motorschutzschalter 12 Transport 27 | 11.2019 Wippkreissäge 46-217 und 46-218...
- Page 44 Index Wippkreissäge 46-217 und 46-218 | 11.2019...
- Page 45 Overview of the rocker circular saw Mode of operation Wearing parts Symbols on the rocker circular saw Included in the delivery Check that the delivery is complete Checking for transport damage Assembly Setting up the rocker circular saw | 11.2019 Rocker circular saw 46-217 and 46-218...
- Page 46 Transport Cleaning and maintenance Cleaning the rocker circular saw Replacing the saw blade Replacing the return spring Decommissioning and disposal Storage Faults Technical specifications General data Specific sound level Accessories and spare parts Dealer service EC Declaration of Conformity Warranty Guarantee Index Rocker circular saw 46-217 and 46-218 | 11.2019...
-
Page 47: About This Manual
• The section "Consequences" describes the possible consequences of non-observance of the warning. • The section "Hazard avoidance" indicates how the hazard can be avoided. It is essential that you implement these hazard avoidance measures! | 11.2019 Rocker circular saw 46-217 and 46-218... -
Page 48: Symbols In This Manual
Keep the manual in a safe place so that it is in a legible condition. › Make sure that the manual is always available to all users. › Always ensure that this manual is passed on to third parties together with the rocker circular saw. Rocker circular saw 46-217 and 46-218 | 11.2019... -
Page 49: Intended Use
Improper use of the rocker circular saw voids all guarantee claims. The manufacturer is not liable for damage to the rocker circular saw or for personal injuries that result from improper use. | 11.2019 Rocker circular saw 46-217 and 46-218... -
Page 50: Qualification Of Personnel
› Wear a hairnet to cover long hair and do not wear loose clothing or jewellery when working with the rocker circular saw. Rocker circular saw 46-217 and 46-218 | 11.2019... -
Page 51: Safety Instructions Regarding The Workplace
(for maintenance measures, see “Cleaning and maintenance” on page 70). › In case of defects to the electrical equipment, switch off the power supply immediately and contact the specialist dealer. | 11.2019 Rocker circular saw 46-217 and 46-218... -
Page 52: Safety Information Before Operation
Do not remove wood pieces when the rocker circular saw is running. › Do not stop the saw blades with lateral pressure. › Ensure that the cut wood pieces do not get caught and ejected from the rocker circular saw. Rocker circular saw 46-217 and 46-218 | 11.2019... -
Page 53: Safety Information After Operation
If, for example, there is a direct risk of personal injuries or damage to the rocker circular saw due to malfunctions or hazardous situations: › Take the rocker circular saw out of operation immediately with the EMERGENCY STOP button. | 11.2019 Rocker circular saw 46-217 and 46-218... -
Page 54: Safety Devices
Safety instructions Fig. 1: EMERGENCY STOP button on the 46-217 (left) and 46-218 (right) variants › Disconnect the rocker circular saw from the power supply. › Have the malfunctions rectified by the specialist dealer. In case of a fire on the electrical equipment of the rocker circular saw: ›... -
Page 55: Personal Protective Equipment
› Always wear the following personal protective equipment: • Safety footwear • Protective hood for long hair • Tight-fitting clothing • Protective gloves • Eye protection • Hearing protection • Protective mask | 11.2019 Rocker circular saw 46-217 and 46-218... -
Page 56: Design And Function
Terminal box incl. Wood insertion area EMERGENCY STOP button Protective hood Return spring Fan for the motor Frame Motor Driving pins Locking plate Wheel Handle Chain with locking pins Rocker Support with safety hooks Rocker circular saw 46-217 and 46-218 | 11.2019... - Page 57 Fig. 3: Detailed overview of the saw blade 15 Saw blade Washer 16 Opening for locking pins Screw 17 Flange Fig. 4: Detailed overview of the support 20 Opening for locking pins Safety hooks 21 Chain Support 22 Locking pins | 11.2019 Rocker circular saw 46-217 and 46-218...
-
Page 58: Mode Of Operation
You can remove the cut piece of wood from the insertion area after the rocker returns. Wearing parts Wearing parts such as saw blades are excluded from warranty claims. › You can reorder them if necessary from your dealer. Rocker circular saw 46-217 and 46-218 | 11.2019... -
Page 59: Symbols On The Rocker Circular Saw
Design and function Symbols on the rocker circular saw Symbol Description Read and comply with the operating manual and safety information before commissioning! Wear safety boots! Wear protective gloves! Wear hearing protection! Wear eye protection! Wear protective clothing! Wear a mask! | 11.2019 Rocker circular saw 46-217 and 46-218... -
Page 60: Included In The Delivery
This sticker warns of hot surfaces on the motor parts. Included in the delivery Check that the delivery is complete The circular saw scope of delivery includes: • A rocker circular saw • Two wheels • A terminal box • An operating manual Rocker circular saw 46-217 and 46-218 | 11.2019... -
Page 61: Checking For Transport Damage
Ensure there is sufficient lighting in the workplace. › Do not level out the floor surface with sawdust or wood ash otherwise there is a risk of slipping. Use an anti-slip mat if there is a risk of slipping. | 11.2019 Rocker circular saw 46-217 and 46-218... - Page 62 Attach the terminal box to the bracket intended for this with the 2 washers and screws. Variant 46-218/400 V › Attach the terminal box to the bracket intended for this with the 2 washers and screws. Fig. 9: Mounting the terminal box Rocker circular saw 46-217 and 46-218 | 11.2019...
- Page 63 Ensure the phased turner is positioned correctly and adjust it if necessary with a screwdriver. If the circular saw blade does not run in the direction of the user, the phase inverter must be switched. Fig. 10: Electrical connection | 11.2019 Rocker circular saw 46-217 and 46-218...
- Page 64 If the protective hood is not adjusted correctly, wood residue may be ejected from the rocker circular saw. › Ensure that the protective cover is in the closed protective position when cutting. Rocker circular saw 46-217 and 46-218 | 11.2019...
- Page 65 › To switch the rocker circular saw on: • Turn the controller (variant 46-217/230 V) so that is shows ON • press the green button (variant 46-218/400 V) of the switch. Fig. 11: Switching on the 46-217 (left) and 46-218 (right) variants The rocker circular saw starts.
- Page 66 Commissioning and operation › To switch the rocker circular saw off: • Turn the controller (variant 46-217/230 V) so that is shows OFF • press the red button (variant 46-218/400 V) of the switch. The saw blade comes to a stop within 10 seconds.
- Page 67 Persons who perform prohibited operations with the rocker circular saw may injure themselves. › Always switch the rocker circular saw off if you are leaving the immediate vicinity. › Never leave the rocker circular saw unattended. | 11.2019 Rocker circular saw 46-217 and 46-218...
- Page 68 Insert one or more wood pieces on the left-hand side of the wood insertion area of the rocker. Wood pieces may have a maximum diameter of 190 mm (variant 46-217/230 V) and 240 mm (variant 46-218/400 V) (see “Technical specifications” on page 80). ›...
- Page 69 Push down on the axle with a foot and tilt the rocker circular saw forwards slightly. It is now possible to roll the rocker circular saw. › To put down, push down on the axle again with a foot and put the saw down carefully. | 11.2019 Rocker circular saw 46-217 and 46-218...
- Page 70 Danger due to inhaling sawdust and dust! When sawing wood pieces, sawdust and dust get into the work area which can cause breathing difficulties. › Wear personal protective equipment, in particular the mask, when cleaning. Rocker circular saw 46-217 and 46-218 | 11.2019...
- Page 71 • Spray all moving parts with the multi-function spray. Use WD-40 multi-function spray. • Remove resin residue from the surface of the saw blade and rocker. Resin can be removed with common agents for maintenance and care. | 11.2019 Rocker circular saw 46-217 and 46-218...
- Page 72 › Only use sharp and intact saw blades. › Only use saw blades which are suitable for use on the rocker saw blade. Observe the information on the type plate regarding this. Rocker circular saw 46-217 and 46-218 | 11.2019...
- Page 73 7. Gently tip the rocker towards the floor and lay it down carefully. Fig. 16: Set aside rocker 8. Slide the locking pins into the intended opening for securing the saw blade. Fig. 17: Locking the saw blade | 11.2019 Rocker circular saw 46-217 and 46-218...
- Page 74 Assistance from a second person is recommended. In order to replace the return spring: 1. Remove the plug. 2. Put the rocker circular saw into the transport position (see “Transport” on page 69). Rocker circular saw 46-217 and 46-218 | 11.2019...
- Page 75 Make sure that the screw is tightened and cannot become loose. Fig. 23: Replaced return 13. Screw the locking plate onto the protective cover of the saw blade spring using a hexagon socket screw. | 11.2019 Rocker circular saw 46-217 and 46-218...
- Page 76 Ensure that the storage room is well ventilated and dry. Before storing the rocker circular saw for a long period of time, clean it thoroughly (see “Cleaning the rocker circular saw” on page 71). Rocker circular saw 46-217 and 46-218 | 11.2019...
- Page 77 These details are required for rectifying the problem or ordering spares. The possible faults, causes and remedies are listed in the table below. Observe the safety regulations for all set-up, cleaning, maintenance and repair work. | 11.2019 Rocker circular saw 46-217 and 46-218...
- Page 78 The rocker no longer works. The safety hook is not Loosen the safety hook engaging. (see “Setting up the transport protection” on page 62). › The return spring is Replace the return spring defective. (see “Replacing return spring” on page 74). Rocker circular saw 46-217 and 46-218 | 11.2019...
- Page 79 72). › The saw blade is not Checking seating mounted properly. of the saw blade and correct it if necessary (see “Setting up the transport protection” page 62). | 11.2019 Rocker circular saw 46-217 and 46-218...
- Page 80 Motor power P1 Power supply Mains frequency Saw blade diameter 700.0 600.0 Saw blade holder 30.0 30.0 diameter Saw blade thickness Min./max. wood 30.0 - 240.0 30.0 - 190.0 diameter Weight Rocker circular saw 46-217 and 46-218 | 11.2019...
- Page 81 Unit 46-218/400 V 46-217/230 V Working sound power level (LWA) Work place sound pressure level (LPA) Measurement uncertainty factor: 4 dB. | 11.2019 Rocker circular saw 46-217 and 46-218...
- Page 82 Circular saw blade, diameter 700 mm More spare parts are available from your specialist dealer upon request. Dealer service Our dealer service will be happy to help with your queries about the rocker circular saw. Rocker circular saw 46-217 and 46-218 | 11.2019...
- Page 83 Managing Director: Dr Gunther Grube Lüneburg District Court HRA No. 100717 · VAT ID DE 1163 80 250 Bispingen, 13/11/2019 Date Dr Gunther Grube (Managing Director) Official language of the country of use: German (Customer copy) | 11.2019 Rocker circular saw 46-217 and 46-218...
- Page 84 Defects occurring during the guarantee period due to faults in material or manufacture shall be remedied by repairs if they have arisen in spite of proper operation and maintenance of the machine. Rocker circular saw 46-217 and 46-218 | 11.2019...
- Page 85 Setting up 61 regarding operating Switching on and off 64 equipment 53 Saw blade Guarantee 84 replacing 72 Service 82 Sound level 81 Improper use 49 Spare parts 82 Included in the delivery 60 Storage 76 Intended use 49 Maintenance 70 | 11.2019 Rocker circular saw 46-217 and 46-218...
- Page 86 Index Rocker circular saw 46-217 and 46-218 | 11.2019...
- Page 87 Osobný ochranný výstroj Štruktúra a funkcia Prehľad o výkyvnej okružnej píle Funkcia Rýchlo opotrebiteľné súčiastky Symboly na výkyvnej okružnej píle Rozsah dodávky Skontrolovanie na úplnosť rozsahu dodávky Skontrolovanie škôd pri preprave Montáž Postavenie (inštalovanie) výkyvnej okružnej píly | 11.2019 Výkyvná okružná píla 46-217 a 46-218...
- Page 88 Zapnutie a vypnutie výkyvnej okružnej píly Rezanie obrobku Preprava Čistenie a údržba Očistenie výkyvnej okružnej píly Výmena pílového listu Výmena vratnej pružiny Vyradenie z prevádzky a likvidácia Skladovanie Poruchy Technické údaje Všeobecné údaje Špecifická hladina zvuku Príslušenstvo a náhradné diely Servis predajcu Vyhlásenie o zhode s ES Poskytnutie záruky Záruka Register Výkyvná okružná píla 46-217 a 46-218 | 11.2019...
-
Page 89: O Tomto Návode
• Odsek „Následky“ popisuje možné následky pri nedodržaní výstražného pokynu. • Odsek „Obrana pred nebezpečenstvami“ uvádza, ako možno obísť nebezpečenstvo. Tieto opatrenia na obranu pred nebez- pečenstvami musíte bezpodmienečne dodržať! | 11.2019 Výkyvná okružná píla 46-217 a 46-218... -
Page 90: Symboly V Tomto Návode
› Prečítajte si dôkladne a úplne tento návod skôr, než pracujete s výkyvnou okružnou pílou. › Uschovajte tento návod tak, aby bol v čitateľnom stave. Výkyvná okružná píla 46-217 a 46-218 | 11.2019... -
Page 91: Používanie Podľa Príkazov
• nastavíte opačný smer otáčania pílového listu, • používate výkyvnú okružnú pílu inak, ako je opísané v kapitole „Používanie podľa príkazov“, • používate výkyvnú okružnú pílu za prevádzkových podmienok, ktoré sa odlišujú od tých v tomto návode opísaných. | 11.2019 Výkyvná okružná píla 46-217 a 46-218... -
Page 92: Kvalifikácia Personálu
› Dajte pozor na správny smer otáčania píly. › Výkyvnú okružnú pílu prevádzkujte výlučne len s ochrannými zariadeniami umiestnenými resp. predvídanými výrobcom. › Obsluhujte výkyvnú okružnú pílu obidvomi rukami. Výkyvná okružná píla 46-217 a 46-218 | 11.2019... -
Page 93: Bezpečnostné Pokyny K Pracovisku
Vyhýbajte sa neprirodzenému držaniu tela. › Zaujmite správne držanie tela pri práci. Postavte sa čelne k píle a pracujte vždy obidvomi rukami na rukoväti. › Noste osobný ochranný výstroj (pozri „Osobný ochranný výstroj“ na strane 97). | 11.2019 Výkyvná okružná píla 46-217 a 46-218... -
Page 94: Bezpečnostné Pokyny Pre Prácu Na Elektrickej Inštalácii
Pred rezaním odstráňte všetky klince a kovové predmety z kusa dreva, ktoré sa má rezať. › Dajte pozor na to, aby kusy dreva neobsahovali žiadne káble, laná atď. › S rezaním začnite až potom, keď pílový list dosiahol plný počet otáčok. Výkyvná okružná píla 46-217 a 46-218 | 11.2019... -
Page 95: Bezpečnostné Pokyny Počas Prevádzky
Ak napr. prostredníctvom chybných funkcií alebo nebezpečných situácií jestvuje bezprostredné nebezpečenstvo poranenia pre osoby alebo sa výkyvná okružná píla môže poškodiť: › Ihneď uveďte výkyvnú okružnú pílu cez tlačidlo NÚDZOVÉHO VYPNUTIA mimo prevádzky. | 11.2019 Výkyvná okružná píla 46-217 a 46-218... -
Page 96: Bezpečnostné Zariadenia
Bezpečnostné pokyny Zobr. 1: Tlačidlo NÚDZOVÉHO VYPNUTIA na variantoch 46-217 (vľavo) a 46-218 (vpravo) › Odpojte výkyvnú okružnú pílu od napájania prúdom. › Nechajte odstrániť chybné funkcie odborným predajcom. Pri požiari na elektrickom zariadení výkyvnej okružnej píly: › Používajte výlučne hasiace prostriedky, ktoré sú na tento účel schválené... -
Page 97: Osobný Ochranný Výstroj
Pri obsluhovaní výkyvnej okružnej píly noste stále nasledujúci osobný ochranný výstroj: • bezpečnostnú obuv • ochrannú pokrývku na dlhé vlasy • úzko priliehajúci odev • ochranné rukavice • ochranu očí • ochranu sluchu • ochrannú masku | 11.2019 Výkyvná okružná píla 46-217 a 46-218... -
Page 98: Štruktúra A Funkcia
Pripojovacia skrinka vrát. Vložná plocha pre drevo tlačidla NÚDZOVÉHO VYPNUTIA Ochranný kryt Vratná pružina Vetranie pre motor Rám Motor Unášací svorník Uzavierací plech Koleso Rukoväť Reťaz s aretačným svorníkom Kolíska Opora s poistným hákom Výkyvná okružná píla 46-217 a 46-218 | 11.2019... - Page 99 Zobr. 3: Detailný pohľad na pílový list 15 Pílový list Podložka pod skrutku 16 Otvor pre aretačný svorník Skrutka 17 Príruba Zobr. 4: Detailný pohľad na oporu 20 Otvor pre aretačný svorník Poistný hák 21 Reťaz Opora 22 Aretačný svorník | 11.2019 Výkyvná okružná píla 46-217 a 46-218...
-
Page 100: Funkcia
Po návrate kolísky môžete odrezaný kus dreva odobrať z vložnej plochy kolísky. Rýchlo opotrebiteľné diely Rýchlo opotrebiteľné diely ako napr. pílové listy sú vylúčené z nároku na záruku. › Tieto si môžete pri ich potrebe doobjednať u Vášho predajcu. Výkyvná okružná píla 46-217 a 46-218 | 11.2019... -
Page 101: Symboly Na Výkyvnej Okružnej Píle
Štruktúra a funkcia Symboly na výkyvnej okružnej píle Symbol Popis Pred uvedením do prevádzky si prečítajte a rešpektujte návod na obsluhu! Noste bezpečnostnú obuv! Noste ochranné rukavice! Noste ochranu sluchu! Noste ochranu očí! Noste ochranný odev! Noste ochranu úst! | 11.2019 Výkyvná okružná píla 46-217 a 46-218... -
Page 102: Rozsah Dodávky
Táto nálepka vystríha pred horúcimi povrchmi na častiach motora Rozsah dodávky Skontrolujte rozsah dodávky na úplnosť K rozsahu dodávky výkyvnej okružnej píly patrí: • výkyvná okružná píla • dve kolesá • pripojovacia skrinka • návod na obsluhu Výkyvná okružná píla 46-217 a 46-218 | 11.2019... -
Page 103: Skontrolovanie Škôd Pri Preprave
Udržujte pracovnú oblasť voľnú od zvyškov dreva, prekážok a miest na zakopnutie. › Starajte sa o dostatočné osvetlenie na pracovisku. › Nezarovnávajte odstavnú plochu drevenými pilinami alebo dreveným popolom, lebo inak jestvuje nebezpečenstvo šmyku. Pri nebezpečenstve šmyku používajte protišmykovú rohož. | 11.2019 Výkyvná okružná píla 46-217 a 46-218... -
Page 104: Namontovanie Kolies
Variant 46-217/230 V › Pripevnite vždy pripojovaciu skrinku s podložkami a skrutkami na to opatrenom držiaku. Variant 46-218/400 V › Pripevnite vždy pripojovaciu skrinku vždy 2 podložkami a skrutkami na nato opatrenom držiaku. Zobr. 9: Namontovanie pripojovacej skrinky Výkyvná okružná píla 46-217 a 46-218 | 11.2019... -
Page 105: Elektrické Pripojenie
Pripojte zástrčku CEE na príslušnú zásuvku. Dajte pozor na správne polohovanie prepínača fáz a prispô- sobte toto príp. skrutkovačom. Pílový kotúč by nemal smerovať k používateľovi keď beží motor, musí sa otočiť fázový menič. Zobr. 10: Elektrické pripojenie | 11.2019 Výkyvná okružná píla 46-217 a 46-218... -
Page 106: Uvedenie Do Prevádzky A Obsluha
Ak ochranný kryt nie je správne nastavený, môžu sa smerom von odstreďovať (od odstredivej sily) zvyšky dreva z výkyvnej okružnej píly. › Dajte pozor na to, aby sa ochranný kryt nachádzal pri rezaní v zatvorenej ochrannej polohe. Výkyvná okružná píla 46-217 a 46-218 | 11.2019... - Page 107 • Otočte regulátor (variant 46-217/230 V) tak, aby udával polohu ON alebo • stlačte zelený gombík (variant 46-218/400 V) vypínača. Zobr. 11: Zapnutie variantu 46-217 (vľavo) a 46-218 (vpravo) Výkyvná okružná píla sa spúšťa: Pri výpadku prúdu sa prístroj automaticky vypne. Na znovuzap- nutie opätovne stlačte zelené tlačidlo alebo otočte regulátor.
-
Page 108: Rezanie Obrobku
Práce vo fázach prevádzky výkyvnej okružnej píly môžu viesť k poraneniam. › Vypnite výkyvnú okružnú pílu kvôli montážnym prácam. › Čakajte, až je pílový list úplne privedený do stavu zastavenia. › Vytiahnite sieťovú zástrčku zo zásuvky. Výkyvná okružná píla 46-217 a 46-218 | 11.2019... - Page 109 Noste osobný ochranný výstroj. Nebezpečenstvo nepovolenou obsluhou! Osoby, ktoré obsluhujú výkyvnú okružnú pílu nepovolene, sa môžu zraniť. › Vždy vypnite výkyvnú okružnú pílu, keď sa od nej vzdialite. › Nikdy nenechávajte výkyvnú okružnú pílu bez dozoru. | 11.2019 Výkyvná okružná píla 46-217 a 46-218...
- Page 110 Vložte jeden alebo viaceré kusy dreva na ľavej strane plochy na vkladanie dreva do kolísky. Kusy dreva smú mať maximálny priemer 190 mm (variant 46-217/230 V) resp. 240 mm (variant 46-218/400 V) (pozri „Technické údaje“ na strane 122). › Rovnomerne tlačte obidvomi rukami na rukoväti kolísku proti pílovému listu.
-
Page 111: Preprava
Zaťažte nápravu jednou nohou a zľahka sklopte výkyvnú okružnú pílu dopredu. › Teraz sa môže výkyvná okružná píla odvaľovať. › Na jej odstavenie opätovne zaťažte nápravu jednou nohou a opatrne pílu odstavte. | 11.2019 Výkyvná okružná píla 46-217 a 46-218... -
Page 112: Čistenie A Údržba
Nebezpečenstvo vdýchnutím drevenej múčky a prachu! Pri pílení kusov dreva sa dostáva drevená múčka a prach do pracovnej oblasti, čo má za následok dýchacie ťažkosti. › Noste pri čistiacich prácach osobný ochranný výstroj, najmä ochranu úst. Výkyvná okružná píla 46-217 a 46-218 | 11.2019... -
Page 113: Očistenie Výkyvnej Okružnej Píly
• Nastriekajte všetky pohyblivé časti multifunkčným sprejom. Použite napr. multifunkčný sprej WD-40. • Odstráňte zvyšky živice s povrchu pílového listu a kolísky. Zvyšky živice sa môžu odstrániť pôvodnými prostriedkami na údržbu a ošetrovanie. | 11.2019 Výkyvná okružná píla 46-217 a 46-218... -
Page 114: Výmena Pílového Listu
Používajte výlučne vysokohodnotné pílové listy napr. z chróm- vanádiovej ocele. › Používajte výlučne ostré a neporučené pílové listy. › Používajte výlučne pílové listy, ktoré sú vhodné na využite výkyvnej okružnej píly. Dbajte k tomu na údaje na typovom štítku. Výkyvná okružná píla 46-217 a 46-218 | 11.2019... - Page 115 6. Pevne držte kolísku a uvoľnite poistný hák prepravnej polohy. Zobr. 15: Uvoľnenie unášacieho svorníka 7. Opatrne sklopte kolísku k podlahe a takisto opatrne ju odložte. Zobr. 16: Odložená kolíska 8. Posuňte aretačný svorník do otvoru predvídaného otvoru na zaistenie pílového listu. Zobr. 17: Aretovanie pílového listu | 11.2019 Výkyvná okružná píla 46-217 a 46-218...
-
Page 116: Výmena Vratnej Pružiny
Opotrebovaná alebo prasknutá vratná pružina sa musí ihneď vymeniť. Odporúča sa pomoc od druhej osoby. Na výmenu vratnej pružiny: 1. Vytiahnite prípojnú zástrčku. 2. Uveďte výkyvnú okružnú pílu do prepravnej polohy (pozri „Preprava“ na strane 111). Výkyvná okružná píla 46-217 a 46-218 | 11.2019... - Page 117 12. Pevne utiahnite reťazový pastorok krútiacim momentom 43,5 Nm. Dajte pozor na to, aby bola skrutka pevne pritiahnutá a aby sa nemohla uvoľniť. Zobr. 23: Vymenená 13. Pevne naskrutkujte uzavierací plech šesťhrannou skrutkou na vratná pružina ochranný kryt pílového listu. | 11.2019 Výkyvná okružná píla 46-217 a 46-218...
-
Page 118: Vyradenie Z Prevádzky A Likvidácia
Výkyvnú okružnú pílu skladujte výlučne v uzavretých miestnostiach. › Zabezpečte, aby skladovacia miestnosť bola dobre vetraná a suchá. Skôr než výkyvnú okružnú pílu uskladníte na dlhší časový úsek, dôkladne ju očistite (pozri „Očistenie výkyvnej okružnej píly“ na strane 113). Výkyvná okružná píla 46-217 a 46-218 | 11.2019... -
Page 119: Poruchy
údaje a číslo stroja z typového štítku. Tieto údaje sú potrebné pri odstránení problému resp. objednávke náhradných dielov. V nasledujúcej tabuľke sú spísané možné chyby, príčiny a ich odstránenie. Dodržujte pri všetkých nastavovacích, údržbárskych a opravných prácach bezpečnostné predpisy. | 11.2019 Výkyvná okružná píla 46-217 a 46-218... - Page 120 (pozri „Výmena pílového listu“ na strane 114) › Tlak je príliš vysoký Nechajte výkyvnú okružnú pílu ochladiť › Tlačte kolísku menším tlakom proti pílovému listu (pozri „Rezanie obrobku“ na strane 108) Výkyvná okružná píla 46-217 a 46-218 | 11.2019...
- Page 121 › Motor sa po krátkom čase Pílový kotúč beží Fázový menič v zástrčke zahreje. Na rozhraní sa tvorí nesprávne hore musí byť otočený. pena. nohami. | 11.2019 Výkyvná okružná píla 46-217 a 46-218...
-
Page 122: Technické Údaje
Všeobecné technické údaje Technické údaje Jednotka 46-218/400 V 46-217/230 V Výkon motora P1 Sieťové napätie Sieťová frekvencia Ø pílového listu 700,0 600,0 Ø upnutia pílového 30,0 30,0 listu Hrúbka pílového listu Min./max. Ø dreva. 30,0–240,0 30,0–190,0 Hmotnosť Výkyvná okružná píla 46-217 a 46-218 | 11.2019... -
Page 123: Špecifická Hladina Zvuku
Jednotka 46-218/400 V 46-217/230 V Hladina akustického výkonu pri práci (LWA) Hladina akustického výkonu na pracovisku (LPA) Faktor neistoty merania: 4 dB. | 11.2019 Výkyvná okružná píla 46-217 a 46-218... -
Page 124: Príslušenstvo A Náhradné Diely
List okružnej píly, Ø 700 mm Ďalšie náhradné diely sú k dostaniu na požiadanie u Vášho odborného predajcu. Servis predajcu Servis predajcu vám je rád k dispozícii pri spätných dotazoch k výkyvnej okružnej píle. Výkyvná okružná píla 46-217 a 46-218 | 11.2019... -
Page 125: Vyhlásenie O Zhode S Es
E-Mail: info@grube.de · www.grube.de Manažér: Dr. Gunther Grube Okresný súd Lüneburg HRA-Nr. 100717 · USt-ID DE 1163 80 250 Bispingen, 13.11.2019 Dátum Dr. Gunther Grube (vedenie podniku) Úradný jazyk používateľskej krajiny : nemčina (kópia zákazníka) | 11.2019 Výkyvná okružná píla 46-217 a 46-218... -
Page 126: Poskytnutie Záruky
Adresa kupujúceho a typ stroja musia byť jednoznačne rozpoznateľné pri profesijnom resp. živnostenskom využívaní. Nedostatky, ktoré vzniknú v rámci záručnej doby chybou materiálu alebo výroby, je treba odstrániť vylepšením (opravou), pokiaľ vznikli napriek odbornej obsluhe a starostlivosti o stroj. Výkyvná okružná píla 46-217 a 46-218 | 11.2019... -
Page 127: Register
Inštalovanie okružnej píly na Záruka 126 palivové drevo 103 Rezanie obrobkov 66 Rozsah dodávky 60 Kvalifikácia personálu 92 Rýchlo opotrebiteľné súčiastky 58 Likvidácia 118 Servis 124 Správanie v prípade Montáž 103 núdze 95 Symboly na stroji 101 Náhradné diely 124 v návode 90 Namontovanie kolies 104 | 11.2019 Výkyvná okružná píla 46-217 a 46-218... - Page 128 Grube KG D-29646 Bispingen · Tel. (0 51 94) 900-0 · Fax 900-270 E-Mail: info@grube.de · www.grube.de Geschäftsführung: Dr. Gunther Grube Amtsgericht Lüneburg HRA-Nr. 100717 · USt-ID DE 1163 80 250...
Need help?
Do you have a question about the 46-217 and is the answer not in the manual?
Questions and answers