
Summary of Contents for Thinkkitchen 10616511
- Page 1 AUTOCUISEUR QUICK POT PRESSURE COOKER Mode d’emploi / Instructions 1000 WATTS / 6 L •...
-
Page 3: Table Of Contents
INSTRUCTIONS FRANÇAIS TABLES DES MATIÈRES CONSIGNES DE SÉCURITÉ IMPORTANTES ........p. 4 TOUCHES ET CARACTÉRISTIQUES ..........p. 7 FONCTIONS DE CUISSON ............p. 10 AVANT LA PREMIÈRE UTILISATION ..........p. 14 AVANT CHAQUE UTILISATION ............. p. 15 CONSIGNES D’UTILISATION ............p. 17 Cuisson sous pression ............p. -
Page 4: Consignes De Sécurité Importantes
CONSIGNES DE SÉCURITÉ IMPORTANTES Respecter les consignes de sécurité de base au moment d’utiliser des appareils électriques, y compris les suivantes. LIRE TOUTES LES DIRECTIVES 1. Ne pas toucher aux surfaces chaudes. Ne se servir que des poignées ou des boutons de l’appareil. 2. - Page 5 9. Toujours vérifier que la soupape d’évacuation de la vapeur ne soit pas obstruée avant l’utilisation. 10. Ne jamais essayer d’ouvrir le couvercle pendant la cuisson ou avant que la pression soit retombée. Si la poignée est difficile à tourner, ceci indique que la pression n’est pas retombée. Ne jamais ouvrir l’autocuiseur de force.
- Page 6 Ne pas utiliser de rallonge électrique avec cet appareil. GARDEZ CES INSTRUCTIONS SPÉCIFICATIONS Modèle Tension Puissance Capacité Dimensions Poids 10616511 120V~60Hz 1000 W 6 litre 6,6 kg 31 x 33 x 32 cm 12,2 x 13 x 12,6 po 14,99 lbs...
-
Page 7: Touches Et Caractéristiques
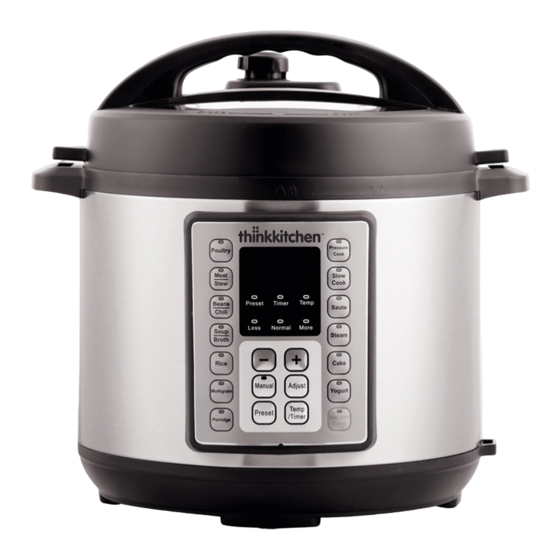
Caractéristiques TOUCHES ET CARACTÉRISTIQUES Éléments chauffants... - Page 8 PANNEAU DE CONTRÔLE Le panneau de contrôle de l’autocuiseur inclut un écran DEL, Panneau de contrôle 14 touches de fonctions 5 touches d’opérations, 1 touche d’annulation, ainsi que plusieurs voyants lumineux. Le panneau de contrôle de l’autocuiseur inclut un écran DEL, 14 touches de fonctions 5 touches d’opérations, 1 touche d’annulation, ainsi que plusieurs voyants lumineux.
- Page 9 TOUCHES D’OPÉRATION A (-) et B (+) : Appuyer pour ajuster la minuterie. C (Régler) : Appuyer pour sélectionner le mode de cuisson. D (Préréglage) : Appuyer pour délayer la mise en marche. Le préréglage peut être utilisé avec les fonctions Volaille, Viande/Ragoût, Fèves/Chili, Soupe/Bouillon, Riz, Multigrain, Gruau, Cuisson sous pression, Mijoter, Cuisson à...
-
Page 10: Fonctions De Cuisson
FONCTION DE CUISSON Fonctions Modes Temps Options de Notes pour l’usager cuisson VOLAILLE Moins 5 min Utilisé pour faire des plats de volaille. Normal 15 min *Fonction sous pression Plus 30 min VIANDE/ Moins 20 min Texture Utilisé pour faire de la RAGOÛT tendre. - Page 11 Fonctions Modes Temps Options de Notes pour l’usager cuisson SOUPE Moins 20 min Soupe sans Cette fonction est utilisée viande. pour la préparation d’une variété de soupes et de *Fonction Normal 30 min Soupe à la potages. Elle peut sous pression viande.
- Page 12 Fonctions Modes Temps Options de Notes pour cuisson l’usager CUISSON Moins 20 min Fonction générale Cette fonction – choisir le temps fonctionnera sous SOUS Normal 35 min de cuisson selon pression. PRESSION la recette suivie. *Fonction Plus 45 min sous pression MIJOTER Moins Correspond au...
- Page 13 Fonctions Modes Temps Options de Notes pour cuisson l’usage GÂTEAU Moins 25 min Gâteaux moelleux Ajuster le temps de plus légers. cuisson pour diffé- rentes recettes. *Fonction Normal 30 min Des gâteaux sous pression plus denses et humides. Plus 40 min Gâteaux au fromage à...
-
Page 14: Avant La Première Utilisation
AVANT LA PREMIÈRE UTILISATION Avant d’utiliser ce produit pour la première fois, retirer tous les accessoires de l’emballage et lire le mode d’emploi attentivement. Lire les instructions et les consignes de sécurité pour éviter des blessures ou des dommages. 1. Laver l’intérieur du couvercle et le récipient interne avec de l’eau chaude et savonneuse, puis rincer et sécher. -
Page 15: Avant Chaque Utilisation
4. Retirer et installer le joint • Le joint peut être retiré de son support en le tirant vers le haut. Pour replacer le joint, l’enfoncer dans son support petit à petit. AVANT CHAQUE UTILISATION Tourner le couvercle dans le sens antihoraire jusqu’à ce que le symbole ... - Page 16 Cela risquerait aussi d’entraîner des fuites, des blessures corporelles ou des dommages à l’autocuiseur. Essuyer complètement l’extérieur du récipient interne. S’assurer qu’il n’y a pas de débris de nourriture sur l’élément chauffant. Replacer le récipient interne dans l’autocuiseur. Tourner légèrement pour vous assurer qu’il est bien en place.
-
Page 17: Consignes D'utilisation
Attention : Il est normal et nécessaire que la soupape d’évacuation soit desserrée. Elle est placée au dessus du tuyau d’évacuation de la vapeur. Si nécessaire, la retirer et la nettoyer. Si le bout de la soupape est aligné avec la marque Sealing lors de l’utilisation des fonctions Maintien au chaud, Mijoter ou Sauté, ceci indique que l’autocuiseur est scellé. - Page 18 Tâche Touche Commentaires Changer le temps de Appuyer sur Régler Choisir parmi trois durées de cuisson cuisson © préétablies, « Normal », « Moins » et « Plus » en appuyant plusieurs fois sur la touche Régler. Appuyer sur + / - Au besoin, appuyer sur + et –...
- Page 19 9. Lorsque la cuisson est terminée, l’autocuiseur émet un son stri- dent et passe automatiquement au mode Maintenir au chaud. Le premier chiffre sur l’écran indique 0 (par exemple 0:02), qui indique le début du maintient au chaud, ainsi que sa durée. Lorsque le processus automatique Maintenir au chaud de 12 heures est terminé, l’autocuiseur se met en mode de veille.
-
Page 20: Cuisson Sans Pression
CUISSON SANS PRESSION Les fonctions de cuisson sans pression sont les suivantes : Sauté, Mijoter et Maintenir au chaud. SAUTÉ Attention : Ne pas mettre le couvercle pour la fonction Sauté. 1. Sélectionner la fonction Sauté. 30 apparaît à l’écran. 2. - Page 21 TÂCHE TOUCHE COMMENTAIRES Changer le temps de Appuyer sur Choisir parmi trois durées de cuisson cuisson Régler © préétablies, « Normal », « Moins » et « Plus » en appuyant plusieurs fois sur la touche Régler. Appuyer sur + / - Au besoin, appuyer sur + et –...
-
Page 22: Nettoyage Et Entretien
NETTOYAGE ET ENTRETIEN Débrancher et laisser refroidir l’appareil avec de le nettoyer. PIÈCE COMMENT NETTOYER Soupape d’évacuation de la vapeur Tirer la Soupape d’évacuation de la vapeur vers le haut pour la retirer. La laver dans de l’eau chaude et savonneuse. Laisser sécher et remettre en place. -
Page 23: Dépannage
DÉPANNAGE PROBLÈME CAUSES POSSIBLES SOLUTIONS L’écran montre « Lid » Le couvercle n’est pas S’assurer que le couvercle (Couvercle) fermé correctement. est bien fermé. Err1 Problème avec le capteur Contacter le service à la de température clientèle Err2 Problème avec le capteur Contacter le service à... -
Page 24: Garantie
THINKKITCHEN pour faire de telles réparations, ou toute autre cause qui ne se rapportent pas directement à un défaut de matériaux et / ou de fabrication de ce produit. - Page 27 ENGLISH INSTRUCTIONS CONTENTS IMPORTANT SAFEGUARDS ............p. 28 CONTROL AND FEATURES ............p. 31 COOKING PROGRAMS ..............p. 34 BEFORE USING FOR THE FIRST TIME .........p. 38 BEFORE EACH USE ..............p. 39 OPERATING INSTRUCTIONS ............p. 41 Pressure Cooking ..............p. 41 Non-Pressure Cooking ............
-
Page 28: Important Safeguards
IMPORTANT SAFEGUARDS When using electrical appliances, basic safety precautions should al- ways be followed, including the following: READ ALL INSTRUCTIONS 1. Do not touch the hot surfaces, specially the steel lid. Use side handles for carrying. 2. Close supervision is necessary when the pressure cooker is used near children. - Page 29 force it open. Any pressure in the cooker can be hazardous. Please see “Cooking Preparation” .Do not place on or near a hot gas or electric burner, or in a heated oven. 11. Never deep fry or pressure fry in the unit with oil. It is dangerous and may cause a fire or serious damage.
- Page 30 SAVE THESE INSTRUCTIONS SPECIFICATIONS Model Power Rated Volume Product Weight Supply Power Dimensions 10616511 120V~60Hz 1000 W 6 litres 31 x 33 x 32 cm 6.6 kg 14.99 lbs 12.2 x 13 x 12.6 in...
-
Page 31: Control And Features
CONTROL AND FEATURES Features... - Page 32 CONTROL PANEL The control panel of the multi-pot consists of a LED screen, 14 Cooking Control Panel Program Keys, 5 Operation Keys, 1 Cancel Key and many indicator lights The control panel of the multi-pot consists of a LED screen, 14 Cooking Program Keys, 5 Operation Keys, 1 Cancel Key and many indicator lights Cooking program keys LED display...
- Page 33 OPERATION KEYS A (-) & B (+): Press these keys to adjust the time. C (Adjust): Press this key to select the mode (Less, Normal, More). D (Preset): Press this key to set time to delay the start. Preset is avail- able for Poultry, Meat/Stew, Beans/Chili, Soup/Broth, Rice, Multi- grain, Porridge, Pressure Cook, Slow Cook, Steam and Manual, but not available for Sauté, Cake and Yogurt.
-
Page 34: Cooking Programs
COOKING PROGRAMS Programs Modes Time Cooking Notes for Users Options POULTRY Less 5 min Used to make poultry dishes. Normal 15 min *Cooks under pressure More 30 min MEAT / Less 20 min Soft tex- Used to make meat and STEW ture. - Page 35 Programs Modes Time Cooking Notes for Users Options SOUP Less 20 min Soup wit- This setting is suitable to hout meat. cook a variety of soups from light broths to hearty. *Cooks under Normal 30 min Soup with It can also be used to cook pressure meat.
- Page 36 Programs Modes Time Cooking Options Notes for Users PRESSURE Less 20 min General pressure This function will function, to use work with pressure COOK Normal 35 min following your *Cooks under favorite recipe pressure More 45 min SLOW Less Corresponds to It allows you to use LOW setting in the pressure coo-...
- Page 37 Programs Modes Time Cooking Options Notes for Users CAKE Less 25 min Lighter moist Ajuster le temps de cakes. cuisson pour diffé- rentes recettes. *Cooks under Normal 30 min Denser moist pressure cakes. More 40 min New York style cheesecakes. YOGURT Less Boil...
-
Page 38: Before Using For The First Time
BEFORE USING FOR THE FIRST TIME Before using this product for the first time, remove all accessories from the package and read this instruction manual carefully. Read the operating instructions and precautions to avoid any injury or property damage 1. Wash the inside of the lid and the inner pot with warm soapy water;... -
Page 39: Before Each Use
4. Remove and Install the Sealing ring • The Sealing ring can be taken out from the ring groove by lifting it upwards. To reinstall the Sealing ring, press it into its groove bit by bit. BEFORE EACH USE Turn the lid counterclockwise until the mark on the lid aligns with the ... - Page 40 Wipe the outside of the inner pot dry. Make sure there is no food debris on the cooking element. Put the inner pot back into the cooker, insuring that it is placed correctly. To lock the lid, hold the lid handle, place the lid on the unit, and align the ...
-
Page 41: Operating Instructions
or Sauté, this indicates that the electric pressure cooker is in a sealed state. Sauté must be used when the lid is opened. Slow Cook and Keep Warm functions can be used with the lid open or closed. OPERATING INSTRUCTIONS PRESSURE COOKING The pressure cooking program is used for Rice, Soup, Poultry, Meat/ Stew, Bean/Chili, Multigrain, Porridge, Steam, Cake and Manual... - Page 42 Task Button Comments Change the cooking press Adjust © Select between three preset cooking time times, Normal, Less and More by repeatedly pressing the Adjust button. The time will appear on the screen and the corresponding mode indicator light will light up. Press + / - If needed, use «+»...
- Page 43 9. When the cooking process is completed, the unit will make a rush- ing sound, and automatically enter the Keep Warm mode. The first digit on the screen displays 0 (for example 0:02). After 12 hours on Keep Warm status, the unit will be in standby status. Please note: You can turn off the Keep Warm mode at any time, using the Keep Warm/Cancel key TIP: It is not advised to leave cooked rice on the Keep Warm...
-
Page 44: Non-Pressure Cooking
NON-PRESSURE COOKING The following non-pressure cooking programs are available: Sauté, Slow Cook and Keep Warm. SAUTÉING Attention : Please note: Do not put the lid on for Sauté program. 1. Select the Sauté program. 30 appears on the screen. 2. If needed, change the Sauté time using the +/- keys. 3. - Page 45 TASK BUTTON COMMENTS Change the cooking Press Select between three preset cooking time Adjust © times, Normal, Less and More by repeate- dly pressing the Adjust button. The time will appear on the screen and the corres- ponding mode indicator light will light up. Press + / - If needed, use «+»...
-
Page 46: Cleaning And Maintenance
CLEANING AND MAINTENANCE Unplug and allow the Digital Pressure Cooker cool to room temperature before cleaning. PARTS HOW TO CLEAN Steam Release Handle Grasp the pressure valve and pull it up. Wash it in warm water with a mild detergent. Allow the valve to dry before putting it back in place. -
Page 47: Troubleshooting
1 888-786-5375. The warranty ob- ligations of THINKKITCHEN for this product are limited to the terms set forth below. This limited warranty does not cover any damage, deterioration or malfunction resulting from any alteration, modification, improper or unreasonable use or maintenance, misuse, abuse, accident, neglect, exposure to excess moisture, fire, lightning, power surges, or other acts of nature. - Page 48 AUTOCUISEUR QUICK POT PRESSURE COOKER 1000 WATTS / 6 L...
Need help?
Do you have a question about the 10616511 and is the answer not in the manual?
Questions and answers
how to cancel a function
To cancel a function on the Thinkkitchen part number 10616511, press the "Cancel" key.
This answer is automatically generated