Table of Contents
Advertisement
Quick Links
Advertisement
Table of Contents

Related Manuals for VTech Drill & Learn Toolbox Pro


Summary of Contents for VTech Drill & Learn Toolbox Pro
- Page 1 Instruction Manual Drill & Learn Toolbox...
- Page 2 INTRODUCTION Thank you for purchasing the Drill & Learn Toolbox Pro! Get ready for fix-it fun with the drill, hammer and wrench while learning cool tool facts, numbers, colors, objects and more. Use the project cards, follow the instructions and enjoy the imaginative repair play. Put on your tool belt to take the fun on the go! Holes Hammer...
-
Page 3: Included In The Package
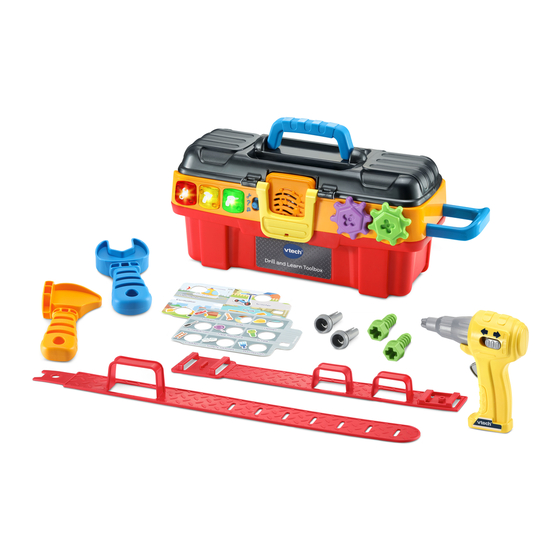
INCLUDED IN THE PACKAGE • Drill & Learn Toolbox™ Pro • 2 project cards • 1 tool belt • 1 drill • 1 hammer • 1 wrench • 2 screws • 2 nails • Quick Start Guide Tool Belt Assembly 1. - Page 4 WARNING All packing materials such as tape, plastic sheets, packaging locks, removable tags, cable ties, cords and packaging screws are not part of this toy, and should be discarded for your child’s safety. NOTE Please save this Instruction Manual as it contains important information. ATTENTION Pour la sécurité...
-
Page 5: Getting Started
GETTING STARTED Battery Removal and Installation 1. Make sure the unit is turned Off. 2. Find the battery cover located on the bottom of the unit, use a screwdriver to loosen the screw and then open the battery cover. 3. Remove old batteries by pulling up on one end of each battery. -
Page 6: Important Battery Information
IMPORTANT: BATTERY INFORMATION • Insert batteries with the correct polarity (+ and -). • Do not mix old and new batteries. • Do not mix alkaline, standard (carbon-zinc) or rechargeable batteries. • Only batteries of the same or equivalent type as recommended are to be used. -
Page 7: Piles Rechargeables
IMPORTANT : INFORMATIONS CONCERNANT LES PILES Les piles fournies avec le produit permettent de tester le jouet en magasin mais ne sont pas des piles longue durée. • Mettre en place les piles ou les accumulateurs en respectant les polarités + et –. •... -
Page 8: Product Features
ACTIVATING NORMAL PLAY MODE When the product is taken out of the packaging, turn it on and insert a Project Card. You will hear a beep and a voice confirming you are in Normal Play mode. PRODUCT FEATURES 1. On/Off/Volume Selector To turn the unit On or adjust the volume, slide the selector to Low or High. -
Page 9: Automatic Shut-Off
6. Tool Belt Insert the tools into the loops on the Tool Belt for fix-it fun. 7. Drill Use the Drill to drill Screws into the Holes. The Drill can turn clockwise or counterclockwise by sliding the Direction Switch on the side. 8. -
Page 10: Challenge Mode
ACTIVITIES 1. Free Play Mode Press the three Tool Buttons to learn about tools, sounds and colors. Use the Drill, Hammer or Wrench to drill Screws or hammer Nails into the Holes. If no Project Card is inserted, you will hear sounds and phrases. - Page 11 SONG LYRICS Tools Card We are fixers with lots of tools Safety first, that’s the rule. No job is too big, No job is too small, With the right tools, We can do them all! Numbers Card One, two, three Count with me.
- Page 12 Housewares Card Well, it might be a little bit noisy All of our repairs Fixing things around the house Well, it takes work and skill When it’s fixed, what a thrill! Wrench Song Twist and turn the bolt to learn How to use the wrench To the right, right, right To make it tight, tight, tight...
-
Page 13: Care And Maintenance
CARE & MAINTENANCE 1. Keep the unit clean by wiping it with a slightly damp cloth. 2. Keep the unit out of direct sunlight and away from any direct heat source. 3. Remove the batteries if the unit will not be in use for an extended period of time. -
Page 14: Important Note
Canada, or by going to our website vtechkids.com and filling out our Contact Us form located under the Customer Support link. Creating and developing VTech products is accompanied by a responsibility that we take very seriously. We make every effort to ensure the accuracy of the information, which forms the value of our products. - Page 15 VTech ® Model: 5509 Product Name: Drill & Learn Toolbox™ Pro Responsible Party: VTech Electronics North America, L.L.C. Address: 1156 W. Shure Drive, Suite 200 Arlington Heights, IL 60004 Website: vtechkids.com THIS DEVICE COMPLIES WITH PART 15 OF THE FCC RULES.
- Page 16 Visit our website for more information about our products, downloads, resources and more. vtechkids.com vtechkids.ca Read our complete warranty policy online at vtechkids.com/warranty vtechkids.ca/warranty TM & © 2021 VTech Holdings Limited. All rights reserved. IM-550900-000 Version:0...
Need help?
Do you have a question about the Drill & Learn Toolbox Pro and is the answer not in the manual?
Questions and answers