Table of Contents
Advertisement
Quick Links
Advertisement
Table of Contents

Summary of Contents for Skyhawk miniSensor
- Page 1 Vibration/Magnet miniSensor Quickstart Guide...
- Page 2 ATTENTION The miniSensor is used in conjunction with an existing Skyhawk CE account, subscription, and an active in-range Hub unit. Sensors are shipped with a default sensitivity of 7, unless otherwise noted. Depending upon your application, this setting may need to be adjusted.
- Page 3 Need to download the Skyhawk CE App?
-
Page 4: Table Of Contents
Table of Contents Device Overview ........Status Lights .......... Sensor Activation ........Start-Up Operation ......... Adjust Accelerometer Sensitivity ..Trigger Type Setups ......10-11 Enable/Disable Accelerometer ..... Shutdown Operation ......Resetting Sensor ........Battery Replacement ......15-16 Battery Optimization ......Product Support ........ -
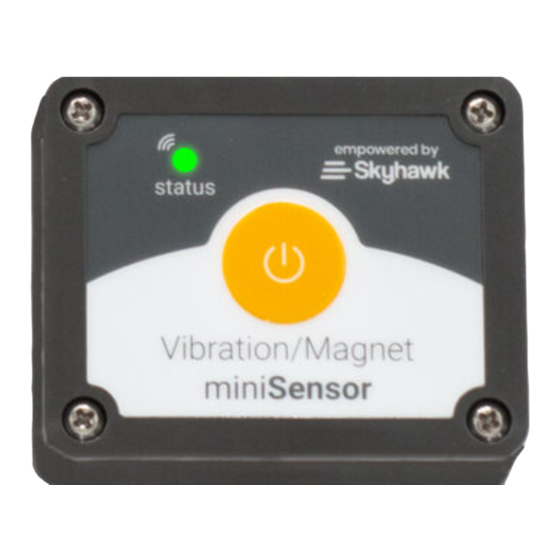
Page 5: Device Overview
Device Overview Magnet Reed Alignment Notch LED Status Indicator status Function Button Cover Screws... -
Page 6: Status Lights
Device Status Lights Powering On (Valid Hub Connection) Powering On (Failed Hub Connection) (5 Sec.) (5 Sec.) Device Reset Powering Down (5 Sec.) (10 Sec.) On & Active Status Event Trigger (Every 10 Sec. Normal) (Every 10 Sec. Retransmission) NOTE: If the Sensor is out of range or the Hub unit was not turned on, the status LED on the Sensor will start rapidly blinking red after power up. -
Page 7: Sensor Activation
Activate Sensor Open Skyhawk CE App Open Main Menu Select Add Sensor Add Sensor... - Page 8 Activate Sensor (Continued) Scan the unique QR code located on the back of the device and follow all in-app instructions to finish activating your sensor. Product Serial Number can be entered manually if QR code can not be read. NOTE: QR code and serial number can also be found on the original packaging.
-
Page 9: Start-Up Operation
Start-Up Operation (IMPORTANT: Hub unit needs to be ON and in range, for Sensor connectivity) Powering On w/ Valid Hub Connection (5 sec.) status 1.) Press and release the power/function button; the status light blinks green. 2.) Once powered on, the Sensor will automatically send an ON alert to your Hub; then, after about a 5 second pause the status light will rapid blink green to confirm a valid connection. -
Page 10: Adjust Accelerometer Sensitivity
Adjust Accelerometer Sensitivity IMPORTANT: Sensor must be turned on to enter program mode Enter Program Adjust Accelerometer Wait 10 Sec. Test Accelerometer Mode Sensitivity Functionality (Sensitivity status confirmation) (1-10 Blinks) status status status status Push button 1-10 times Unit will blink 1-10 times 5 rapid green blinks as Press and hold button to adjust sensitivity... -
Page 11: Trigger Type Setups
Trigger Type Setup Accelerometer (By Default) Attach Sensor Trigger Sensor 1-Minute, Sensor Ready Short Pause (Test Sensor functionality) Until Next Trigger* confirm 5 seconds of green blinks 5 rapid green blinks as (Unit communicated an acknowledgment with Hub) from the hub. status status status... - Page 12 Trigger Type Setup Magnet Reed Switch (Optional item, purchased separately) Locate Magnet Notch Attach Attach other End Trigger Confirm 5 seconds Magnet (Top of Sensor) Pull Magnet Kit to Monitored Object of green blinks (Test Sensor (Unit communicated functionality) with Hub) status status 5 rapid green blinks as...
-
Page 13: Enable/Disable Accelerometer
Enable/Disable Accelerometer IMPORTANT: Remove batteries prior to changing jumper configuration. Unscrew/Open Configure Jumpers Close Case > Test Accelerometer Sensor Case (Located above battery tray) Turn Sensor On Functionality status status (Press + Release) -
Page 14: Shutdown Operation
1.) Press and release the power/function button; the status light starts blinking red. 2.) Sensor will continue to blink red 5 times during shutdown. NOTE: If Hub unit is in range during the shut down process, the Sensor will send a power-down alert to your Skyhawk CE App. -
Page 15: Resetting Sensor
Resetting Sensor Reset Sensor to original factory default setting Press & Hold Keep Holding Release Startup Operation Function Button Function Button Begins Function Button (2 seconds) (1 second) status status status 5 green blinks Press and hold button (Red/Green/Blue (15+ Sec.) 1 second apart until LED sequence changes continuous rapid flash) -
Page 16: Battery Replacement
Battery Replacement IMPORTANT: Always replace batteries with 2 new and identical name-brand AAA alkaline batteries. If jumpers have been modified, removing and replacing batteries will update unit to new settings. Startup Sequence Unscrew/Open Remove Batteries Insert New Batteries Sensor Case Begins When User (Following +/- symbols) (Located under PC card) - Page 17 Battery Replacement Device Will Enter Tighten Screws In “X” Pattern Order, Sleep Mode 1, 4, 3 Then 2 Until Completely Seated. (**When the cover is screwed on, be sure status the notch is at the top. LED light will not be visible if rotated 180 degrees**) (Refer to hardware manual for detailed instructions)
-
Page 18: Battery Optimization
Battery Optimization While transporting or not actively using the Sensor in a deployment, it is recommended to power down the device to prevent unwanted and excessive triggering. Accelerometer will activate due to vibration in transport and battery life will shorten considerably. If not using the Sensor for more than 1-2 days, it is recommend to turn the device off. -
Page 19: Product Support
Product Support & Manuals For product support and to download detailed user and product manuals: support.sky-hawk.com Contact us at 1-800-760-3966... -
Page 20: Limited Product Warranty
Who May Use the Limited Product Warranty? This limited warranty extends only to the original purchaser of the Skyhawk Product from the Skyhawk Website or from an authorized Skyhawk Dealer, or to the first person who activates the Skyhawk Product through registration of the Product to their Skyhawk Account (“you“/ “your”). - Page 21 What Does the Limited Product Warranty NOT Cover? THIS LIMITED WARRANTY DOES NOT APPLY, AND IS VOID AND WITHOUT EFFECT AND COMPANY SHALL HAVE NO LIABILITY WHATSOEVER FOR DEFECTS OF SUCH PRODUCT, WHERE: The Product has been subjected to abuse, misuse, neglect, negligence, accident, improper testing, improper installation, improper storage, improper handling, abnormal physical stress, abnormal environmental conditions, or use contrary to Seller’s installation and maintenance instructions, restrictions on use and/or Important Safety Precautions.
- Page 22 LIMITATION OR EXCLUSION MAY NOT APPLY TO YOU. THE TERMS OF THIS LIMITED WARRANTY FOR SKYHAWK PRODUCTS WILL APPLY TO THE EXTENT PERMITTED BY APPLICABLE LAW. FOR A FULLDESCRIPTION OF YOUR LEGAL RIGHTS YOU SHOULD REFER TO THE LAWS APPLICABLE IN YOUR JURISDICTION.
-
Page 23: Regulatory Information
Regulatory Information This device complies with part 15 of the FCC Rules. Operation is subject to the following two conditions: (1) This device may not cause harmful interference, and (2) this device must accept any interference received, including interference that may cause undesired operation These limits are designed to provide reasonable protection against harmful interference in a residential installation. - Page 24 App Store and the Apple logo are trademarks of Apple Inc. | Google Play and the Google Play logo are trademarks of Google LLC. Skyhawk™, No Wi-Fi. No Power. No Problem.™, Skyhawk CE™ and Skyhawk Logo are trademarks of PICA Product Development, LLC, dba Skyhawk. ©2021 All rights reserved.
Need help?
Do you have a question about the miniSensor and is the answer not in the manual?
Questions and answers