Table of Contents
Advertisement
Quick Links
Advertisement
Table of Contents

Summary of Contents for DUROPRO PM3000
- Page 1 INSTRUCTION MANUAL PM3000 MIT RE SAW WORK STAND...
-
Page 2: Table Of Contents
General Safety Instructions for Power Tools This stand comes with a 10 year warranty. For all service or general queries, Safety Instructions for Mitre Saw Stands please visit www.duropro.com, email us at info@909.com, or call us on 1800 909 909. Unpacking Parts list... -
Page 3: Introduction
Introduction Description of symbols Your new Duropro mitre saw stand will more than satisfy The rating plate on your tool may show symbols. your expectations. It has been manufactured under These represent important information about the stringent Duropro Quality Standards to meet superior product or instructions on its use. -
Page 4: Specifications
Due to modern mass production techniques, it is unlikely Safety Instructions for Mitre Saw Stands that your Duropro mitre saw stand is faulty or that a part is missing. If you find anything wrong, do not operate the tool 1. Use caution when folding or unfolding legs to limit any until the parts have been replaced or the fault has been finger pinch points. -
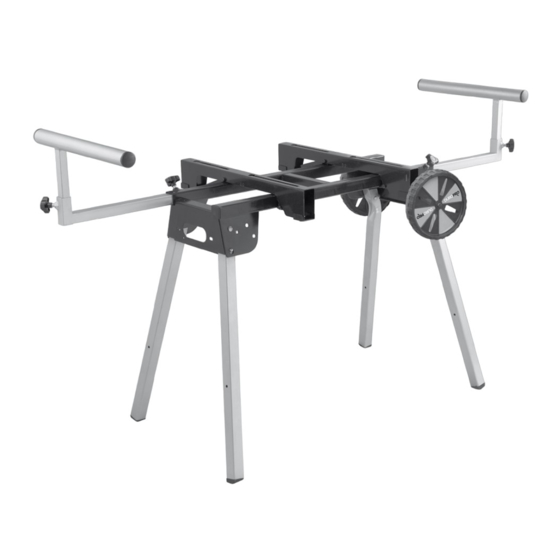
Page 5: Description Of Mitre Saw Stand
Know Your Product 1. Top Stand Frame 9. 8mm x 20 Bolts, washer & nut x 2 2 (for off set mounts) 2. Legs 10. 8mm x 45 Bolts, washers & nut x 4 3. Outrigger Supports (x2) (not shown ‑ to attach mitre saw) 4. -
Page 6: Assembly
Assembly Instructions Installing the Outrigger Supports Read all assembly instructions completely before attempting 1. Insert the outrigger support (3) into the frame end tubing assembly. on the left hand side and position length wise according to your requirements. See parts list on Page 5 for names and pictures of parts to identify all components. - Page 7 Fitting the Quick Attach machine mounts to To remove the quick Attach machine mounts (5), compress the mount spring lever(6) and lift. the top stand frame. NOTE: If there is any appliance on the mounts when The quick attach machine mounts are designed to be able removing, the weight of the appliance will tend to slide to be quickly fitted and quickly removed.
-
Page 8: Mounting The Saw
Mounting the saw. and is suggested to be mounted as shown in Pic B. 1. Measure the distance between the front mounting holes (C) If the difference between of the saw and compare with the distance between the the Front mount holes rear mounting holes. - Page 12 P: 1800 909 909...
Need help?
Do you have a question about the PM3000 and is the answer not in the manual?
Questions and answers