Table of Contents
Advertisement
Quick Links
Advertisement
Table of Contents

Summary of Contents for Oceasoft OCEABridge
- Page 1 OCEABridge Installation and operation...
- Page 2 Notices and safety Disclaimer and limitation of liability OCEASOFT assumes no responsibility for any loss or claims by third parties which may arise through the use of this product. In particular, users must not use the product in any manner not specifically indicated by OCEASOFT.
- Page 3 RF radiation: EN 300 328 V2.1.1 Safety: EN 60950-1:2006 + A11:2009 + A1:2010 + A12:2011 + A2:2013 • Caution: Any changes or modifications not expressly approved by OCEASOFT could void the user’s authority to operate the equipment. OCEABridge User Guide Page 3...
- Page 4 © 2018 OCEASOFT S.A. All rights reserved. OCEASOFT, the OCEASOFT logo, OCEABridge, OCEASOFT Emerald, All other brands mentioned are the OCEASOFT Atlas, and OCEAView are the exclusive property of OCEASOFT. property of their respective owners. This is a non-contractual document. Product photos and features may vary.
-
Page 5: Table Of Contents
Introduction Contents 1 Introduction ....................7 1.1 OCEABridge™ solution overview ................. 7 Main features ......................7 Architecture ......................8 Package contents ....................9 1.2 Gateway presentation ....................10 Overhead/front view ................... 10 Front view ......................11 Side view (right-hand side) .................. 12 Back/bottom ...................... - Page 6 Introduction 5 OCEABridge maintenance ................34 5.1 Changing the password ..................... 34 5.2 Updating OCEABridge data collection firmware ............34 5.3 Backing up and updating system firmware ............... 35 Archiving your data ....................35 Restoring an archived backup ................36 Complete firmware upgrade ................
-
Page 7: Introduction
Introduction Congratulations and thank you for choosing the OCEABridge™ wireless gateway solution. This guide provides a general description of the OCEABridge solution as well as practical instructions for installation and easy setup of your device. OCEABridge is designed to interact with the following OCEASOFT products and applications: Emerald™... -
Page 8: Architecture
Figure 1 – Data flow from wireless modules to OCEACloud via OCEABridge™ Step Description • Simply install your OCEABridge gateway in a loading or unloading zone, or product handling area. • Use the embedded web application to set up your OCEABridge gateway. -
Page 9: Package Contents
Introduction Package contents • OCEASOFT OCEABridge™ gateway AC power adapter • • Bluetooth dongle To be ordered separately (depending on your gateway model): • OCEASOFT wireless data loggers 3G/4G cellular data module • • Micro SIM card for cellular data... -
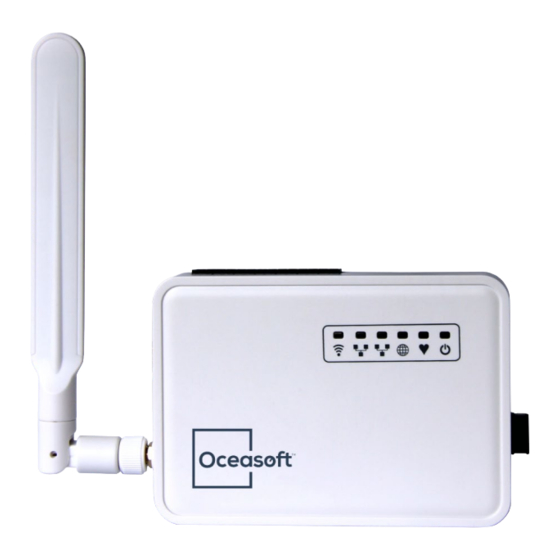
Page 10: Gateway Presentation
Figure 2 – OCEABridge gateway overhead view 1.2.1.1 Description of status LEDs The OCEABridge gateway has 6 LEDs with colors and blinking patterns that vary with the device’s status and network traffic: Description WLAN. Indicator for WiFi or 3G/4G wireless activity (see section 0 Configuring the network LED, page 27). -
Page 11: Front View
Power indicator. Green light remains on, indicating power on. Front view Figure 3 – Front view of OCEABridge gateway 1. Power port for provided power adapter 2. WAN RJ-45 port for data transmission to Cloud 3. LAN RJ-45 port for device configuration... -
Page 12: Side View (Right-Hand Side)
Insert the dongle into the USB port located on the right-hand side of the gateway. USB port Figure 4 – USB port for Bluetooth dongle Back/bottom The OCEABridge gateway may be placed on a flat surface or mounted using the mounting holes under the casing. Mounting holes Figure 5 –... -
Page 13: Starting The Gateway
Starting the gateway Starting the gateway There are no switches or control buttons on the OCEABridge gateway. All settings are configured using the embedded web application. You must use the configuration interface to determine how OCEABridge connects to the Internet via Ethernet, WiFi, or a cellular data connection. -
Page 14: Plugging In Oceabridge
The system LED blinks during OCEABridge startup. The first step in configuration is to access the OCEABridge web application from your computer using an Ethernet cable. 1. Disconnect your computer from the regular network to avoid any IP address conflict when connecting to OCEABridge. -
Page 15: Connecting To The Configuration Application
Attention: The subnet LAN interface address is 192.168.1.0/24. If your network is also set to use 192.168.1.0/24, do not plug the WAN Ethernet cable into OCEABridge while you are setting up the device via the LAN connection. Connecting to the configuration application OCEABridge is delivered with a fixed IP address. -
Page 16: Gateway Properties
Starting the gateway Gateway properties After you connect, OCEABridge properties are displayed on the screen: Figure 9 – OCEABridge gateway properties Change this information as necessary: Local time The device’s internal clock adjusts automatically to network time. Host name Enter a name for your OCEABridge gateway. This name is displayed in the upper left-hand corner of the screen. -
Page 17: Gateway Settings
Starting the gateway Gateway settings In the main menu, click on Gateway Settings for Cloud settings and OCEABridge gateway operation. Cloud server Adjust settings for accessing the server on the Cloud Server tab: Figure 10 – Cloud server settings Server URL Address used by OCEABridge to access the OCEACloud platform. -
Page 18: Operating Mode
Operating mode Click on the Operating mode tab to determine how the gateway will operate. Figure 11 – Setting the OCEABridge operating mode Use the Mode drop-down list to select the operating mode you want for your OCEABridge gateway: •... - Page 19 The log files contain information about connected modules, including detected errors. This option should only be activated when requested by the OCEASOFT support team. Folder name for operating information: enter the name of the log file folder •...
-
Page 20: Wireless Network Management
OCEASOFT Bluetooth®-enabled data loggers to the Cloud for a fully wireless solution. Connecting to a WiFi network To connect OCEABridge™ to your WiFi network, click on Network Wireless. The WiFi Overview screen is displayed on the screen: Figure 12 – Wireless network detection 1. - Page 21 4. Scroll down the page and click on Submit to save the information. 5. The WiFi access point you just configured is now listed in the Associated Stations section. Figure 15 – WiFi access configured OCEABridge User Guide Page 21 User guide...
-
Page 22: Adding A Wireless Network
Figure 17 – Configuring the wireless network In the screen that opens, you may modify all settings to meet your needs. If you change the settings for your wireless network while the OCEABridge gateway is in use, the device’ Internet connection will be deactivated. -
Page 23: Enabling An Existing Wireless Network
If you only have one wireless network, then your configuration is complete at this time. You may connect to the WiFi network using the security key you defined. If you have several wireless networks, you must configure each one by repeating these steps. OCEABridge User Guide Page 23 User guide... -
Page 24: Configuring A 3G/4G Connection
Wireless network management Configuring a 3G/4G connection This section describes how to connect your OCEABridge gateway to a cellular data network. 1. Insert the provided cellular antenna into the 3G/4G connector and turn the ring in a clockwise direction to firmly attach the antenna. - Page 25 For OCEABridge devices not equipped with a pre-programmed micro SIM card: The wireless module for cellular data requires a valid micro SIM card. If your OCEABridge gateway does not have a pre-programmed SIM card, follow these steps to insert the SIM card from your carrier.
- Page 26 Wireless network management Figure 23 – Inserting the micro SIM card 5. Then go to section 4.2 Cellular data interface, page 32, to adjust the settings under Mobile network for your 3G/4G network. OCEABridge User Guide Page 26 User guide...
-
Page 27: Configuring The Network Led
LED to indicate: Figure 24 – Configuring the wireless network activity LED 3. Click on Save to record your changes. 4. Check to make sure that the corresponding LED blinks as expected on your device. OCEABridge User Guide Page 27 User guide... -
Page 28: Managing Network Interfaces
Managing network interfaces Managing network interfaces Click on Network Interfaces to edit settings for your OCEABridge gateway’s network interfaces. Depending on the model, OCEABridge offers three types of network interface: • Cellular (only on gateways equipped with a 3G/4G modem) RJ45_WAN (Ethernet interface) •... -
Page 29: Wan And Wlan Interface
If you choose to use a Fixed address, confirm the address protocol change by clicking on Protocol on switch, then enter the OCEABridge IP address and subnet mask in the fields displayed on the screen. Click on Save and apply to record your changes. -
Page 30: Advanced Settings
The options present on the Advanced Settings tab depend on the protocol you are using. Figure 27 – Advanced settings for the interface Change this information as necessary: Bring up on boot: specify whether you want to start the interface when OCEABridge • boots. Make sure the cable is connected correctly. - Page 31 Managing network interfaces For OCEABridge gateways equipped with a 3G/4G modem, the metric for Mobile interface is set to 300 by default. Adjust priorities for the WAN and WLAN interfaces by entering a higher or lower metric value based on the connection order you would like to assign to the different network interfaces.
-
Page 32: Cellular Data Interface
Managing network interfaces Cellular data interface Click on Network Interfaces in the OCEABridge configuration interface. Click on Edit to adjust settings for the Cellular data interface as needed for your 3G/4G network. Figure 28 – Editing cellular data settings The General Setup tab contains options for the interface as well as parameters that depend on your carrier. - Page 33 • APN (network access point name): • o If your OCEABridge is equipped with a pre-programmed cellular connectivity module, leave the default value. o If you use your own SIM card, enter the code provided by your carrier. PIN: if necessary, enter the PIN code to unblock access to your SIM card. Many IoT •...
-
Page 34: Oceabridge Maintenance
4. Click on Save to apply your changes. Updating OCEABridge data collection firmware You may update the firmware in OCEABridge manually in order to benefit from the latest features and improvements. Your gateway configuration remains unchanged when you update firmware. -
Page 35: Backing Up And Updating System Firmware
OCEABridge contains important information that you may back up at any time. The backup function creates a current copy of OCEABridge data (such as the module list, operating mode, and configuration settings) that can be restored at a later time in case of problems or high-volume deployment. -
Page 36: Restoring An Archived Backup
2. Then simply click on Upload archive to restore the data. Complete firmware upgrade It is possible to update the entire OCEABridge firmware. To do so: 1. Click on Gateway Backup – Firmware update. 2. In the section Flash new firmware image, click on Choose file to select the system file to import. -
Page 37: Restarting Oceabridge
2. Then click on Restart. 3. Your browser window will close. The gateway will power down and restart right away. You may connect to the configuration interface again after it has finished rebooting. OCEABridge User Guide Page 37 User guide... -
Page 38: Diagnostics And Statistics
The Status menu contains various functions for statistics and diagnostics so you can make sure your gateway is running properly. Platform information Click on Status Platform Information to access OCEABridge system information: Figure 30 – OCEABridge system information OCEABridge User Guide... -
Page 39: Module Statistics
OCEASOFT Bluetooth dataloggers emit a wireless frame about every second, but many of those frames are lost due to range or wireless interference. This table shows the intervals at which those frames are effectively captured by OCEABridge. Figure 31 – Module statistics... - Page 40 This information determines the frequency at which a module transmits its data, and therefore the frequency at which it is “seen” by OCEABridge. This data enables you estimate the distance between the module and the gateway. Interference and module placement may affect wireless signal performance.
-
Page 41: Real-Time Network Traffic
Processor usage in intervals of 1, 5, and 15 minutes: Figure 32 – Real-time traffic status • Incoming and outgoing traffic on each interface: Figure 33 – Network traffic for each interface • Real-time WiFi connection: OCEABridge User Guide Page 41 User guide... - Page 42 Diagnostics and statistics Figure 34 – Real-time traffic on WiFi network Activate network connections: • Figure 35 – Network connection activity OCEABridge User Guide Page 42 User guide...
-
Page 43: Start Log
Diagnostics and statistics Start log Click on Status Start Log to see if any problems were detected while OCEABridge was booting: Figure 36 – OCEABridge start log OCEABridge User Guide Page 43 User guide... -
Page 44: Annexe 1 - Technical Specifications
• Weight: about 150g (5.3 oz) Casing: ABS plastic • • Operating ranges: 0°C to +50°C Relative humidity: 0 to 90% (non-condensing) • • Storage conditions: 0° to +50°C Protection index: IP40 • OCEABridge User Guide Page 44 User guide... - Page 45 Annexe 1 – Technical specifications Appendix 2 - EU Declaration of Conformity OCEABridge User Guide Page 45 User guide User guide...
Need help?
Do you have a question about the OCEABridge and is the answer not in the manual?
Questions and answers