Table of Contents
Advertisement
Available languages
Available languages
Quick Links
Manuale Istruzioni
Ricevitore Digitale Terrestre HD DVB-T2
SET-TOP BOX con connessione LAN
Mod. JL43700
Cod. JL43700
Si prega di leggere attentamente il presente manuale per garantire il corretto utilizzo di
questo prodotto e conservare il manuale per riferimento futuro. I dati contenuti in questo
manuale possono cambiare per ragioni di natura tecnica o commerciale, senza alcun
preavviso
1
ITALIANO
Advertisement
Table of Contents

Summary of Contents for JollyLine JL43700
- Page 1 Manuale Istruzioni Ricevitore Digitale Terrestre HD DVB-T2 SET-TOP BOX con connessione LAN Mod. JL43700 Cod. JL43700 Si prega di leggere attentamente il presente manuale per garantire il corretto utilizzo di questo prodotto e conservare il manuale per riferimento futuro. I dati contenuti in questo...
-
Page 2: Importanti Avvertenze Di Sicurezza
Importanti avvertenze di sicurezza Leggere attentamente il manuale prima di collegare l’apparecchio all’alimentazione. Il presente manuale deve essere conservato per tutta la durata di vita dell’apparecchio per future consultazioni. L’apparecchio non è un giocattolo, impedire che i bambini ci giochino. Prima di effettuare qualsiasi connessione verificare l’integrità... -
Page 3: Riparazione In Garanzia
Non aprire l’apparecchio, mettendo a nudo parti in tensione che possono risultare pericolose per l’utente. Non contiene parti utili per l’utente. Per l’assistenza fare riferimento a personale qualificato. Questo simbolo indica Questo simbolo indica di fare attenzione e una tensione che ci sono importanti pericolosa, con rischio istruzioni da seguire... -
Page 4: Principali Caratteristiche Dell'apparecchio
Principali caratteristiche dell’apparecchio ✓ Compatibilità DVB-T/T2 in standard HEVC main 10bit H.265 e H.264 ✓ Telecomando IR universale con autoapprendimento per pilotare DECODER e TV ✓ Qualità audio Dolby Digital per una eccellente qualità sonora ✓ 3 tasti multifunzione sul pannello frontale ✓... -
Page 5: Specifiche Tecniche
Specifiche tecniche Sintonizzatore DVB-T2 Intervallo di frequenza 174-230MHz 470-862MHz Banda 7MHz/8MHz Impedenza d’ingresso 75Ω Decodifica canale Standard DVB-T/T2 main 10 bit HEVC, FTA Decodifica video Standard MPEG 2(ISO/IEC 13818-2) MPEG-4 (ISO/IEC14496-2) H.264 (ISO/IEC14496-10) 1080P@60 fps H.265 1080P@60 fps Livelli di profilo decodifica video Standard MPEG-2MP@ML(fino a 1080p@60fps) MPEG-4 ASP@L5HD (fino a... -
Page 6: Table Of Contents
Sommario Importanti avvertenze di sicurezza ........................2 Riparazione in garanzia: ............................ 3 Principali caratteristiche dell’apparecchio ......................4 Connessioni ............................... 4 Specifiche tecniche ............................5 Installazione delle batterie nel telecomando ....................5 Uso del telecomando ............................. 5 Panoramica dell’apparecchio ..........................8 Contenuto della confezione .......................... - Page 7 Creazione e visualizzazione lista canali preferiti ..................22 Controllo parentale (Parental control) ......................23 Modifica password ............................23 Ripristino delle impostazioni predefinite ....................24 Aggiornamento software ..........................24 Risparmio energetico........................... 25 Applicazioni di rete (Network App) ......................25 Programmazione telecomando ........................26 Funzioni non disponibili ..........................
-
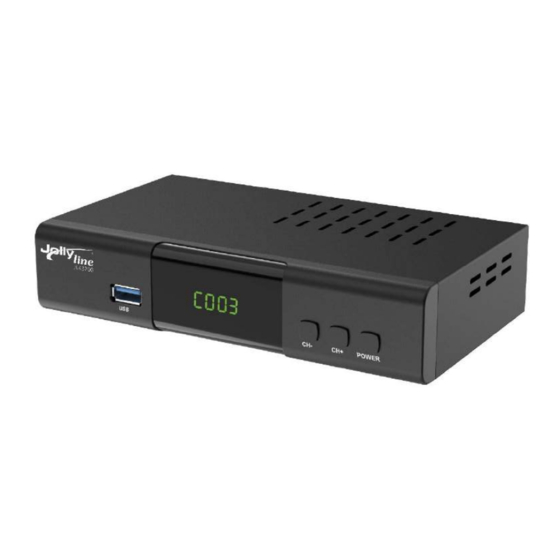
Page 8: Panoramica Dell'apparecchio
Panoramica dell’apparecchio Contenuto della confezione ✓ Decoder digitale ✓ Telecomando ✓ N. 2 batterie AAA 1.5Vdc ✓ Guida veloce all’installazione multilingue ✓ Manuale d’istruzione completo Pannello frontale Figura 1 1 Ingresso USB 2 Display 3 Tasti CH+ e CH-: modifica del canale 4 Tasto Power: accende/spegne il decoder Pannello posteriore Figura 2... - Page 9 1 Tasto Power TV: permette di spegnere/accendere il televisore 2 Tasto Power: permette di spegnere/accendere il decoder 3 Tasto SET: permette di configurare il telecomando 4 Tasto TV/AV: permette di modificare la sorgente dell’ingresso TV 5 VOL +: alza il volume del dispositivo associato (televisore) 6 VOL –: abbassa il volume del dispositivo associato (televisore) 7 Tasto PRV (rosso): funzione non disponibile 8 Tasto V-Format (verde): seleziona la risoluzione video (576i/p;...
-
Page 10: Collegamento
Collegamento ATTENZIONE: connettere alla rete elettrica solo dopo aver effettuato tutte le connessioni necessarie. Assicurarsi di aver inserito le batterie nel telecomando, potrebbero essere necessarie regolazioni possibili solo con il telecomando. Fare riferimento agli schemi ed alle immagini precedenti (Figura 2) per l’individuazione della corretta posizione delle prese sul decoder. -
Page 11: Prima Accensione
Prima accensione Selezionare l’ingresso del segnale nel televisore (come descritto qui sopra), se si è optato per la connessione HDMI; per la connessione via SCART la regolazione avverrà automaticamente. Sul display del decoder comparirà la scritta “boot” La prima schermata “Guida d’installazione” prevede la scelta della lingua e del paese d’utilizzo. La lingua ed il paese preimpostati sono Italiano ed Italia. -
Page 12: Panoramica Menu
Una volta risolti tutti i conflitti si potranno visionare i programmi TV. NOTE IMPORTANTI Nel caso in cui i canali memorizzati nella ricerca non sono disposti secondo lo standard nazionale che prevede il loro ordinamento in base alla loro importanza (RAI 1 sul canale 1; RAI 2 sul canale 2; RAI 3 sul canale 3, Rete 4 sul Canale 4;... -
Page 13: Immagine
Immagine Questo menu permette di modificare il formato di visualizzazione delle immagini. Il formato viene impostato automaticamente in base al TV a cui il decoder è collegato, se ciò non fosse selezionate 576I/P o 702P se si usa un TV con la sola presa SCART, oppure 1080i/p se si usa un TV con presa HDMI (1080p dà il massimo della risoluzione video, ma non tutti i TV la supportano). -
Page 14: Ora
Questo menu permette la regolazione del fuso orario e lo spegnimento automatico del decoder tramite la funzione “Sleep” (è possibile impostare da 1 a 12 ore). Entrando in “Power On/Off” è possibile impostare l’accensione e lo spegnimento automatico del decoder. Per accedere al menu ORA selezionare la quarta icona in alto da sinistra. -
Page 15: Sistema
Sistema Questo menu permette di modificare le impostazioni di sistema. Per accedere al menu SISTEMA selezionare la sesta icona in alto da sinistra. Questo menu permette di gestire le opzioni multimediali. Per accedere al menu USB selezionare la settima icona in alto da sinistra. ITALIANO... -
Page 16: Operazioni
Operazioni Selezione del canale Per selezionare il canale è sufficiente digitare il suo numero tramite il tastierino numerico del canale, oppure utilizzare i tasti freccia SU/GIÙ che permettono avanzare o regredire di un’unità. È possibile visualizzare anche la lista dei canali usando il tasto OK/LIST del telecomando. Scorrendo l’elenco con i tasti SU/GIÙ... -
Page 17: Commutazione Tv/Radio
Digitando una seconda volta il tasto INFO si possono avere ulteriori informazioni, come ad esempio la qualità e la potenza del segnale video. Il banner informativo risulterà visibile per alcuni secondi, per farlo sparire prima premere EXIT. Commutazione TV/RADIO Usando il tasto TV/RADIO del telecomando si può passare dai canali TV a quelli radio (solo audio) e viceversa. -
Page 18: Usb
Il menu MODIFICA PROGRAMMA permette di spostare i canali, riposizionandoli nella lista, di bloccarne la visione, di eliminarlo o di aggiungerlo alla lista dei preferiti. Per spostare un canale, posizionarsi con i tasti freccia su quello da riposizionare, premere il tasto ROSSO del telecomando, appare il simbolo di spostamento, spostarlo usando i tasti freccia e confermare con OK o con il tasto ROSSO. - Page 19 Per visualizzare un’immagine accedere al menu MULTIMEDIA, selezionare l’icona FOTO con i tasti freccia ed il tasto OK del telecomando. Il decoder permette di navigare all’interno delle cartelle contenute nella chiavetta USB: usare i tasti freccia- per spostarsi nella lista di cartelle o file, premere OK per aprire la cartella o il file scelto (prima di aprire il file se ne può...
-
Page 20: Guida Ai Programmi
Entrando nel menu FOTO CONFIGURA sono possibili alcune configurazioni riguardanti la visualizzazione delle immagini come la durata di ogni scheda durante la visualizzazione slideshow Entrando nel menu FILM CONFIGURA si possono configurare i sottotitoli (se disponibili): dimensione, colore sottofondo e colore carattere. Guida ai programmi Alcuni fornitori trasmettono informazioni sui loro programmi. -
Page 21: Televideo
Televideo Alcuni canali trasmettono anche un servizio testuale di informazione (teletext) che è possibile attivare premendo il tasto TEXT sul telecomando. Seguendo le indicazioni dell’indice è possibile selezionare la pagina richiesta. La funzionalità non è attiva per tutti i canali. Trasmissione multilingue Se un canale è... -
Page 22: Creazione E Visualizzazione Lista Canali Preferiti
Creazione e visualizzazione lista canali preferiti È possibile creare una lista di canali preferiti divisi per categoria (Film, Musica, Sport, News). Raggiungere il menu PROGRAMMI attraverso il tasto MENU del telecomando ed i tasti freccia, selezionare MODIFICA PROGRAMMI (richiede l’immissione della password). Selezionare il canale da aggiungere alla lista e premere FAV sul telecomando, apparirà... -
Page 23: Controllo Parentale (Parental Control)
Controllo parentale (Parental control) Il Parental Control impedisce la visione di programmi non adatti ai bambini, bloccandone la visione a meno di non immettere la password corretta. Per attivare questa funzione premere il tasto MENU del telecomando e raggiungere tramite i tasti freccia il menu SISTEMA, posizionarsi su CONTROLLO PARENTALE e premere OK, viene richiesta l’immissione della password (di default è... -
Page 24: Ripristino Delle Impostazioni Predefinite
PASSWORD. A questo punto si apre una schermata in cui viene richiesta sia la password attualmente in uso sia quella che si desidera usare d’ora in avanti. La password è un numero di 6 cifre, che è possibile immettere con il tastierino numerico del telecomando. Conservare con cura la password appena cambiata, la vecchia password non sarà... -
Page 25: Risparmio Energetico
Risparmio energetico In accordo con la normativa europea l’apparecchio è dotato di una funziona di risparmio energetico che spegne l’apparecchio dopo 3 ore di inutilizzo, lo spegnimento è preceduto da un messaggio di avvertimento della durata di 2 minuti e durante il quale la funzione può essere procrastinata di altre 3 ore. La funzione spegne solo il decoder e non il TV. -
Page 26: Programmazione Telecomando
Programmazione telecomando Il telecomando in dotazione può essere usato anche per comandare un altro apparecchio dotato di telecomando ad infrarossi (per esempio il televisore). Per fare in modo che il telecomando comunichi con il televisore bisogna seguire questi passaggi: 1. Posizionare i due telecomandi di decoder e televisore uno in fronte all’altro in modo che i due emettitori si guardino non ostacolati 2. -
Page 27: Risoluzione Dei Problemi
Risoluzione dei problemi Possono sussistere differenti cause per il funzionamento anomalo dell’apparecchio. È possibile che il ricevitore si blocchi, nel qual caso staccare la spina ed attendere 30 secondi prima di reinserirla. Se l’apparecchio non funziona correttamente fare riferimento alla seguente tabelle per le possibili soluzioni. - Page 28 Il fabbricante KON.EL.CO. S.p.A dichiara che il tipo di apparecchiatura radio Ricevitore Digitale Terrestre DVB-T2, codice JL43700 è conforme alla Direttiva 2014/53/UE. Il testo completo della dichiarazione di conformità UE è disponibile al seguente indirizzo Internet: www.jollyline.it...
- Page 29 KON.EL.CO. S.P.A. Piazza don Mapelli 75, 20099 Sesto San Giovanni, Milano (Italia) Made in China ITALIANO...
- Page 30 User manual Digital Terrestrial Receiver HD DVB-T2 SET-TOP BOX with LAN connection Mod. JL43700 Cod. JL43700 Please read carefully this manual to guarantee the proper use of this appliance and keep the manual for future reference. The data contained in this manual may change for...
- Page 31 Important safety warnings Read carefully the user manual before connecting the appliance to the mains. This manual must be kept for all the life of the decoder for future consultations. The appliance is not a toy, prevent children from playing on it. Before any connection verify the integrity of the product ad overall of the supply cable;...
- Page 32 This symbol indicates This symbol indicates a to be careful and that dangerous voltage, there are important with risk of electric instructions to follow shock and personal that accompany the injury. appliance. Do not throw batteries into fire, short-circuit them, open them or subject them to excessive temperature.
- Page 33 Main characteristics of the appliance ✓ DVB-T / T2 compatibility in HEVC main 10bit H.265 and H.264 standards ✓ Universal remote control with auto-learning to control both decoder and TV ✓ Dolby Digital audio quality for excellent sound quality ✓ 3 multifunctional keys in the front panel ✓...
- Page 34 Technical specification DVB-T2 Tuner Frequency range 177.5-226.5MHz 474-858MHz Band 7MHz/8MHz Input impedance 75Ω Channel decoding Standard DVB-T/T2 main 10 bit HEVC, FTA Video decoding Standard MPEG-2MP@ML (up to 1080p@60fps) MPEG-4 ASP@L5HD (up to 1080p@60fps) MHEG-5 (up to 1080p@60fps) Aspect ratio 16:9 Video format Video resolution...
- Page 35 Index Important safety warnings ..........................2 Warranty repair: ..............................3 Main characteristics of the appliance ....................... 4 Connections ............................... 4 Technical specification ............................5 Installing remote control batteries ........................5 Using the remote control ..........................5 Overview of the appliance ..........................8 Package contents ............................
- Page 36 Creation and display of favorite channels list ..................... 22 Parental control – Parental guidance ......................23 Change password ............................23 Restore default settings ..........................24 Software update ............................24 Energy saving ............................... 24 Network Apps .............................. 25 Remote control programming ........................26 Functions not available ..........................
- Page 37 Overview of the appliance Package contents ✓ Digital decoder ✓ Remote control ✓ 2xAAA 1.5Vdc batteries ✓ Multilanguage quick guide to the installation ✓ Complete user manual Front panel Figure 1 1 USB input 2 Display 3 CH+ e CH- buttons: change the channels 4 Power Button: turn on/off the decoder Rear panel Figure 2...
- Page 38 1 Power TV key: turn on/off the television 2 Power key: turn on/off the appliance 3 SET key: configure the remote control 4 TV/AV key: configure the source of the television 5 VOL +: allow to adjust the intensity of the output audio of the linked TV 6 VOL –: allow to adjust the intensity of the output audio of the linked TV...
- Page 39 Connection WARNING: connect the appliance to the mains only after making all the necessary connections. Make sure to have inserted the batteries in the remote control, adjustments may only be necessary with the remote control. Refer to the previous diagrams and images (Error! Reference source not found.Error! Reference source not found.) for the identification of the correct position of the sockets on the decoder.
- Page 40 Boot Select the video source via the TV settings (see the TV manual for any information), if the HDMI connection is used; instead with the SCART connection the selection will be automatic. On the decoder display the “boot” sign will appear. The home screen “Installation Guide”...
- Page 41 This operation could require some minutes. At the end of the search there may be channel conflicts and a pop up will appear with which you will be asked to make a choice between one or more TV stations. Using the arrows keys of the remote control and the OK key it is possible to make the choice.
- Page 42 Program This menu allows to order, modify or delete the stored channels. To access the PROGRAM menu, select the first icon in the upper left. In this menu it is possible to proceed with the activation of the "LCN" function: select with the arrow keys "Sort by LCN"...
- Page 43 Channel search This menu allows to search new channels, in automatic or manual way. To access the CHANNEL SEARCH menu, select the third icon in the upper left. IMPORTANT NOTE: the "Antenna power" parameter should normally be left Off, unless a portable indoor antenna that requires an external 5Vdc power supply is connected.
- Page 44 Option This menu allows you to change the language of the on-screen menu (OSD), subtitles or audio. To access the OPTION menu, select the fifth icon at the top from the left. System This menu allows you to change the system settings. To access the SYSTEM menu, select the sixth icon at the top from the left.
- Page 45 ENGLISH...
- Page 46 Operations Channel selection To select the channel, simply enter its number using the channel numeric keypad, or use the CH + and CH- keys (UP/DOWN arrows) which allow you to move forward or backward by one unit. It’s possible to visualize also the list of the channels using the OK/LIST key on the remote control. Sliding the list via arrows keys and confirming with OK, it’s possible to visualize the desired channel.
- Page 47 By pressing the INFO button again further information, such as the quality and strength of the video signal can be got. The information banner is visible for a few seconds, to make it disappear first press EXIT. Switching TV/RADIO By pressing TV/RADIO key on the remote control you can switch between TV and radio channels (audio only) and vice versa.
- Page 48 The PROGRAM EDIT menu allows to move the channels, repositioning them in the list, block their viewing, delete it or add it to the list of favorites. To move a channel, with the arrow keys place on the that to be moved, press the RED key on the remote control, the moving symbol appears (double arrows) and move it via arrow keys and confirm by OK or with RED key.
- Page 49 To open a picture, enter in the MULTIMEDIA menu, select the PHOTO icon via the arrows and the OK key on the remote control. The appliance allows to navigate through the directory of the memory stick: use the arrows to move in the list of directories or files, press OK to open the directory or the file (before opening the image a preview can be seen in the square at top right);...
- Page 50 Entering in the PHOTO CONFIGURE some setting regarding the view of the pictures can be changed (for example the time of visualization of images during the slideshow). Entering in the MOVIE CONFIGURE the settings of the subtitles (if available) can be configured: size, background color and letters color.
- Page 51 Teletext Some channels also transmit a text information service (teletext) which can be activated by pressing the TEXT key on the remote control. By following the indications of the index, you can select the required page. The functionality is not active for all channels. Multilanguage transmission If a channel is broadcast in multiple languages, you can select the language in which you want to listen to the program: press AUDIO, a menu opens in which you can select an alternative language, if any, with the...
- Page 52 Creation and display of favorite channels list It’s possible to create favorite channels lists, divided by categories (Movie, Music, Sport, News). Reach the PROGRAM menu using the MENU button on the remote control and the arrow keys, select EDIT PROGRAM (requires password entry). Select the channel to add to the list and press FAV on the remote control, a window with the four categories will appear;...
- Page 53 Parental control – Parental guidance Parental Control prevents the viewing of programs unsuitable for children, blocking their viewing unless you enter the correct password. To activate this function, press the MENU key on the remote control and reach the SYSTEM menu using the arrow keys, move to PARENTAL GUIDANCE and press OK, the password is requested (default is 000000).
- Page 54 ATTENTION: If the password is lost, it is possible to memorize another one: enter the code 888888, as "Old password" and choose a new one from the SET PASSWORD screen. Restore default settings If you want to return to the factory settings of the appliance, press MENU on the remote control, move with the arrow keys to access the SYSTEM menu, click on RESTORE FACTORY DEFAULT, confirming with OK the password is requested.
- Page 55 Network Apps If the device is connected to the internet via the network cable, it is possible to access some applications such as Youtube, news (RSS) weather and IPTV. The decoder directly accesses Youtube content and has several fairly intuitive options. The news application has some preloaded English-language sites to draw from, but other links can be added.
- Page 56 Remote control programming The supplied remote control can also be used to control another device equipped with an infrared remote control (for example the television). To make the remote control communicate with the TV you need to follow these steps: 1.
- Page 57 Troubleshooting There can be different causes for the abnormal operation of the appliance. The receiver may hang, in which case unplug it and wait 30 seconds before reinserting it. If the appliance does not work properly, refer to the following tables for possible solutions. Problem Possible cause Solutions...
- Page 58 Check with your Local Authority or retailer for recycling advice. Hereby, KON.EL.CO. S.p.A declares that the radio equipment type DVB-T2 Digital Terrestrial Receiver, code JL43700 is in compliance with Directive 2014/53/EU. The full text of the EU declaration of conformity is available at the following internet address: www.jollyline.it...
- Page 59 KON.EL.CO. S.P.A. Piazza don Mapelli 75, 20099 Sesto San Giovanni, Milano (Italia) Made in China ENGLISH...
Need help?
Do you have a question about the JL43700 and is the answer not in the manual?
Questions and answers