Advertisement
Quick Links
Advertisement

Summary of Contents for FINE INSTRUMENTS CORPORATION FINEST 135
- Page 1 735 CLAMP METER...
-
Page 2: Clamp-On Meter Safety
This Meter measures the true-rms value of Alternating Cur- rent (AC) over from 0.3A to 700A. AC measurements are 2. Clamp-on Meter Safety from 10Hz to 1 KHz and frequency measurements are from In this manual, the word “ DANGER” identifies a severe or immediately accessible personal hazard that tan Cause death Clamp meters that measure average current flow are in- accurate for non-linear currents and their measurements... -
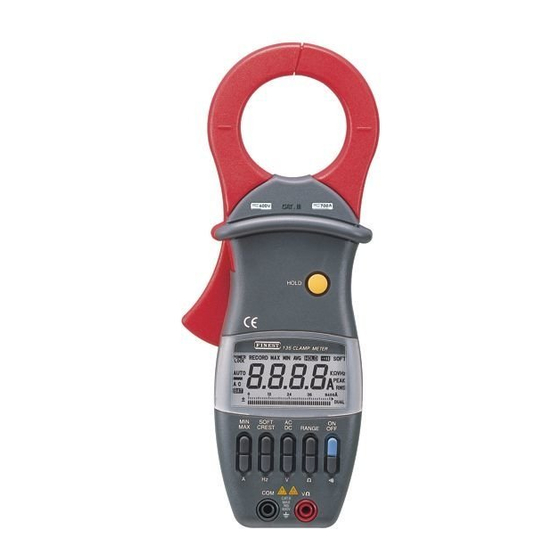
Page 3: Explanation Of Controls And Indicators
RANGE. Selects 0 to 40A, 0 to 400A, or AUTO. ment. ON OFF. Selects meters power ON or power OFF. 3. Explanation of Controls and Indicators AC DC. Selects AC or DC mode. LEVER. Opens and closes clamp jaws. AVG values are being recorded. Duration of RECORD is limited by battery life. -
Page 4: Alignment Marks
. Displayed when G)) pushbutton has been pressed. 4. Alignment Marks SOFT. Displayed when current flow readings or Hz or V readings are softened out over 3-second intervals. MARK CONDUCTOR frequency. PEAK. Displayed when current flow readings are in half- cycle peak amperes (Crest mode). - Page 5 Grasp the bottom of the rear cover and lift it free of the not necessary to make a measurement to learn how to use this meter. Take the time to read this section completely before attempting any meter applications because this meter Lift the battery from the case, and carefully disconnect has many features and operating sequences that are not the battery connector leads.
- Page 6 5.5 Measuring DC Amperes pressed, even if it is making a measurement. To disable the auto power off, press the ON OFF pushbutton ( is displayed), when if you press the ON OFF pushbutton again, the Meter turns OFF. When you want to use this Meter in manual range, press the RANGE pushbutton, then this Meter is in manual range.
- Page 7 When HOLD is used while measuring frequency, RANGE 5.6 Measuring Frequency on the 40A scale, and 40A on the 400A scale. The frequen- cy reading will be O.OHz when HOLD is released, if the trig- ger threshold is not reached. When in the HOLD mode, this Meter function tan be when HOLD is automatically released.
- Page 8 5.9 Measuring Resistance 5.10 Continuity Testing Press the R pushbutton to enable the resistance measure- Press the $j pushbutton to enable the continuity testing ment mode. This Meter defaults in the autoranging mode and mode. This Meter defaults in the 400-ohm range and then displays KR and AUTO.
- Page 9 5.11 Using Soft The Crest Factor is a nominal 1.414 for linear current flow without current wave drstortion. Crest Factors other than SOFT 1.414 indicate the presence of harmonic current flow. (See 6.1 Non-Linear Loads.) AUTO Press the SOFT CREST pushbutton once to exit CREST. Then.
-
Page 10: Applications Of Measurement
Press the MIN MAX pushbutton for 2 seconds and then Press and hold the MIN MAX pushbutton for 2 seconds and release tn Order to exit RECORD (or HOLD and RECORD then release in Order to exit RECORD. This Meter ac- knowledges with a beep Sound and RECORD is no longer RECORD is no longer displayed. - Page 11 power line current for only a fraction of each cycle so that 6.2 General Applications they Cause non-linear loading and subsequent non-linear current flow. This generates odd harmonics of the 5OHz/6OHz You tan measure any conductor carrying AC unless this line frequency.
- Page 12 6. To soften readings, press the SOFT CREST pushbutton running curren!. once (SOFT displayed) or to measure half-cycle peak amperes, press this pushbutton twice (PEAK displayed). A crest factor (see 5.11 Using Crest) other than 1.414 is an indication of non-linear current flow. or a shorted motor winding.
-
Page 13: Maintenance And Calibration
Press the ON OFF pushbutton to turn on this Meter. Observe the display for true rms current flow. Any Clamp around an input or output Phase (as required), presence of harmonic currents and run motor at desired Speed. Be sure the clamp jaws are securely closed, or measurements will not be Press the Hz pushbutton to measure the frequency of accurate. - Page 14 Table 2. Replaceable Parts PART WARNING! DESCRIPTION NUMBER TO AVOID ELECTRIC SHOCK, DO NOT PERFORM ANY SERVICING PROCEDURE UNLESS YOU ARE QUALIFIED TO DO SO. READ “CIAMP-ON METER SAFETY” AT THE CL2 LENS Lens, LCD BEGINNING OF THIS MANUAL BEFORE PROCEEDING. Cover, Rear CL2 CASE To assure continued safety of this Meter, inspect this Meter...
-
Page 15: Technical Data And Specifications
8 Technical Data and Specifications AC Current RMS AMPERES ” 8.1 Technical Data Display: Digital - 4000 counts (3% digits) [Hz: 9999 counts], updates 4 times/sec. Analog - Updates 20 timeslsec, 41 Segment bar graph. Maximum Conductor Size: $ 51mm (2.00” ) Maximum Jaw Opening: 52mm (2.04”... -
Page 17: Table Of Contents
Measurement Limits: AC Amperes DC Amperes AC Voltage DC Voltage Frequency Resistance Continuity Check : Beep at Approx. <35R in the 40012 range WARNING! READ “ CLAMP-ON METER SAFETY” BEFORE USING THIS METER. Contents 2. Clamp-on Meter Safety 3. Explanation of Controls and Indicators 4.
Need help?
Do you have a question about the FINEST 135 and is the answer not in the manual?
Questions and answers