
Summary of Contents for Döhmann HELIX ONE
- Page 1 HELIX ONE Mk2 INSTALLATION & OPERATION GUIDE HELIX ONE Mk2 Phonograph Installation & Operation Guide DA-MAN-H1-001 www.dohmannaudio.com...
-
Page 2: Table Of Contents
Opening the Shipping Case Packing List Unpacking and Assembling the Helix One Adjusting the Internal Suspended Chassis Height . The Rear Panels of the Helix One and the PowerBase Connect the 5-Pin Din Cable Connect Power . Operating the Helix One . -
Page 3: A Message From Döhmann Audio
Your Helix One turntable incorporates state-of-the-art technologies that have previously never been applied to audio applications. It is an heirloom quality industrial work of art that has been designed to give you the ultimate enjoyment of your record collection. -
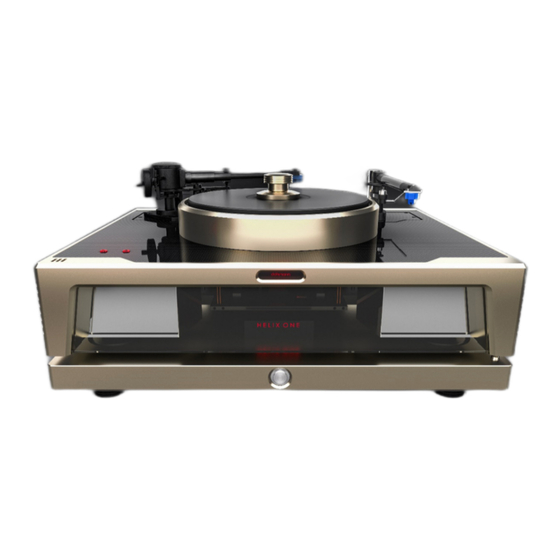
Page 4: The Helix One
Helix One is considered to be outstanding value. As a result of this attention to detail, the Helix One’s sound is immediately recognised for its purity and realism. It has become the turntable of choice of many discerning audiophiles around the world and has been critically acclaimed to be in the top echelon of players available at any price. -
Page 5: Important Messages To Be Read Before Unpacking The Turntable
HELIX ONE Mk2 INSTALLATION & OPERATION GUIDE Important Messages to be Read Before Unpacking the Turntable Please read and ensure that you understand the following information before proceeding to unpack, assemble and operate the turntable. CAUTION: CAUTION: CAUTION: CAUTION: The fully packed shipping crate can weigh in the order of 105kg (232 lbs). -
Page 6: Opening The Shipping Case
• Coloured string to facilitate the fitting of the belts around the motor spindle • 5-Pin Din cable to connect the Helix One Chassis to the PowerBase • The smaller case contains the following items: Döhmann Audio Helix One PowerBase •... -
Page 7: Unpacking And Assembling The Helix One
PowerBase case opened Located in the top centre & towards the front of the PowerBase is the Helix One name plate in a ‘tomb stone’ design which is attached to the PowerBase. Once the case has been opened, be careful not to place any pressure on the top of the PowerBase and not touch the name plate so that it is not damaged. - Page 8 HELIX ONE Mk2 INSTALLATION & OPERATION GUIDE With the assistance of another person, grab the lift handles on either side of the top section of the flight case and lift the top section straight up and off the bottom section. Place the top section on the floor away from the bottom section.
- Page 9 HELIX ONE Mk2 INSTALLATION & OPERATION GUIDE STEP 3 Now it is time to open the top of the flight case to access the rest of the turntable parts. Undo the four piano hinges that disconnect the top compartment and gently lift the top off the case.
- Page 10 HELIX ONE Mk2 INSTALLATION & OPERATION GUIDE STEP 4 Please note the 4 x LONG M6 transport securing screws used to lock the table chassis to the suspension system (vibration isolation platform) during shipping. They are located near the inner edge of the Platter Ring shown below.
- Page 11 HELIX ONE Mk2 INSTALLATION & OPERATION GUIDE * In the event that the Helix One * In the event that the Helix One is moved at a later date, the transport screw is moved at a later date, the transport screws s s s must be...
- Page 12 HELIX ONE Mk2 INSTALLATION & OPERATION GUIDE STEP 8 Gently lower the platter to the bearing & feed the string through the rear portal on the side of the motor spindle. Finish lowering the platter onto the bearing & pull the string with the two belts attached up and over the motor spindle.
- Page 13 HELIX ONE Mk2 INSTALLATION & OPERATION GUIDE STEP 10 Please Note: Before performing this step, please check the level of the platter and adjust the four chassis feet accordingly to achieve as horizontal level as possible. Adjust the armboard - proper adjustment is achieved when the armboard is level with the top surface of the platter.
-
Page 14: Adjusting The Internal Suspended Chassis Height
HELIX ONE Mk2 INSTALLATION & OPERATION GUIDE Adjusting the Internal Suspended Chassis Height The Helix One turntable contains a MinusK Negative Stiffness Mechanism (NSM) which is integrated inside the table chassis. This is a state-of-the-art mechanical resonance isolation device that is integral to the turntable’s performance. -
Page 15: The Rear Panels Of The Helix One And The Powerbase
HELIX ONE Mk2 INSTALLATION & OPERATION GUIDE The Rear Panel of the Helix One and the PowerBase The various sockets, switches and buttons that appear on the rear of the Helix One and the PowerBase are explained below. The 5-Pin DIN cable Receptacles used to program the motor during servicing. -
Page 16: Connect The 5-Pin Din Cable
HELIX ONE Mk2 INSTALLATION & OPERATION GUIDE Connect the 5-Pin Din Cable Connect one of the ends of the 5-Pin DIN cable to the socket on the rear of the turntable under the speed control buttons and the other end to the relevant socket on the PowerBase as shown below. -
Page 17: Operating The Helix One
The Helix One Mk2 has speed control functionality, allowing the user to make fine adjustments to achieve a highly accurate speed. -
Page 18: Each Turntable Has A Serial Number
Please note that the Helix One is a ‘set and forget’ design, meaning it has been designed to hold its performance parameters and not need adjusting, so it is very rare that a turntable will require any speed adjustment but the functionality is there in the event that it’s needed. -
Page 19: Register Your Turntable
Armboards All Helix One Mk2 turntables come with one Advanced Composite Armboard with a carbon fibre top for the main tonearm on the right hand side and one standard solid aluminium armboard for the second tonearm facility on the left hand side. -
Page 20: Customer Support
HELIX ONE Mk2 INSTALLATION & OPERATION GUIDE Speed is constantly calibrated over 130,000 times per second to deliver precise 33.33 or 45.15 rpm (factory default). Default factory set speeds are: 33 RPM & 45 RPM 78 and other RPM’s are available by request ... - Page 21 HELIX ONE Mk2 INSTALLATION & OPERATION GUIDE DA-MAN-H1-001 www.dohmannaudio.com...
Need help?
Do you have a question about the HELIX ONE and is the answer not in the manual?
Questions and answers