Table of Contents
Advertisement
Quick Links
Advertisement
Table of Contents

Related Manuals for Dedoes Alliance A7


Summary of Contents for Dedoes Alliance A7
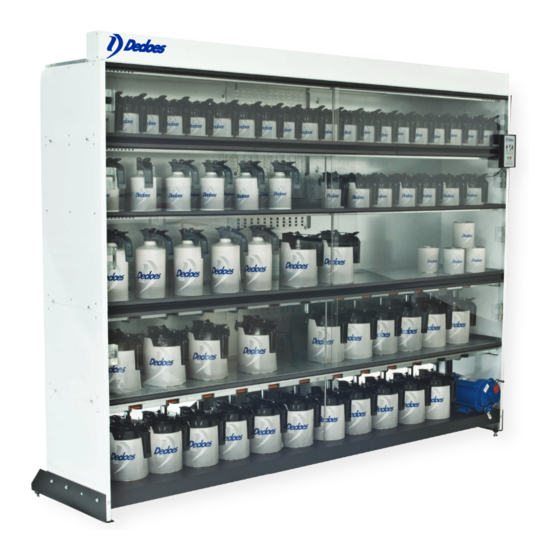
- Page 1 Alliance A7 Assembly Instruc�ons Assembly Instruc�ons Care Instruc�ons Warranty Informa�on 1060 W. West Maple Road Walled Lake, MI 48390 T: +1 248 624 7710 F: +1 248 624 5080 E: info@dedoes.com www.dedoes.com 248-624-7710 / dedoes.com P1615 RV.5 2022-05-20...
-
Page 2: Product Warranty Policy
Dedoes Industries warrants the Dedoes Alliance A7 Machine against defects due to defec�ve material, design or manufacturing to the end user for a period of three years from the produc�on date on the serial number plate of the motor. Dedoes warrants the heater for one and a half years from the produc�on date based on the serial number of the heater. -
Page 3: Safety Precau�Ons
Electrical Connec�ons The Alliance A7 machine uses a 220-240 Volt motor and a 220-240 volt heater with remote thermostat if the machine is heated. There are three wires coming out of the motor and the thermostat which must be wired to the power supply by a cer�fied electri- cian. - Page 4 Alliance A7 Assembly Instruc�ons General Guidelines for Assembling A7 Mixing/Storage Machines: (Back of machine shown) The base should be installed first, then all non heated units above the base, with heated units installed above those. One liter units should always be installed above the four liter units of the same type, heated or non-heated.
- Page 5 Alliance A7 Assembly Instruc�ons 248-624-7710 / dedoes.com P1615 RV.5 2022-05-20...
- Page 6 Alliance A7 Assembly Instruc�ons A. Installa�on of Base Unit with Motor Note: We recommend using gloves for the installa�on of the machine. Step 1 – Remove top shelf cover and header from base unit and set it aside for use later in the assembly.
-
Page 7: Connector Bracket
Note: To help determine which unit should be installed in which loca�on please review the instruc�on on Page 2 & 3. The Alliance A7 System can be assembled in a variety of configura�ons. Follows these rules to assist in assembly. - Page 8 Alliance A7 Assembly Instruc�ons Step 6 – If the unit is heated, install the handles onto the Plexiglas doors, one handle assembly on each of the sliding doors. Plexiglas door Handles Tighten the set screws Step 7 – If installing a heated storage unit above a heated storage unit, insert the plas�c filler strips between the door guides.
- Page 9 Alliance A7 Assembly Instruc�ons C. Installa�on of the Heater Please note, before installing the heater: • Wiring: The cord exi�ng the remote thermostat must be wired by a cer�fied electrician to the codes in your area for explosion-proof applica�ons. Only a cer�fied electrician can wire properly and safely.
- Page 10 Alliance A7 Assembly Instruc�ons Step 1 – Remove the chimney top shelf and vent covers from the top of the heater housing and set aside for later in the assembly. Chimney top shelf Vent Covers Heater Housing Step 2 – Install the four hex head screws that are included with the heater housing into the highest non-heated units, which may include the base.
-
Page 11: Vent Cover
D. Installa�on of the Chimney Sec�ons and Vent Covers The Alliance A7 machine uses mul�ple sizes of chimney sec�ons that differ in height. The height of each chimney sec�on matches the height of the heated unit that the sec�on should be a�ached to. - Page 12 E. Baffle and Thermometer Installa�on Instruc�ons Step 1 - Once the units are assembled, adjust the interior vents. For best results, Dedoes recommends star�ng with the lowest vent fully open, the central vents open one quarter, and the top vent fully closed.
-
Page 13: Drive Gear
Drive Gear The Wall Anchor Brackets help to secure your Alliance A7 System to the wall. This is a safety feature and will also help your system remain square and level, increasing the life of the machine and its components. - Page 14 Alliance A7 Assembly Instruc�ons To install the header and top shelf cover that was packaged with the base unit: Step 1 – Remove one screw closest to the front of the system from each side of the highest unit. Step 2 - Install the top shelf cover on top of the highest mixing unit to enclose the drive system.
- Page 15 Excessive belt tension will cause noise or problems with the machine opera�on. If the belt has no slack along the backside or appears too �ght, please contact Dedoes Customer Service at 248-624-7710 for instruc�ons on how to properly adjust the belt.
- Page 16 • Are there pla�orms available for the A7 machine to mix quart/one liter cans on a gallon/four liter shelf? Yes, the Alliance A7 machine will u�lize a pla�orm, Dedoes Part # SA0319. • Why do the orange safety guards "flu�er" up and down while the machine is mixing? The movement of the orange safety guard indicates that each can is inserted properly and mixing.
Need help?
Do you have a question about the Alliance A7 and is the answer not in the manual?
Questions and answers