Table of Contents
Advertisement
Quick Links
Instruction Manual
Thank you for purchasing the
Wearable Surgical Lighting System
Please be sure to read this instruction manual before use.
Please also keep this manual close at hand for future reference.
TM
Safety Precautions
Part names
How to use
使用方法
Storage
Maintenance
Repair & Inspection
Troubleshooting
Specifications
Warranty
E300019
Advertisement
Table of Contents

Summary of Contents for taiyo OPELA III
- Page 1 Instruction Manual Safety Precautions Part names 使用方法 How to use Storage Maintenance Repair & Inspection Troubleshooting Specifications Warranty Thank you for purchasing the Wearable Surgical Lighting System Please be sure to read this instruction manual before use. E300019 Please also keep this manual close at hand for future reference.
-
Page 2: Safety Precautions
Introduction This product is a wearable surgical lighting system focused on the quality of light, while providing both moveableness (with installed batteries) and a comfortable feel. 【 】 Purpose of Use To wear on your head and illuminate the field of vision during surgery, examinations, and treatment. - Page 3 ■ Examples of picture indications The following symbols indicate actions that you should not perform. Indicates an action that you should not perform. Indicates that you should not disassemble the product. The following symbol indicates an action that you must perform. Indicates that the description must be followed.
- Page 4 ■ Precautions for Usage, Charging, and Storage Locations WARNING Do not use, charge, or store in locations other than the specified environment (refer to 8. Specifications), such as high humidity environments or high temperature environments. It may cause battery leakage, heat generation, rupture, or ignition. It may also reduce the battery capacity and charging efficiency. Do not bring the product into MRI environments.
- Page 5 ■ ■ Handling the Battery Unit Handling the Battery Unit WARNING WARNING Do not drop in fire or heat up. Do not drop in fire or heat up. It may cause rupture or ignition. It may cause rupture or ignition. Do not leave the battery unit under direct sunlight or in sun-heated cars.
- Page 6 ■ Usage Precautions WARNING Do not use at illumination level higher and at distance closer than necessary. Heat generated by light energy may cause thermal injury (particularly with prolonged illumination of a fixed location by multiple light sources, etc.) Observe tissue during use of this product. Heat generated by light energy may cause thermal injury.
- Page 7 ■ ■ Maintenance Precautions Maintenance Precautions CAUTION CAUTION Do not wash it by exposing it to or submerging it in water. Do not wash it by exposing it to or submerging it in water. It may cause electric shock or failure. It may cause electric shock or failure.
- Page 8 Serial number Date of manufacture ■ Labels Attached to the Product Main unit E300019 SAMPLE ANSI/AAMI ES60601-1 (01)XXXXXXXXXXXXXXX CSA-C22.2 No.60601-1 (11)XXXXXX(21)XXXXXX Wearable Surgical Lighting System XXXXXX OPELAIII Model - H XXXX-XX-XX TAIYO CORPORATION Battery unit Dedicated AC adapter SAMPLE (01)XXXXXXXXXXXXXX (11)XXXXXX(21)XXXXXX-X XXXXXX-X XXXX-XX-XX...
- Page 9 Composition Composition A standard package of this product includes the following items. A standard package of this product includes the following items. Please inquire the place of purchase regarding purchases of any additional accessories. Please inquire the place of purchase regarding purchases of any additional accessories. ■...
-
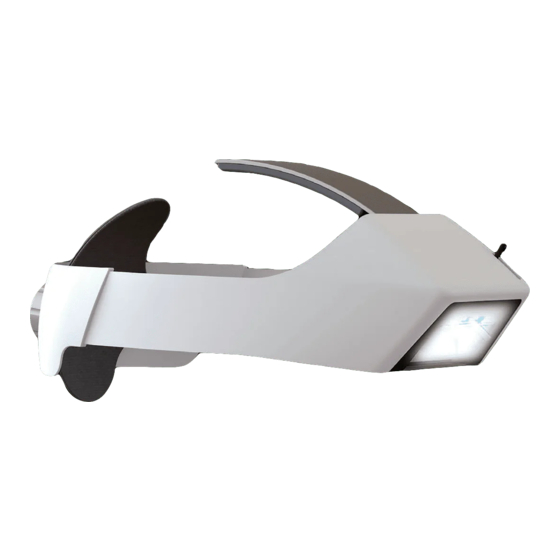
Page 10: Part Names
Part names Main unit Antibacterial urethane pad Heat sink Label Front face Front hub Antibacterial urethane pad Light source unit Cord clip (Small) Cord clip (Large) Mirror Illumination range Back hub Size adjustment adjustment lever knob Transparent Cord tie band cover Illumination Connection cord Back face... -
Page 11: How To Use
How to use How to use Charging Charging Check 1 Check 1 Wearing Wearing Check 2 Check 2 Lighting Lighting After Use After Use ■ ■ Battery Unit: Safety Precautions Battery Unit: Safety Precautions WARNING WARNING Charge in locations away from direct sunlight. Charge in locations away from direct sunlight. - Page 12 Charging Check 1 Wearing Check 2 Lighting After Use Charging the Battery Unit Turn the dimming knob clockwise to switch it on. If the charge lamp is illuminated orange, the battery needs to be charged. Turn the dimming knob counter-clockwise to turn it off, and connect the dedicated AC adapter and battery unit (INPUT jack).
-
Page 13: How To Check
Charging Charging Check 1 Check 1 Wearing Wearing Check 2 Check 2 Lighting Lighting After Use After Use Check 1 Check 1 Check that all 3 LED lights illuminate. Check that all 3 LED lights illuminate. Product safety may be affected if only 2 or fewer LEDs illuminate or if they flicker. Product safety may be affected if only 2 or fewer LEDs illuminate or if they flicker. - Page 14 Charging Check 1 Wearing Check 2 Lighting After Use Wearing (Attached belt, battery unit) CAUTION Do not use with other belts. Do not use with other belts. This may cause the attached belt to loosen and the battery unit to fall. (Be sure to use the attached belt of this product.) Wear the attached belt for a couple of hours before use.
- Page 15 Charging Charging Check 1 Check 1 Wearing Wearing Check 2 Check 2 Lighting Lighting After Use After Use Place the attached belt on your pelvis. Place the attached belt on your pelvis. *Wear the attached belt underneath *Wear the attached belt underneath your surgery gown.
- Page 16 Charging Check 1 Wearing Check 2 Lighting After Use Wearing (Main unit) CAUTION Put the product on yourself in front of a mirror before washing your hands. It may fall off if others put the product on for you as it tends to become loose or tilt. Be sure to put it on yourself in front of a mirror before washing your hands, to ensure it is worn in the correct position.
- Page 17 Charging Charging Check 1 Check 1 Wearing Wearing Check 2 Check 2 Lighting Lighting After Use After Use Tie the connection cord of the main Tie the connection cord of the main unit with a tie band, and connect the unit with a tie band, and connect the Connection Connection cord...
- Page 18 Charging Check 1 Wearing Check 2 Lighting After Use How to Adjust Lighting Turn the dimming knob clockwise to turn it on and adjust the brightness. Power lamp 【 】 Continuous Lighting Hours Green: ON : OFF ・ Dimmer Knob MAX (Dimming Level 100%): Approx. 2.5 Hours ・...
- Page 19 Charging Charging Check 1 Check 1 Wearing Wearing Check 2 Check 2 Lighting Lighting After Use After Use The optimal illumination position depends on the operation. The optimal illumination position depends on the operation. Adjust the light source position according to the operative eld you want to illuminate. Adjust the light source position according to the operative eld you want to illuminate.
- Page 20 Charging Check 1 Wearing Check 2 Lighting After Use Storage CAUTION Store in locations according to the Environmental Specifications (refer to 8. Specifications). Storing in locations with high temperature and high humidity may cause electric shock, leakage, heat generation, or ignition. Storing in locations with high temperature and high humidity may cause electric shock, battery leakage, heat generation, or ignition.
-
Page 21: Storage Bag
【 【 Storage bag Storage bag 】 】 Check that the calibration kit is firmly Check that the calibration kit is firmly Place the battery unit in the front Place the battery unit in the front pushed to the bottom of the storage bag. pushed to the bottom of the storage bag. -
Page 22: Maintenance
Charging Charging Check 1 Check 1 Wearing Wearing Check 2 Check 2 Lighting Lighting After Use After Use Maintenance Maintenance CAUTION CAUTION Do not wash it by exposing it to or submerging it in water. Do not wash it by exposing it to or submerging it in water. It may cause electric shock or failure. - Page 23 Charging Charging Check 1 Check 1 Wearing Wearing Check 2 Check 2 Lighting Lighting After Use After Use 【 【 Calibrating the heat sink Calibrating the heat sink Post Post Part names of the Part names of the 】 】 height height calibration kit calibration kit When you cannot wear the product...
- Page 24 Repair & Inspection The warranty period of this product is 1 year from the time of purchase. Repair and inspection costs will be paid by the customer after the warranty period or if the services are beyond the scope of warranty coverage. If the product does not function correctly, fill in the required fields in the form below and immediately contact the distributor.
-
Page 25: Troubleshooting
Troubleshooting Troubleshooting Symptom Symptom Cause Cause How to handle How to handle ・ ・ Dimming knob is turned off Dimming knob is turned off Turn the dimming knob clockwise. Turn the dimming knob clockwise. ・ ・ Main unit does not Main unit does not Turn the dimming knob clockwise to Turn the dimming knob clockwise to... -
Page 26: Specifications
Specifications ■ Instrument Classification Electrical Shock Protection Classi cation Internally Powered Equipment Unintentional Protection Against Harmful Intrusion of Water or Particulates Unintentional Sterilization Use in High Oxygen Concentration Environments Unintentional Operation Mode Continuous Operation ■ Main Body Ⅲ Brand Name Wearable Surgical Lighting System OPELA Model -H (High Illumination Model) - Page 27 ■ Attached belt Manufacturer Mizuno Corporation C3JKB501 Model Number Weight 103g (M-L), 111g (LL) Nylon (90%), Polyester (10%) Material 75 - 95 cm (30 to 37 inch) (M-L), 95-115 cm (37 to 45 inch) (LL) Pelvis diameter Country of Origin Japan ■...
-
Page 28: Limited Warranty
) : TAIYO CORPORATION Manufacturer Fuji Bldg. 9F, 5-30-9 Shiba, Minato-ku, Tokyo, 108-0014 Point of inquiry Issued July 2021 OP̲P̲02US(02) Manufacturer: TAIYO CORPORATION Fuji Bldg. 5-30-9 Shiba, Minato-ku, Tokyo, 108-0014 is registered in U.S. Patent and Trademark Of ce. is trademark of Taiyo corporation.
Need help?
Do you have a question about the OPELA III and is the answer not in the manual?
Questions and answers