Table of Contents
Advertisement
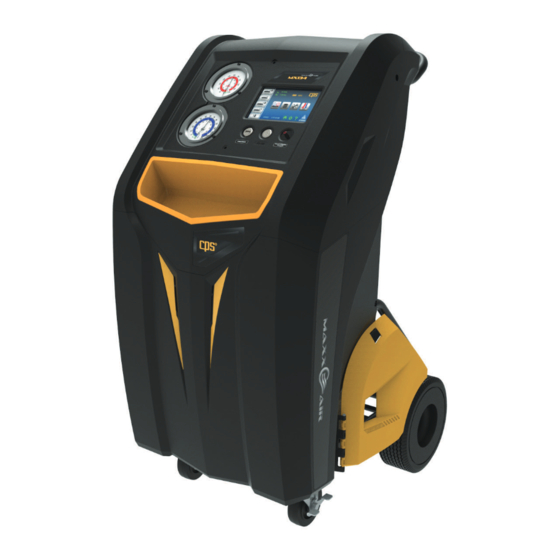
MAXXAIR™ MX134
AUTOMOTIVE REFRIGERANT MANAGEMENT CENTER
Recover, Recycle, Evacuate & Recharge A/C Systems
In Passenger Vehicles & Light Trucks
For Use With R-134a Refrigerant Only
OWNER'S MANUAL (English)
Latest updates: www.cpsproducts.com
TO BE OPERATED BY QUALIFIED PERSONNEL ONLY
UL1963 EEI, CSA C22.2 120 DEI
Advertisement
Table of Contents

Related Manuals for CPS MAXXAIR MX134

Summary of Contents for CPS MAXXAIR MX134
- Page 1 MAXXAIR™ MX134 AUTOMOTIVE REFRIGERANT MANAGEMENT CENTER Recover, Recycle, Evacuate & Recharge A/C Systems In Passenger Vehicles & Light Trucks For Use With R-134a Refrigerant Only OWNER’S MANUAL (English) Latest updates: www.cpsproducts.com TO BE OPERATED BY QUALIFIED PERSONNEL ONLY UL1963 EEI, CSA C22.2 120 DEI...
-
Page 3: Table Of Contents
Setup ................16 Set Language ............16 A/C Database End-User License Agreement ....50 Set Units of Measure ..........16 CPS Company Locations ..........51 Set Tank & Refrigerant Weights ....... 17 Job Tracker .............. 18 Wireless Device Setup ..........19 Set Date Or Time ............20 Online Registration/Warranty ........ -
Page 4: General Safety Instructions
CAUTION – RISK OF INJURY, the equipment should only be operated by certified personnel. CAUTION – Use only CPS certified hose assemblies on this unit. The hose assemblies are made to proper length, contain shut-offs where required and have direct affect on the proper operation of this equipment. -
Page 5: Product Registration
GENERAL SAFETY INSTRUCTIONS (Cont’d) Tank Overfill Limit 1. The MX134 Series’ 30lb internal storage tank is designed to contain a maximum of 20.96 Lbs (9.52 Kg) of refrigerant. 2. If this amount is exceeded, the user will be alerted and system operations will be halted. 3. -
Page 6: Key Features/Benefits
Warranty, Three Year Compressor Warranty. Optional Accessories • Heater Blanket (#CCXHB) – During colder weather, this CPS 120V AC accessory can be applied to the refrigerant tank to speed up charging, which eliminates the need to run a vehicle’s AC system. -
Page 7: Specifications
SPECIFICATIONS MX134 OVERALL SPECIFICATIONS Power 115V 60Hz Compressor 2/3 HP Twin Cylinder Oil-less Gauges 3.5” Low side, 30 in/Hg to 250 psi; High Side, 0 to 600 psi Hoses 10 Ft. (3.0 m), Barrier Type Refrigerant For Use With R-134a Only ASHRAE Refrigerant Code Maximum Recovery Rate Up To 1 Lb (0.453 kg) per minute... -
Page 8: Lb Recovery Tank
SPECIFICATIONS (Cont’d) CPS REFRIGERANT TANK SPECIFICATIONS (Industry Standard) Max. Refrigerant Total Weight Max. Weight Of Tank Water Tank Foot Ring Tank Outside Weight (80% Of (Tank & Tank Height Pressure Empty Tank Capacity Diameter Diameter Water Capacity) Refrigerant) Rating psig (bar) -
Page 9: Machine Layout
MACHINE LAYOUT FRONT VIEW CONTROL PANEL Machine Model # 3.5” High Side Gauge (Analog) 7” Color Touch Screen LCD Display 3.5” Low Side RCA Port (For Temperature Gauge (Analog) Probe #TMX2P Accessory (Included) Power (On/Off) Button Storage Tray USB Port For Small Tools Or Fittings... - Page 10 MACHINE LAYOUT (Cont’d) SIDE VIEW REAR VIEW Handle Bar (1 Piece) SD Card Port (Access North American A/C Database) Left & Right Side Hose Connections Replaceable Refrigerant Filter/Dryer Refrigerant Identifier (For MX1234 & 3030 Only) 30 Lb Refrigerant Recovery (Internal) Tank One Piece Welded Frame Vacuum Pump Oil Level (Sight Glass)
-
Page 11: Quick Start Guide
QUICK START GUIDE 1. Remove the protective packaging between the storage tank and the scale. 2. NOTE: BEFORE TURNING THE MX134 MACHINE ON, ENSURE THERE ARE NO HOSES CONNECTED TO VEHICLE 3. The Vacuum Pump on MX Series Machines contains Vacuum Pump Oil (factory filled). Check the “Sight Glass” on the Vacuum Pump to ensure the oil level is between the MAX and MIN lines. -
Page 12: Overview (Primary Touch Screen Keys)
OVERVIEW (Primary Touch Screen Keys) This MX series machine features a 7” (17.8 cm), color, touch-screen LCD display from which all machine functions or settings can be accessed. HOME SCREEN 5 Selectable Functions 1. Refrigerant Recovery Key Pg 24 2. A/C System Evacuation Key Pg 26 3. -
Page 13: Print Key, Help Menu
OVERVIEW (Primary Touch Screen Keys, Cont’d) PRINT KEY Home Screen a. Use the MX134’s Bluetooth Low Energy or Wi-Fi functions to connect to a wireless printer. The Bluetooth range is generally 30 ft, while Wi-Fi is generally 150 ft (both direct line of sight). to receive a printed copy showing b. -
Page 14: Machine Upkeep
OVERVIEW (Primary Touch Screen Keys, Cont’d) MACHINE UPKEEP (2 Functions) Home Screen Machine Upkeep Screen a. To enter the SETUP FUNCTION, touch a. Touch to access the MACHINE UPKEEP Screen b. Or, to enter the MAINTENANCE MENU, touch SETUP FUNCTIONS Tank Weight Or Units Of Measure Refrigerant Weight... -
Page 15: Hybrid Vehicle Key
OVERVIEW (Primary Touch Screen Keys, Cont’d) HYBRID VEHICLE KEY Home Screen a. Touch if the vehicle is Hybrid to flush service a. Touch if vehicle uses a HIGH VOLTAGE COMPRESSOR. hoses. b. Or touch to return to HOME SCREEN. a. Connect service hoses to FLUSH PORTS. b. -
Page 16: Setup
SETUP SET LANGUAGE (Not All Screens Are Shown) MX Series Machines have an English language default setting. To change the default FROM English TO either German, French or Spanish, use the following instructions. Setup Function Screen Select Default Language a. Touch to veiw languages to work in. -
Page 17: Set Tank & Refrigerant Weights
SETUP (Cont’d) SET TANK & REFRIGERANT WEIGHTS (Not All Screens Are Shown) Confirm (Or Change) Weights* (*For 30 Lb Tank Shown) Setup Function Screen a. Touch and to move to next screen. a. If weights shown are correct, touch b. If weights shown must be changed, touch Enter Password (Before Changing Weights) Confirm (Or Change) Tank Weight a. -
Page 18: Job Tracker
SETUP (Cont’d) JOB TRACKER (Not All Screens Are Shown) Setup Function Screen Job Tracker Screen a. Warranty Code- Touch white box to have MX a. Touch machine generate an encrypted warranty code for manufacturer’s vehicle being serviced. b. Track Jobs- Touch white box to have Job Data appear (in next screen). -
Page 19: Wireless Device Setup
TACI100 CarSmart A/C Inspector Temperature Probes (an ® optional accessory from CPS Products) can be paired via BLE to any of the MX Series Machines. These 2 probes allow technicians to data log temperature, feels like temperature, humidity, dry and wet bulb, and dew point readings inside of, or around passenger vehicles and light trucks over a preset period of time. -
Page 20: Set Date Or Time
Bluetooth Low Energy (BLE) Devices Wi-Fi Devices a. After the CPS brand CarSmart BLE devices have a. Select one or more of the desired Wi-Fi devices been set up, they can be enabled/disabled by (Wi-Fi Device, Printer, E-mail) to pair the MX134. -
Page 21: Online Registration/Warranty
(Not All Screens Are Shown) Please register this MX134 Refrigerant Management Center for warranty (2 methods possible): A. On-Line Method: Visit “www.cpsproducts.com/hvac-warranty-registration/” CPS Products Home Page (CPSPRODUCTS.COM) a. On the “Support” tab, select the “Automotive” drop down. a. Select Equipment Warranty Registration. -
Page 22: Shop Information
SETUP (Cont’d) SHOP INFORMATION (Not All Screens Are Shown) B. On-Screen Method: Users may register an MX series machine via the following “Onscreen” method: Home Screen Setup Function Screen a. Touch a. Touch and enter information by following the prompts. b. -
Page 23: Select Sae Or Global Standards
To change the factory default SAE Mode setting TO a. Enter password (example password shown. International Mode, Touch the SAE key. Contact CPS Technical Support for password to change to International Mode) that has been set up for this machine. b. Touch to enter password. -
Page 24: Refrigerant Recovery
REFRIGERANT RECOVERY REFRIGERANT RECOVERY (Not All Screens Are Shown) DO NOT CONNECT SERVICE HOSES TO REFRIGERANT SOURCE UNTIL INSTRUCTED TO DO SO. The RECOVERY process pulls refrigerant into a distillation chamber which has a coil that is heated by compressor outlet gas. This distills the refrigerant (turns it to gas) and separates liquids and debris from the refrigerant. - Page 25 REFRIGERANT RECOVERY (Cont’d) a. Refrigerant Oil draining (into the MX machine’s a. Use keypad to enter amount of recovered oil. included Oil Recovery Bottle). b. Touch to enter data and move to next screen. b. Countdown timer shows remaining time. a.
-
Page 26: A/C System Evacuation
EVACUATION OF A/C SYSTEM A/C SYSTEM EVACUATION (Not All Screens Are Shown) After all refrigerant has been recovered from the vehicle’s AC system, and the system has been reassembled following any repairs, the AC system must be evacuated. Within a vehicle’s AC system, any moisture that is present can mix with oil to form “sludge”, while moisture mixed with refrigerant forms hydrofluoric and hydrochloric acids all of which can permanently damage a system. -
Page 27: Refrigerant Charging
4. The MX134 will complete the remaining 85% of the charge. 5. Note; During cold conditions, a Heater Blanket (CPS optional accessory # CCXHB) may be wrapped around the Recovery Tank to assist with charging. If the MX134 cannot complete a charge due to pressure equalization, it will notify the user to close the high side coupler and start the vehicle. - Page 28 REFRIGERANT CHARGING (Cont’d) a. Ensure hoses are connected to vehicle and a. Touch “Low Side” key. hose valves are OPEN. a. Close the High Pressure Valve. a. Start the vehicle. a. Vehicle AC system charging has begun. a. Final “Charge” Vs. “Dispensed” amounts shown. b.
-
Page 29: Full Cycle
FULL CYCLE FULL CYCLE Select “Full Cycle” on the Home Screen to Recover, Recycle, Vacuum, Leak Check (if desired) and Charge the vehicle’s AC system. Home Screen Full Cycle Screen a. Touch to go to FULLY CYCLE Function. a. Touch to proceed to next screen. -
Page 30: Refrigerant Tank Refill
REFRIGERANT TANK REFILL REFRIGERANT TANK REFILL (Not All Screens Are Shown) FOLLOW DIRECTIONS ON SCREEN AND DO NOT OPEN COUPLE OR TANK VALVE UNTIL SCREEN SHOWS TO OPEN BOTH It is suggested that at least 4.5 lbs (2 kg) of refrigerant be available in the storage tank to begin any operation. If less is observed, choose this operation to add refrigerant to the internal tank. - Page 31 Touch Continue to proceed. 9. The main menu will appear. Touch and refer to page 30 (previous page) for further instructions on how to fill the tank. 10. Please contact CPS Technical Support if you have any problems registering this machine.
-
Page 32: Maintenance
MAINTENANCE MENU FILTER/DRYER Filter Dryer (Not All Screens Are Shown) The included filter Filter/Dryer has the capacity to dry 150lbs of recovered refrigerant. The reminaing FILTER life is graphically displayed on the TOP CENTER of the HOME SCREEN. When all 4 segments are no longer visible, change the Filter/Dryer. Maintenance Screen Maintenance −... - Page 33 MAINTENANCE (Cont’d) Maintenance − Filter/Dryer Change Maintenance − Filter/Dryer Change a. Turn Filter Dryer on end. a. Replace the Filter Dryer with CPS part #FX3030X1. Maintenance − Filter/Dryer Change Maintenance − Filter/Dryer Change a. Install the Filter Dryer a. Using the keypad, enter the NEW Filter Dryer ID #.
-
Page 34: Vacuum Pump Oil Change (Frequency)
4. Remove Oil Drain CAP, then remove Oil Drain PLUG from drain port. AVOID CONTACT WITH HOT OIL. HOUSING COMPONENTS MAY BE HOT. Let contaminated oil drain into suitable container. Reinstall OIL DRAIN PLUG. 5. Add fresh Pro-Set Premium Vacuum Pump Oil (by CPS) until level is between the MAX and MIN lines on the pump housing. -
Page 35: Refrigerant Charging Scale
Touch Maintenance Mode Icon to: (left to right) • Check Calibration • Tare (Zero) the Scale • Scale Calibration (by CPS Products only). Tare (Zero) The Scale Check Calibration Screen a. On the “Scale Maintenance Modes” screen, touch a. -
Page 36: Pressure Transducer
Actual scale calibration is suggested only if the calibration test was off by more than .02lbs. Calibration may be performed by a CPS authorized service center. CPS Technical Support can also assist with the process. Scale calibration requires a certified 25lb weight. -
Page 37: Calibrate Pressure Transducer
MAINTENANCE (Cont’d) Zero The Pressure Transducer Zero The Pressure Transducer a. Chart will populate with PT data. a. Wait while PT2 zeros out. Calibrate Pressure Transducer (Not All Screens Are Shown) Calibrate Pressure Tranducer Calibrate Pressure Tranducer a. Touch to calibrate the Pressure Transducer. a. -
Page 38: Air Purge
Purge reduces “non-condensable gases” in the storage tank to an acceptable level and may take a few minutes to complete. DO NOT TURN THE MACHINE OFF OR UNPLUG THE MACHINE DURING AN AIR PURGE CYCLE. 1. This mode should only be entered with direction by CPS Products Technical Support or by a CPS Authorized Service Center. -
Page 39: Diagnostics Of Valves, Controls, Scale
MAINTENANCE (Cont’d) DIAGNOSTICS OF INDIVIDUAL VALVES, CONTROLS, SCALE, TANK, ETC. (Not All Screens Are Shown) Valves & Controls Screen a. Touch (Valves & Controls Icon). a. List of Valves, Controls, PT Scale, etc. to select for disgnostics. Valves & Controls Screen Valves &... -
Page 40: Software Upgrade
MAINTENANCE (Cont’d) FIELD SOFTWARE UPGRADE (Not All Screens Are Shown) Use this mode to update the MX134 system software. Loading New Firmware 1. The latest MX134 firmware can be downloaded at https://www.cpsproducts.com/support/firmware-updates/. 2. Select the MX134 model and follow the instructions also available on this page. Maintenance Menu Software Upgrade a. - Page 41 TOUCH SCREEN DISPLAY CALIBRATION (Cont’d) a. Touch screen to continue. a. Touch and release the “filled” circle (UPPER LEFT). a. Touch and release the filled circle (UPPER RIGHT). a. Touch and release the filled circle (LOWER RIGHT). a. Touch and release the filled circle (LOWER LEFT). a.
-
Page 42: Car System Health Mode
CAR SYSTEM HEALTH MODE CAR SYSTEM HEALTH MODE (Not All Screens Are Shown) Use this mode for checking system pressures and vent temperature before and after servicing the AC system. 1. System parameters can be printed while in this mode to provide a before and after comparison. 2. -
Page 43: Corded Temperature Probe (Included Accessory)
CAR SYSTEM HEALTH MODE (Cont’d) a. Wait. a. CLOSE VALVES and DISCONNECT COUPLERS. a. Wait. a. Home Screen. CORDED TEMPERATURE PROBE ACCESSORY #TMX2P (INCLUDED) The TMX2P has a 15’ (4.5m) cord and is commonly used to measure vent or liquid temperatures in vehicles. It has an operating temperature range of -40˚F to 257˚F / -40˚C to +125˚C. -
Page 44: A/C Database For North American Vehicles
A/C DATABASE FOR NORTH AMERICAN VEHICLES A/C DATABASE FOR NORTH AMERICAN VEHICLES (Since 1994) (Not All Screens Are Shown) NORTH AMERICAN VEHICLE A/C DATA BASE 1. Insert the included SD Card (Secure Digital Memory Card) into the back of the MX134 Machine. 2. -
Page 45: Flush Refrigerant Hoses
FLUSH REFRIGERANT HOSES FLUSH REFRIGERANT HOSES (Not All Screens Are Shown) a. On the HOME screen, touch if the vehicle is a. If you want to Clear Service Hoses (of refrigerant), Hybrid/Electric to flush service hoses. CLOSE COUPLERS and DISCONNECT SERVICE b. -
Page 46: Appendix
Touch to select LBS:OZ as UOM Notifies user to connect HP port CONNECT HP during tank refill Touch to select the LOW SIDE coupler LOW COUPLER only CPS FILTER CPS FILTER Touch to launch the MAINTENANCE MAINTENANCE DISCONNECT Notifies the user to DISCONNECT menu... - Page 47 APPENDIX (Complete Icon Library) ICON NAME DESCRIPTION OFF/ON ICON NAME DESCRIPTION OFF/ON Notifies user to PLACE WEIGHT on the PLACE WEIGHT SCALE ZERO Touch to RE-ZERO the scale scale PRINT SERVICE Touch to PRINT a report of the service Touch to select SERVICE SERVICE HOSES Indicates that the SERVICES HOSES PSIG...
-
Page 48: Mx Error Codes
MX ERROR CODES “E1-BAD TXT EPROM”; A bad scale may cause this, also. “E2-SCALE ADC”; Connection to the scale electronics lost. “E3-SCALE EPROM”; Scale not calibrated? “E4-CANNOT CAL”; Scale cannot be calibrated or bad calibration. “E5-MBV FAULT: X”; Where X is a number from 1 to 5 indicating which MBV has failed. “E6-AMB. -
Page 49: Warranty
Two Year Parts Warranty From the end of Year 1 through the end of Year 2, CPS will repair or replace (at our option)* any parts (at no charge to the original owner, except for labor) that are found to be defective. -
Page 50: A/C Database End-User License Agreement
A/C DATABASE END-USER LICENSE AGREEMENT THIS IS A LEGAL AND BINDING AGREEMENT BETWEEN YOU, THE END-USER (“YOU”), AND MOTOR Information Systems, Hearst Business Publishing, Inc. (“MOTOR”). BY ACCESSING ANY OF THE MOTOR DATABASES VIA THIS WEB SITE, YOU AGREE TO ALL THE TERMS AND CONDITIONS OF THIS AGREEMENT. -
Page 51: Cps Company Locations
(e) This Agreement may only be amended, modified, suspended or canceled by a writing signed by MOTOR. (f) This Agreement may be assigned by MOTOR, but may not be assigned by You. CPS COMPANY LOCATIONS CPS PRODUCTS, INC. U.S.A. (Headquarters) CPS PRODUCTS N.V 3600 Enterprise Way, Miramar, Florida 33025, USA Krijgsbaan 241, 2070 Zwijndrecht, Belgium Tel: 305.687.4121 / 1.800.277.3808, Fax: 305.687.3743... - Page 52 www.cpsproducts.com 73-802A REV B...
Need help?
Do you have a question about the MAXXAIR MX134 and is the answer not in the manual?
Questions and answers
First time using the equipment. Went to recharge but in the wrong amount. Now the error came on the lower side gauge is stuck at 90 psi High side 30 psi. Just a warning alarm now.
If the CPS MX134 equipment shows a low side gauge stuck at 90 psi and a high side gauge at 30 psi after incorrect recharging, the unit may be experiencing a fault. Check for scale errors such as E1 to E4 or pressure transducer error E8. Perform a full calibration or scale check using the SCALE CHECK and FULL CALIBRATION functions. If issues persist, inspect for a faulty pressure transducer or improper scale connection. Only certified personnel should operate or service the equipment.
This answer is automatically generated