Table of Contents
Advertisement
Quick Links
FMD-250W
INSTRUCTION MANUAL
Thank you very much for purchasing an OLYMPUS product.
Please keep this manual handy for future use.
MODE D'EMPLOI
Nous vous remercions pour l'achat d'un produit OLYMPUS.
Veuillez conserver ce manuel à portée de main pour un usage ultérieur.
MANUAL DE INSTRUCCION
Le agradecemos por la adquisición de un producto OLYMPUS.
Conserve este manual a mano para uso futuro.
Advertisement
Table of Contents

Related Manuals for Olympus Eye-Trek FMD-250W

Summary of Contents for Olympus Eye-Trek FMD-250W
- Page 1 FMD-250W INSTRUCTION MANUAL Thank you very much for purchasing an OLYMPUS product. Please keep this manual handy for future use. MODE D’EMPLOI Nous vous remercions pour l’achat d’un produit OLYMPUS. Veuillez conserver ce manuel à portée de main pour un usage ultérieur.
-
Page 2: Safety Notice
SAFETY NOTICE The exclamation point within an equilateral triangle is intended to alert the user to the presence of important operating and maintenance (servicing) instructions in the literature accompanying the product. WARNING: CAUTION: WARNING: CAUTION: TO REDUCE THE RISK OF FIRE OR ELECTRIC SHOCK, DO NOT EXPOSE THIS PRODUCT TO RAIN OR MOISTURE. -
Page 3: Safety Instructions
SAFETY INSTRUCTIONS Read Instructions — All the safety and operating instructions should be read before the product is operated. Retain Instructions — The instruction manual should be retained for future reference. Heed Warnings — All warnings on the product and in the operating instructions should be adhered Follow Instructions —... - Page 4 Damage Requiring Service — Unplug this product from the wall outlet and refer servicing to qualified service personnel under the following conditions: (a) When the power-supply cord or plug is damaged, (b) If liquid has been spilled, or objects have fallen into the product, (c) If the product has been exposed to rain or water, (d) If the product does not operate normally by following the operating instructions.
-
Page 5: Warnings
WARNING Some people should not use this product: Children under 16 years of age This product may interfere with development of their eyes and visual system. Password protection is provided to prevent children under 16 from using this display unit. Anyone who has ever experienced convulsive or epileptic fits or loss of consciousness from light flashes or oscillations. - Page 6 WARNING Improper use of this product may cause serious injury: Under some conditions, viewing with the Eye-Trek may cause: Nausea Headache Motion sickness If you experience any of these symptoms, stop viewing and rest until you recover. These symptoms could temporarily disturb your vision or balance. Do not try to operate a vehicle, walk, or move around until you feel better.
- Page 7 Do not use it near flammable gas, liquid, or vapor. Do not expose it to very dusty environments. Do not disassemble. Do not use any AC adapter except the AC adapter provided or specified by Olympus. Follow the appropriate cautions for electrical devices.
-
Page 8: For Your Safety
WARNING For your safety: Do not use this product in situations that are potentially dangerous, such as on a bus or train where you may fall down, or in places where you cannot guarantee your personal safety. Using this product in such a situation may result in an unexpected accident or injury. Do not leave this product in a closed automobile or in other Prohibited places under direct sunlight for long periods. -
Page 9: Table Of Contents
CONTENTS SAFETY NOTICE...E-2 SAFETY INSTRUCTIONS...E-3 WARNINGS...E-5 MAIN FEATURES OF Eye-Trek ...E-10 ADDITIONAL INFORMATION ...E-10 CHECKING THE CONTENTS...E-11 NAMES OF PARTS ...E-12 CONNECTIONS...E-13 WEARING/REMOVING THE DISPLAY UNIT...E-15 WATCHING VIDEO...E-17 TURNING ON THE POWER FOR THE FIRST TIME ...E-17 TURNING ON THE POWER AFTER THE FIRST TIME ...E-19 SELECTING SCREEN FORMAT ...E-20 ADJUSTING THE AUDIO/VIDEO...E-21... -
Page 10: Main Features Of Eye-Trek
MAIN FEATURES OF E New type of personal display that uses a unique optical system to enlarge video images generated by small LCDs. Powerful image equivalent to viewing a 62" screen at 6 1/2 feet. Can be connected to a variety of video components, including a VCR, Video CD player, laserdisc player, DVD player, video camera, or TV, using audio/video output jacks. -
Page 11: Checking The Contents
CHECKING THE CONTENTS Display unit AC adapter AV cable Control unit Instruction manual E-11... -
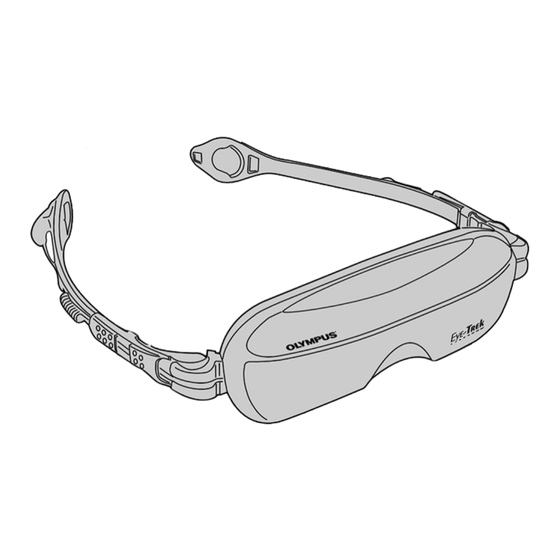
Page 12: Names Of Parts
NAMES OF PARTS DISPLAY UNIT Display cable CONTROL UNIT Display cable POWER switch E-12 Frame adjuster AV cable S-video Audio right (red) Audio left (white) Video (yellow) Frame Headphone holder Nose pad Headphone Power indicator (green) Multi Control button Multi-connector terminal Multi-connector AC adapter connector... -
Page 13: Connections
CONNECTIONS Basic Connections Notes: Make sure that the Eye-Trek and other video components are turned off before connecting. Make sure that the AV cable’s red, white, and yellow jacks are connected to the output jacks of the video component. If the AV cable is plugged into the input jacks, no image or sound will appear. - Page 14 CONNECTIONS Improving video clarity If the connected video component has an S-video output jack, clearer video can be viewed by connecting it through the S-video jack. If the S-video jack and the video jack (yellow) are connected at the same time, the S-video output has priority.
-
Page 15: Wearing/Removing The Display Unit
WEARING/REMOVING THE DISPLAY UNIT Wearing the display unit Remove each headphone upward from the holder as shown in the figure. When putting the headphones back in the holders, simply reverse the order of removal for each. If you wish to use ear pads on the headphones, use 16.0 mm ear pads (commercially available). - Page 16 WEARING/REMOVING THE DISPLAY UNIT Adjusting the space between the frame arms You can narrow the space between the frame arms using the frame adjusters when the frame arms don’t fit your face. How to adjust Slide the frame adjuster in the direction of the display unit.
-
Page 17: Watching Video
WATCHING VIDEO TURNING ON THE POWER FOR THE FIRST TIME Before watching an image, password (“ ”). Turn the power on and select the desired language. 1. Turn on the connected video component. 2. Press the POWER switch on the Eye-Trek control unit. - Page 18 WATCHING VIDEO Acknowledge the warning, then enter the password. 1. Acknowledge the warning on the screen, then press the Multi Control button. The password entry screen appears. If the Multi Control button is not pressed on the warning screen, the password entry screen will not appear.
-
Page 19: Turning On The Power After The First Time
TURNING ON THE POWER AFTER THE FIRST TIME When you turn on the power after the first time, simply enter the password to display images. (The language selection screen does not appear.) Turn the power on. 1. Turn on the connected video component. 2. -
Page 20: Selecting Screen Format
WATCHING VIDEO SELECTING SCREEN FORMAT You can select the size of the screen (NORMAL/WIDE). Select NORMAL/WIDE. 1. While an image is being displayed, press the Multi Control button to bring up the Menu screen. 2. Move the Multi Control button up/down ( , ) to select NORMAL/WIDE. -
Page 21: Adjusting The Audio/Video
ADJUSTING THE AUDIO/VIDEO Once the image appears, adjust the VOLUME and CONTRAST. Adjusting the volume 1. Move the Multi Control button up/down ( , ) while the normal screen is displayed. The volume level appears on the screen. 2. Move the Multi Control button up/down ( , ) to adjust the volume. - Page 22 WATCHING VIDEO You can adjust the desired audio/video items. You can also save your preferred settings. (For more information, refer to “SAVING, LOADING AND CANCELING THE AUDIO/VIDEO SETTINGS” on pg.25.) ADJUSTING THE VIDEO Select VIDEO SETTINGS in the Menu screen. 1.
- Page 23 ADJUSTING THE AUDIO Select AUDIO SETTINGS in the Menu screen. 1. Press the Multi Control button to display the Menu. 2. Move the Multi Control button up/down ( , ) to select AUDIO SETTINGS, then press it or move it to the right ( When EXIT is selected, the menu disappears from the screen and returns to the normal screen.
- Page 24 WATCHING VIDEO ADJUSTING THE AUDIO/VIDEO (Cont.) Menu items EXIT Cancels the menu and returns to the normal screen. WIDE Selects the size of the screen. NORMAL CONTRAST Adjusts the contrast. Can also be adjusted on the normal screen. BRIGHTNESS Adjusts the brightness. TINT Adjusts the tint.
-
Page 25: Saving, Loading And Canceling The Audio/Video Settings
SAVING, LOADING AND CANCELING THE AUDIO/VIDEO SETTINGS You can save your desired audio/video settings. SAVING Select SAVE LOAD in the Menu screen. • When you complete your audio/video settings, move the Multi Control button up/down to select SAVE LOAD, then press it or move it to the right •... -
Page 26: Registering, Changing Or Canceling The Password
WATCHING VIDEO REGISTERING, CHANGING OR CANCELING THE PASSWORD You can register a 3-digit password to prevent unauthorized use of this display unit. If you forget the password, register a new one. You can cancel the password registration if you do not wish to use this feature. The password is preset to “... -
Page 27: When You Are Finished
WHEN YOU ARE FINISHED Follow the steps below to turn off the power after use. 1. Remove the headphones from your ears. 2. Remove the display unit from your face. 3. Turn off the control unit. 4. Turn off the video component. Health warning A health warning appears approx. -
Page 28: Changing The Frames
CHANGING THE FRAMES Perform the following steps if a frame is broken and must be replaced. If you cannot wear the display unit securely even after increasing or decreasing the space between the frame arms using the frame adjusters, try switching the left and right frame arms following the steps below and adjust the space again. -
Page 29: Specifications
SPECIFICATIONS Product Type Product name Model name Power Supply Ratings AC adapter (provided) Power consumption Video Video signal Video display devices Effective number of pixels Angle of view Input Jacks Audio/Video/Power input jack Ambient Temperatures Operation Storage Dimensions Display unit Control unit Weight Display unit... -
Page 30: Troubleshooting
REPAIR SERVICE The warranty period of this unit is one year from the date of purchase. Within this period, Olympus will repair this unit free of charge. However, this warranty may not cover damage caused by user mishandling, even if it occurs during the warranty period. If repairs are required after the warranty period has ended, please contact the dealer from whom you purchased the unit or Olympus. - Page 31 MEMO...
Need help?
Do you have a question about the Eye-Trek FMD-250W and is the answer not in the manual?
Questions and answers