Advertisement
Quick Links
Advertisement

Summary of Contents for fireTEK FTM-48F Series
- Page 1 Firing device Quick Guide 05/2018...
- Page 2 Foreword This Quick Guide is for firing device FTM-48Fx and FTM-48Sx. Functions and operations are same with different types of firing devices, like -48Qx, so this manual is combatible with other models also. 05/2018...
- Page 3 Index How to set ID-number Display and 48Sx Front connectors Back connectors Field testing Channel connection legend Use of one device as Standalone (without remote) Use of one device as Master (without remote) 05/2018...
- Page 4 1. How to set ID-number ID number can be set only when there is no program on firing device. If it is programmed, program must be deleted in order to change ID number. 1. Turn power on (Key switch to test position).
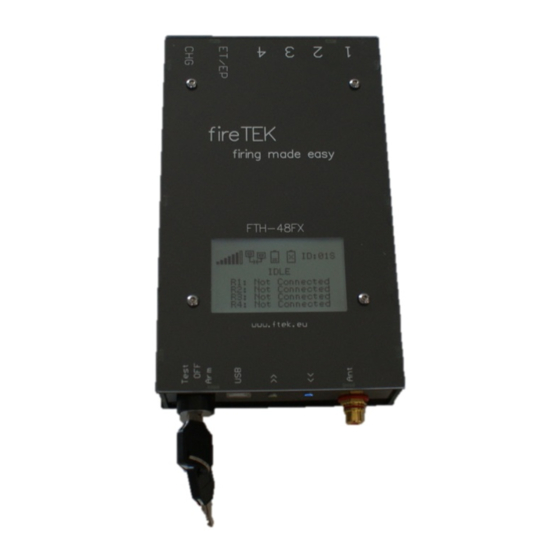
- Page 5 2. Display, FTH-48Fx Battery and external battery indicator ID - Interface ID I - INIT mode A - Stand alone mode Wireless field strength indicator (S - standard network M - Master mode C – Custom Network) S - Slave mode Status (PRG = programmed 2-wire connection status (connected/not connected) only with pyro events...
- Page 6 2. FTH-48Sx, Connectors USB connector Buttons (Green & Blue) Charging port Time code input DMX connector 2-wire connection External power/trigger Rails 1-4 connection connection 05/2018...
- Page 7 3. Front connectors, FTH-48Fx USB connector DMX output connector (optional) Buttons (Green & Blue) 2-wire connectors (opt.) Time code input (optional) 05/2018...
- Page 8 4. Back connectors, FTH-48Fx Power on (green) and Armed External trigger/power (yellow) lights connector Rail (1-4) connectors Charging connector 05/2018...
- Page 9 5. Field testing On the field, users can test the connections and module status without risk of firing by mistake. 1. Power on the module without pressing any button. 2. Wait until TestMode appears on the screen. 3. Now you can check the module rail connections. 4.
- Page 10 6. Channel connection legend 05/2018...
- Page 11 7. Use of one device as Standalone (without remote) Precondition: Module is External trigger control: programmed. 1. To be able to control the system via external 1. For safety reasons to use the trigger you will need to give an impulse on module without a remote you external trigger connector and the second will need to press and hold green...
- Page 12 7. Use of one device as Standalone (without remote) C. Firing step by step using panel buttons: A. Firing automatic using panel buttons: 1. While module ARMED, press blue button and 1. While module ARMED, press again module goes in step by step mode or Seq by green button, module enters PLAY- Seq mode, if the scripts contains sequences.
- Page 13 8. Use of one device as Master (without remote) Set the module as Master: Connect all other modules to 1. On the module which you are Master: going to use as master: press 1. Power on all other modules green button and keep it pressed you have (master can work while power on until INIT even without slaves).
Need help?
Do you have a question about the FTM-48F Series and is the answer not in the manual?
Questions and answers